scrapwood grooming side table

I have no idea what to call this… It’s a helping table – a side table for grooming, a tool table. Whatever it is, it’s a handy little benchlike structure I made to sit next to my grooming table to hold my tools handy and safe while I groom.

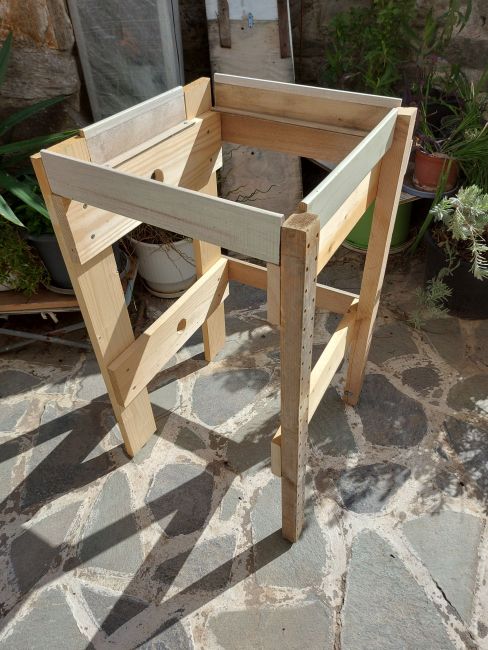
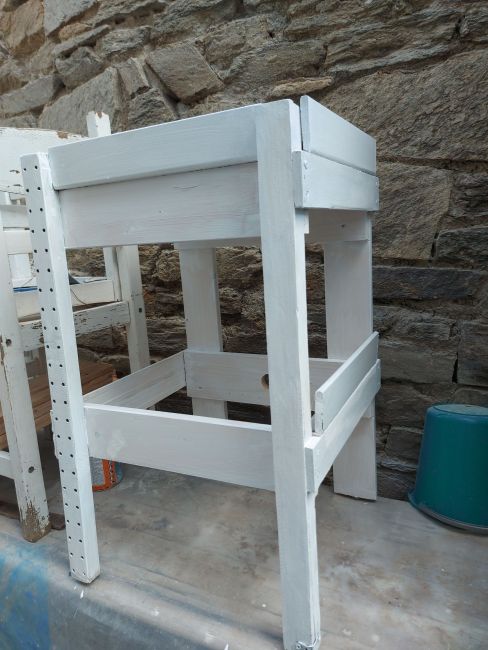
I had a general idea of what I wanted in my head and pile of scrap wood on the patio here at home. So, without any real plan, I just began cutting random bits of wood and screwing them together.

I don’t recommend this way of working, but it’s how I roll… flying by the seat of my pants!

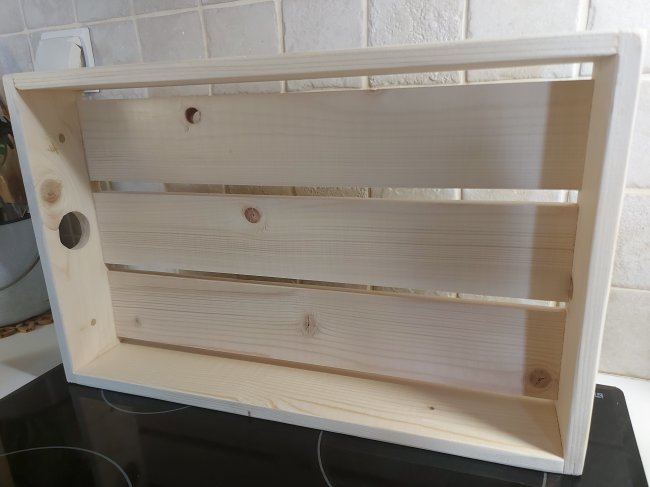
You can see various bits of pine, odd corner bits of some kind of wood, thicker bits, thinner bits, wider bits, narrower bits. All different.

Eh. They all tie in when painted… sort of. After all, it’s not a beauty contest.

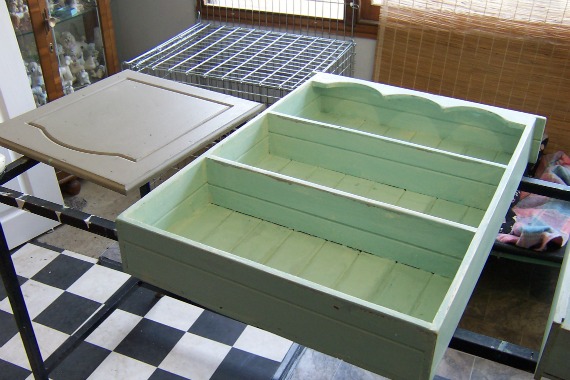
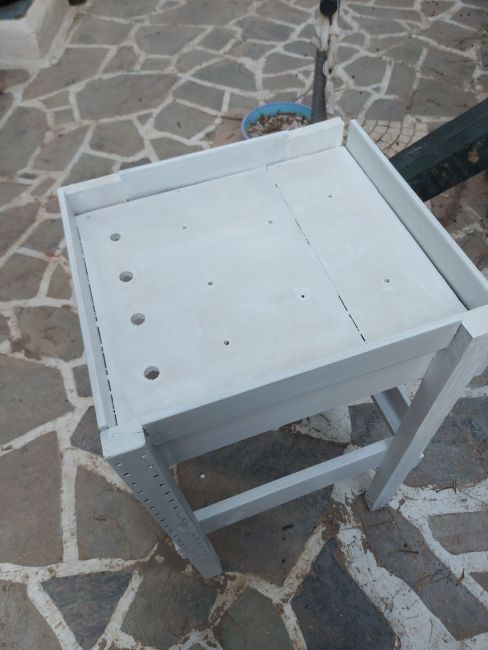
One thing I knew for sure when ‘thinking about designing’ this little table, was that I needed a safe place for my shears (scissors to non-groomers!) so they wouldn’t fall off the table. Actually, that’s also why there are sides on the top, to stop anything at all from falling off. But shears are especially delicate… drop those and they’re useless till you get them fixed.

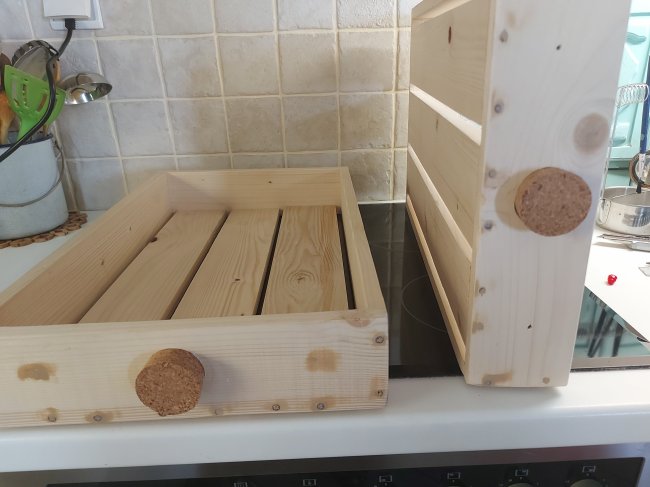
So, besides the corner side bits of odd wood I found on the rubbish pile, I drilled holes into the top to put the shears in.

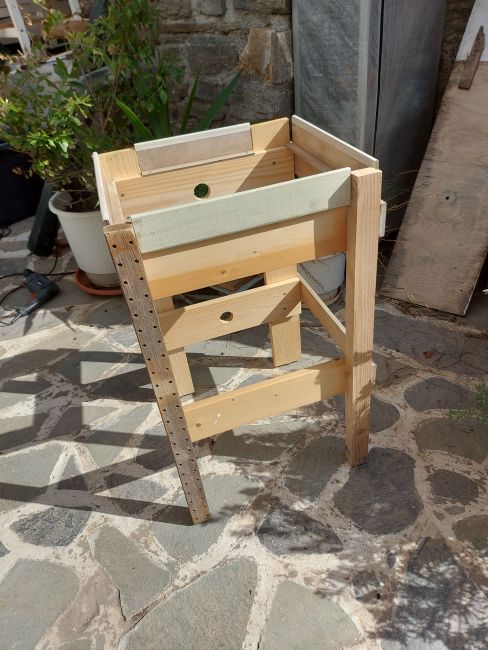
Here it is finished. Or 99.9% finished. I still need to decide how I’ll orient it when I’m working, then add some hooks to it for hanging clippers, Dremel or anything else that I might need to get out of the way of scrabbling little feet.

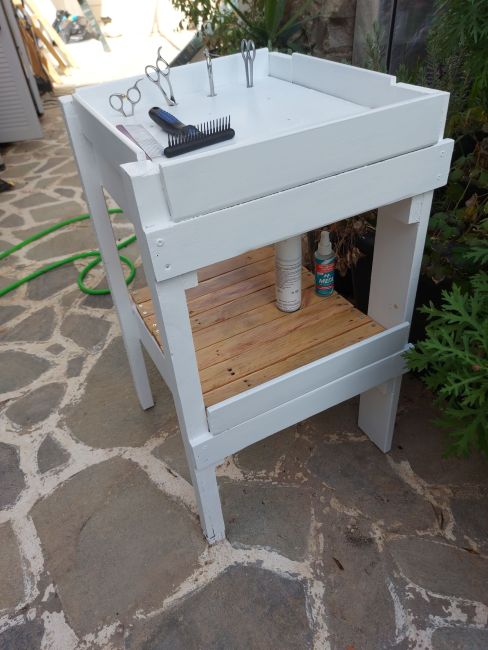
The lower shelf will hold my dryer and maybe even my extension cord to keep them off the ground. The bad thing about grooming outdoors in this place is that if one of the neighbours further up decides it’s a good time to hose down their yard, my yard is second last and I quickly find myself ankle deep in water.

Generally speaking, it’s not recommended you stand in water while performing activities requiring electricity.

The lower shelf is made from a skinny pallet I picked up along the side of the road and pulled apart with only minor damage to myself. I cut, sanded and varnished the pieces before pre-drilling them in order to prevent splintering when screwing them to the side pieces. It was a frustrating endeavour, but I got it done with minimal swearing.

So now its ready.

I’m ready to use it.

Unlike the dog bath while still awaits the plumber to plumb it in… He said this week.

We live in hope.

z

messy

You do know that you can’t create without making a mess, right? So why bother cleaning if you’re going to just make another mess? 

At least that’s my philosophy in life.

My house is my art studio, a place to pile stuff, where I groom dogs, where I make stuff or paint stuff and, sometimes, where I actually make art…

This little 50m2 apartment has to fit all that in it.

As a result, I can’t see my kitchen table top for months at a time. When I want to cook I have to clear crafts, paint and occasionally tools off the kitchen bench and stove top.

In summer, since I don’t really have time to do much other than groom, I usually keep the house tidier. Soon as I get busier with grooming, I pack away all the paint tubes, varnish spray cans, the sewing machine, the unfinished works of art, and clean the house. Once almost everything but the daily living stuff is put away, its easy to clean.

I just run a broom or a vacuum cleaner over the floor, mop it, and voila. Its pretty much done.

But its too early in the year for that, so for now I only sweep or mop when it gets embarrassingly bad, or I can no longer quieten the voice my mother implanted in my head as a child which hassles me to do housework.

For the last couple of days I’ve been doing online stuff as well as building a side table for grooming. I’m using all scrap wood I’ve collected over the months, making something not so pretty but functional. It’s where I’ll put my scissors, clippers, blades, and anything I might need to reach for while grooming a dog. When its finished it will have a couple of handy hooks, get painted a pretty colour and have a cover to protect it from the weather.

Till now I’ve been using a metal trolley I found at the rubbish bins a couple of years ago. It’s missing the top but the two lower shelves are intact. I think that while I have power tools out, I’ll make a top shelf for it. So far, I’ve been spreading a clean towel over the existing middle shelf and laying my tools on that. However, now I bought a bath for the dogs, I will move that to the wet area to hold shampoos and other bath accessories. Hence the need for the patched together little bench/side table.

When it’s finished, I will share a post about it, but trust me… I am no carpenter, so I don’t bother sharing instructions or how to videos. You do not want to do things the way I do them! I just screw this to that, measure then measure again another 2-3 times, and still get it wrong sometimes, cut this or that to add as I progress along a path that is totally unplanned and for sure completely the wrong way to do things.

It works for me. I’m not fussy. I like using recycled materials and making things from scraps. I also don’t care if something looks wonky. It has character!

Better get back to my messy work.

z

there will be signs

I’m not a sign writer, but this year I made two signs that I’m not sure I shared on here.

Given they turned out reasonable, I figured I’d share them with you now, just for something to do.

This is the one I made for my place, to put outside when I was running art studio open days or sculpture workshops. For now it’s just sitting in a corner of the living room.

The other one I made was a little fancier – This was for one of my cousins for her air bnb.

Both signs are small, no more than about a ruler’s length across. Both are made from bits of recycled wood I collected from somewhere. I did them by printing the writing in the size I wanted onto A4 paper, rubbing the back with charcoal and tracing the letters onto the wood.

Then it was a case of painting the letters on with a brush and acrylic paint. And as steady hands as possible.

It’s not the most efficient way to make signs.

Please don’t ask me to make a sign for you. It’s art, not professional!

z

Shared at:

a long time coming

Since I never seem to find the time to paint lately, I figured I would go ahead and work on a commission.

A friend of mine ordered coat hanging racks for her two granddaughters.

Coat racks. Too plain, I thought. Not much scope for “zefiness”… So I started on the idea of a shelf with hooks.

I found some pallet table drawers online and they were just the thing!

In this pic, I have already removed the front drawer panel, leaving the finger pull hole.

I didn’t want a hole there, so I found some corks that fit and glued them in. Eventually, there will be pretty white knobs on the corks for hanging a scarf or cap. I ordered them but they haven’t arrived yet.

I began by painting the drawers pale pink. I then mixed up a lighter and a pinker batch to create an ombre.

I thought it was too pale, so I darkened the pink for the bottom slat. Now I wonder if it was better paler… oh well… It’s a process!

I also cut 2 bits of trim to act as a barrier to hold things safely on the narrow shelf. In the end I made the trims the palest pink to offset the brighter pink.

Once the paint was dry, and before putting on the shelf barriers, I added cute little critters to the slats. They are different but the same, if you know what I mean. They’re done in the different shades of pink with a black outline.

I added double under-shelf hooks to the bottom, I couldn’t find them in white, but they tie in nicely with the black outlines on the artwork.

Here they are with some of my recycled sock bunnies and one of my favourite shopping bags.

All in all, I’m pretty happy with how they turned out. Now I just need the cute, simple white flower knobs to arrive, and I can pack them up for shipping.

z

recovering the kitchen chairs

My work here seems to have come to a grinding halt. Its not that there’s not a ton left to do, its that in a way my hands are tied. I can’t work on the upstairs house while mom is still living in it, and until we have natural gas connected to the house downstairs mom can’t move down there.

So I’m at the floundering stage where I’m not really sure what to do. I’ve sorted out most closets and cabinets, donated a ton of stuff, thrown some out, packed away some stuff of sentimental value and stored it where it will be safe… and now the upstairs house looks like a cyclone went through it and the downstairs house is waiting.

All downstairs needs of course is the gas connection and radiators installed for mom to be able to move in. But I’m told that could take another month or two – they are so behind in applications. And its just our luck that right when we opt to switch, the price of gas has more than doubled. sigh. I never seem to win when it comes to money spent.

Whatever. I won’t dwell.

I finished a small project last week just so I could feel like I was doing something. I recovered mom’s old kitchen chairs. This is what they looked lke originally…

Plain cream weaved fabric. Very dirty from years of use. Grey metal frame. Plain and simple. This is how mom had them to hide the stains…

Ok, too yucky for me in her new home. So I decided to recover them using something bright and cheerful. It was easy to take them apart as the top was simply screwed in place on the frame.

The frames are in good condition, though I need an allen key to give them a bit of a tighten. They were mostly missing all their ‘feet’ so I ended up buying some rubber stoppers for them so they wouldn’t scrape on the tile floor.

I was planning to buy some nice waterproof fabric from a local store but while going through mom’s stuff I found this pretty tablecloth and decided to make do.

I didnt’ have my staple gun with me so I had to use hot glue to secure the fabric to the bottom of the chairs. Hopefully it will last long enough… If not, well… I’ll have to redo them. No problem. This is how they came up. Much better.

For now mom has a table and ‘happy’ chairs for her new kitchen. They will do.

Now I’m waiting for good weather so I can return to my home on Paros for a while. I may as well be in my own home while I wait for the gas installation. I’ll have to return to Athens to be here when that’s happening and to finally finish moving mom downstairs. At that stage I can get some removalists (ie burly men) to take down the fridge, washing machine and couch plus any other boxes I pack up for her.

To be honest I need the break… A couple of days ago I carried some boxes to the stairwell for collection and pulled a muscle in my back. Ugh. No more carrying for a few days.

z

Shared at: Funky Junk

a small key rack

Well, since I had the paint and the stencils out, I figured I’d knock something up for mom’s new place. She’s always had a key rack by the back door in the house upstairs but that wouldn’t fit next to the front door in the downstairs place. I needed something taller and narrower instead of long and narrow.

This little guy will sit behind the front door so that mom can hang her keys in a safe place away from the open door.

Its nothing special, just a piece of old plywood I had lying around. But it will do the job.

There’s been a lot of trouble with the radiators in Athens. Mom left here on Sunday and she was only able to get heat on last night. Lots of calls to the plumber who’d replaced the water tank on the roof (holds heated water for the radiators). Lots of waiting for the plumber to come to take a look. A couple of visits from the plumber’s partner which didn’t fix the problem.

And me on Paros, with no knowledge of how radiators work, how to check the furnace, what to do other than get frustrated, worried for mom and make calls. There’s not much else I can do when I’m so far away – plus (as I kept telling mom) I couldn’t help even if I was there. If you showed me a donkey and a furnace and asked ‘which is the furnace?’ I wouldn’t have a clue.

Well, ok. I would. But only cause I know what a donkey looks like!

Sheesh.

Anyway, seems its sorted now, but I’m reconsidering waiting till next week to leave for Athens again. I’ve already started getting my stuff together in order to go on Friday.

We’ll see…

z

revisiting colours


I’m still obsessed with shades of mint green. As if you didn’t notice… And the darker, greener green which appears on vintage pieces.

The little cabinet I just shared under the electric board door I shared months ago:

The green cupboard I just shared:

The chalkboard visible behind the sea rope basket which also lived in my kitchen in Tasmania:

Almost everything in my kitchen in Tasmania… The doors, the chalkboard…

This image has an empty alt attribute; its file name is cnr1.jpg
My kitchen doors and a chalkboard in pale minty green.

The paper towel holder…

This image has an empty alt attribute; its file name is towelhldr4.jpg
My paper roll holder made using a beautiful old bracket I found.

The drawer I upcycled into a charging station…

This image has an empty alt attribute; its file name is drw1.jpg

The roadside find trolley I fixed as my coffee cart…

This image has an empty alt attribute; its file name is trolley3.jpg

Don’t get me wrong. I love old things and I love the antique colours they come in. I love other colours too – light blue, creamy white, pale yellow, dusty pink, light grey. But vintage greens never fail to catch my eye.

I think the first piece I ever had in green was a meat safe like this one.

This image has an empty alt attribute; its file name is 131605007524.jpg

Isn’t it just the perfect colour? Greeny blue with a nice dose of rust.

These days a paler version is in fashion: a softer, more pastel, more 50s colour. Since I mostly mix up my own colours I find something I like and try to match the colour. That means I get close but not identical each time I paint something. Suits me fine. I’ve never been hung up on perfection. Old things are not perfect… its that worn and used look that makes them perfect to me.

This image has an empty alt attribute; its file name is ariete-097904-vintage-green-575914_500x360.jpg

Here are a few examples of things I painted in variations of that minty greeny colour.

A small wall mounted bookshelf (sorry, no finished photo):

This image has an empty alt attribute; its file name is shelf.jpg
A wall mounted shelf I made over.

The bottom of an old wardrobe I converted into shoe storage for our porch in Tasmania. The drawer was broken so I kept the front in its original colour and hinged it from the bottom.

This image has an empty alt attribute; its file name is cb1.jpg
The bottom part of an old wardrobe which I made into shoe storage for the porch. I kept the drawer the original colour cause the handles were painted.

Not the best photo, but the most distressed look I ever attempted on a small men’s wardrobe I used for craft supply storage in my office. I painted this in pale yellow and pink then topped it off with minty green before sanding and scraping back.

This image has an empty alt attribute; its file name is chippy1.jpg
An experiment in extreme distressing for storage in my office.

A greener green colour for a small vintage meatsafe I upcycled for towel storage in my grooming room.

I have an old timber couch I plan to sand back and paint next but I think I should stick to antique white for that cause then I can pick any colours I want for the cushions. Painting it green will limit my choices…

z

green cupboard

Well whaddayaknow? Another green cupboard…

I found this gorgeous cupboard in an online store on Facebook and feel in love. So I bought it before even figuring out where I’d put it. Turns out it fit perfectly in my bedroom.

I didn’t take any good before photos, but the guys from the shop were kind enough to send me the one above from their listing. You can see it has a nice shape in the display area, no doors, no drawers and a dish rack inside the top part.

I basically let it sit there, wrapped in plastic, for a couple of months before I started working on it. The only thing I did was expose the hinges. I’ve never seen hinges placed on a piece of furniture like this before. I measured them and went looking to see if I could find hinges to fit so I wouldn’t have to mess with removing and replacing. I got lucky and found some in brass (which I painted naturally!). They’re great actually as I can easily remove the doors if I want to move it around, making it much lighter.

It needed a major overhaul obviously. I sanded it back to remove the old paint (and dirt. Lots of dirt). I removed the dish rack cause I wasn’t going to use it in the kitchen. I made doors out of plywood. I made drawers out of whatever I had on hand, with plywood fronts. I got some simple white ceramic knobs.

I mixed up paint to match the original colours cause I liked them. A more yellowish green than the minty green I usually like. You can’t see it in the wrapped pic but the inner part in the middle was blue and the insides unpainted. I painted the insides blue.

My plan was always to put it in the bedroom for linen up top and shoes down the bottom. Hence the holes in the doors: to allow air to circulate. Bonus that it looks cute.

The naked ladies, being mostly white, are ideal for display purposes. Mind you, its also a handy spot to store them till I decide what to do with them. And till I find what belongs in that spot.

So another project finished and shared!

z

Shared at:

water bottle storage

Ever since I moved here I thought it would be handy to have a pull out shelf drawer cabinet thingy (what are those things called anyway?) to hide away the bottled water. The water here is meant to be great quality but you know, once you get into the habit of drinking bottled water…

Anyway, till recently I would buy a six pack of 1.5 litre bottles and put them in the corner next to the washing machine, then toss the empties on top… given the washing machine still sticks out of the kitchen bench and I still need to finish that ‘end’ of the kitchen, its not a pretty sight even without the bottles.

So while I was up at my uncle’s garage remaking the cupboard I figured I’d use the opportunity to try my hand at making my thingy.

Its basically made out of odds and ends I already had on hand, but I did have to buy the wheels. The paint I mixed up to match the existing kitchen cabinets. Its basically just a box with a shelf in it, a solid back and narrow slats to hold in the bottles. Pretty easy to make. Its not perfect, but it works.

Given I make things without any real knowledge of the hows tos, I’d say it came out pretty well. Especially cause its the exact right height! And me with my mathematical disability!

PLUS I didn’t have to re-cut anything. I got everything cut the right size first time (I have been known to waste a bit of wood now and then… but that’s ok, I usually find something to do with the ‘wrong’ bits.) I’m pretty amazed at myself really.

You may have noticed, its not all bottled water. The idea was for it to hold a full six pack of water and perhaps a couple of leftover bottles from the previous pack, but I thought it was a nice spot to store my measely collection of alcohol as well. It had the room!

So there you have it. Another home improvement brought to you by Zefi. 🙂

z

a little green cabinet

Remember long ago I mentioned I’d bought a glass fronted cabinet and a cupboard? Well, I’m finally sharing one of those projects. About bloody time too. I’ve been letting myself get really lazy when it comes to working on the computer and blogging has suffered.

Anyhow… I found this cute little cabinet at a local antique shop a few months ago and had to have it. It was missing one side glass panel, both inner shelves and bascially needed a bit of TLC.

Ok. Maybe a lot of TLC. But that kind of thing never scares me.

My uncle had given me a couple of these old parian couch decorations which he’d salvaged from a burn pile. It came from some very old broken couches from an old hotel. He asked if I wanted them. Of course I wanted them!

I picked this one, deciding it would add that little something extra to my cabinet.

The entire remake took ages to complete. Mainly cause I just let the cabinet sit in my house for ages before I even began, then I only worked on it in spits and spurts.

First order of business was to remove the remaining glass on the side and replace it with flyscreen. The whole idea was to make this little cabinet into towel storage to fit right outside my bathroom. Boy I’m glad I have tools. The staple gun came in really handy for putting in the flyscreen.

Once that was done and it was all cleaned up I began painting it with a ready made chalk paint. I say that cause most of the time I mix up my own paint colours and make my own chalk paint.

I used clear wax to finish it off, tinting some of it to create the old look where necessary as I went.

So here it is. Finished, in its place in the tiny hallway to the bathroom. I made a shelf in the top to hold hand towels, the bottom holds my bath towels. I put an old lace pillow case I was given in the window. This is a very traditional look: in the old houses here on Paros there were window cabinets cut into the thick stone walls. The women would put lace curtains in them to decorate them and hide what was inside. They weren’t usually used as display cabinets but for every day storage. I love the way this turned out.

Till I can find a better place for them, my cowboy boots sit underneath it, sort of on display too. And the paint colour I chose almost matches the little door I made to hide the electricity panel.

z

Shared at: