walking dead dolls

I know I’ve shared a couple of my Walking Dead doll remakes, but I found I had this post in my drafts folder and it includes one previously unshared doll: Sasha.

sasha2

This is Sasha in the show:

Sasha_Williams_TWD

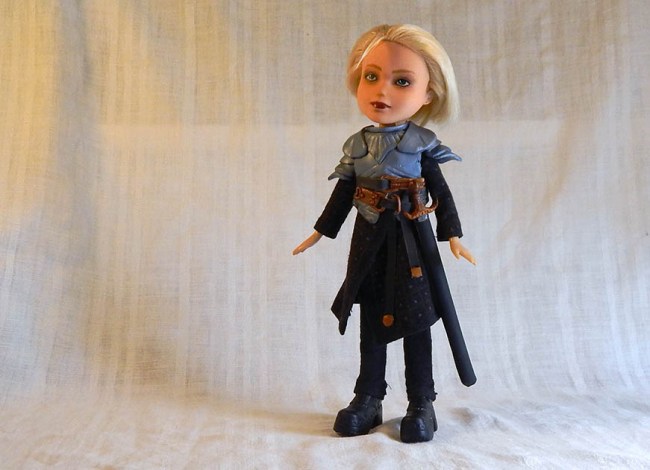
And this is my Sasha, complete with a high powered rifle with moving parts.

sasha3

Remaking Sasha included a total repaint of her face and a new hair style. I made her singlet top and she wears Bratz jeans. I bought her gun on ebay as I’ve bought various other accessories at times when I can’t make them myself. I already have a crossbow to make Daryl… I just have to get there.

sasha5

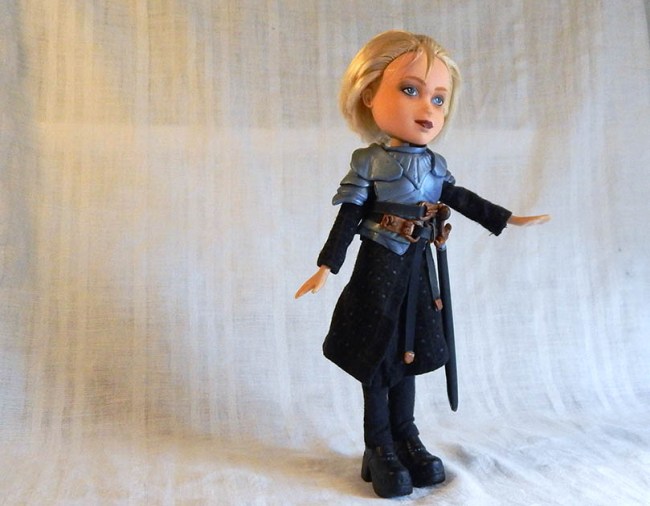
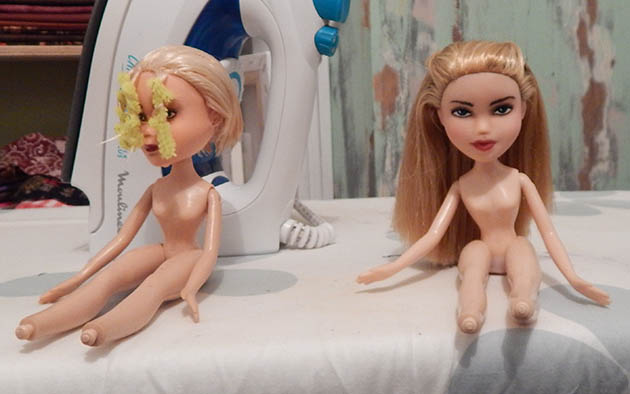
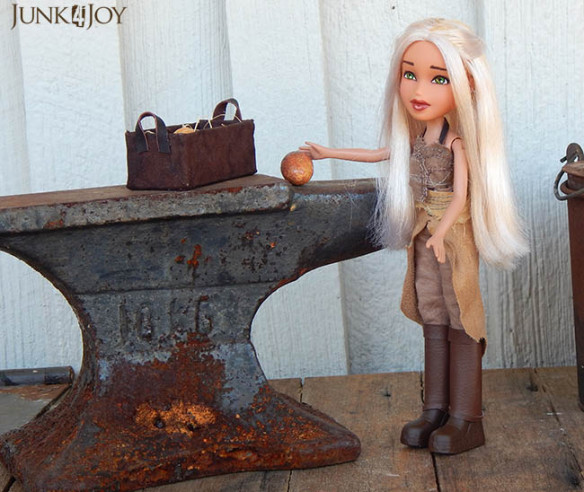
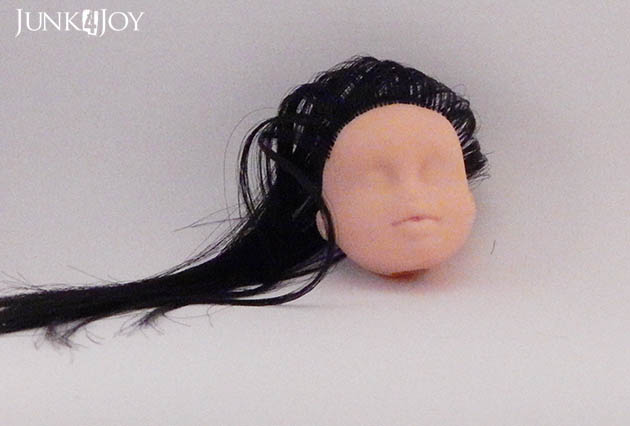
Let’s revisit the other girls… Firstly my all time favourite: Michonne. This is how she began, a very messy Bratz girl I bought in an op shop. That’s one thing I miss here (among other things…) No op shops. I’ve never seen dolls I can remake for sale anywhere for instance. I’m glad I brought a ton with me! When I eventually get around to re-making some again.

doll2

This is Michonne on the show…

walking-dead-michonne-danai-gurira-season-3-amc

And this is how my interpretation, complete with a katana and a chain to hold her pet walkind dead.

michonne1 (3)

In Michonne’s case I had to do a total overhaul. I had to remove her hair and make dredlocks by wet felting a combination of wools. I made her top, including a leather vest plus a studded belt. Her jeans are original Bratz jeans as they’re just too hard to make.

michonne4
michonne5

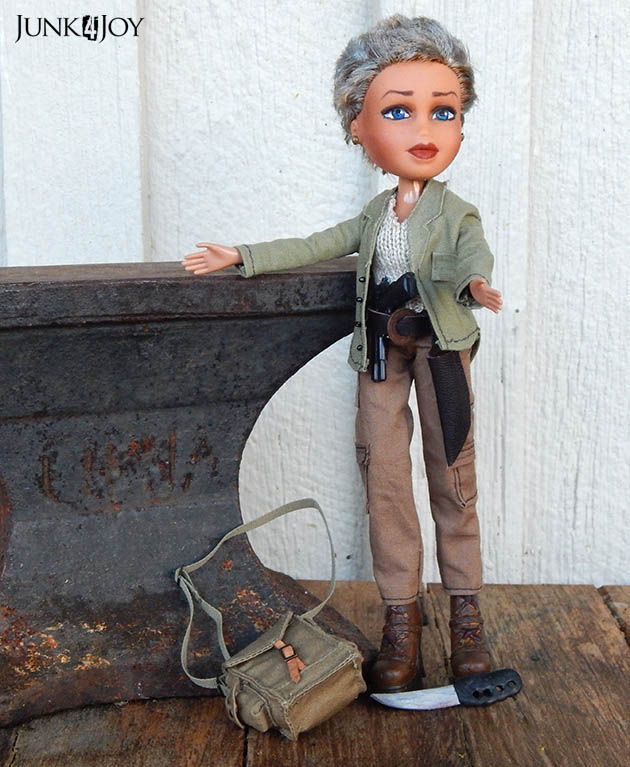
Last but not least, Carol. This is Carol on the show:

carol

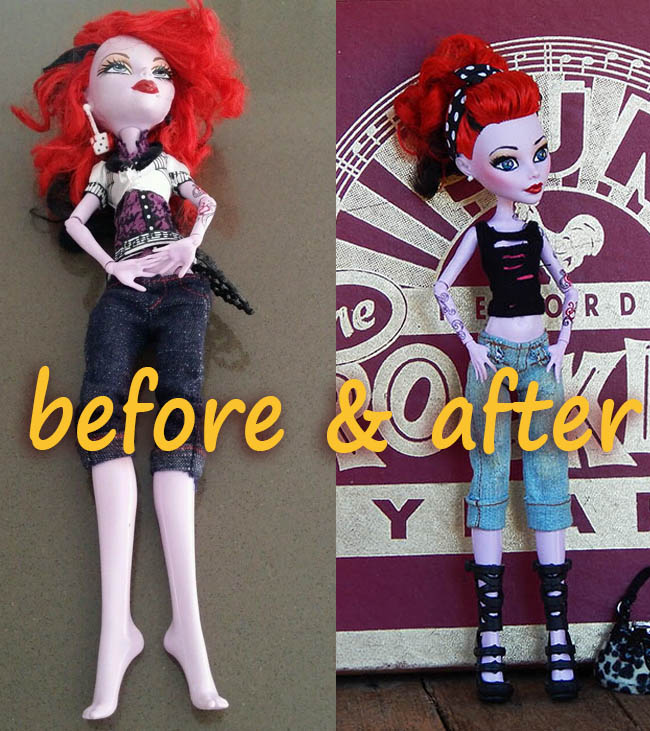
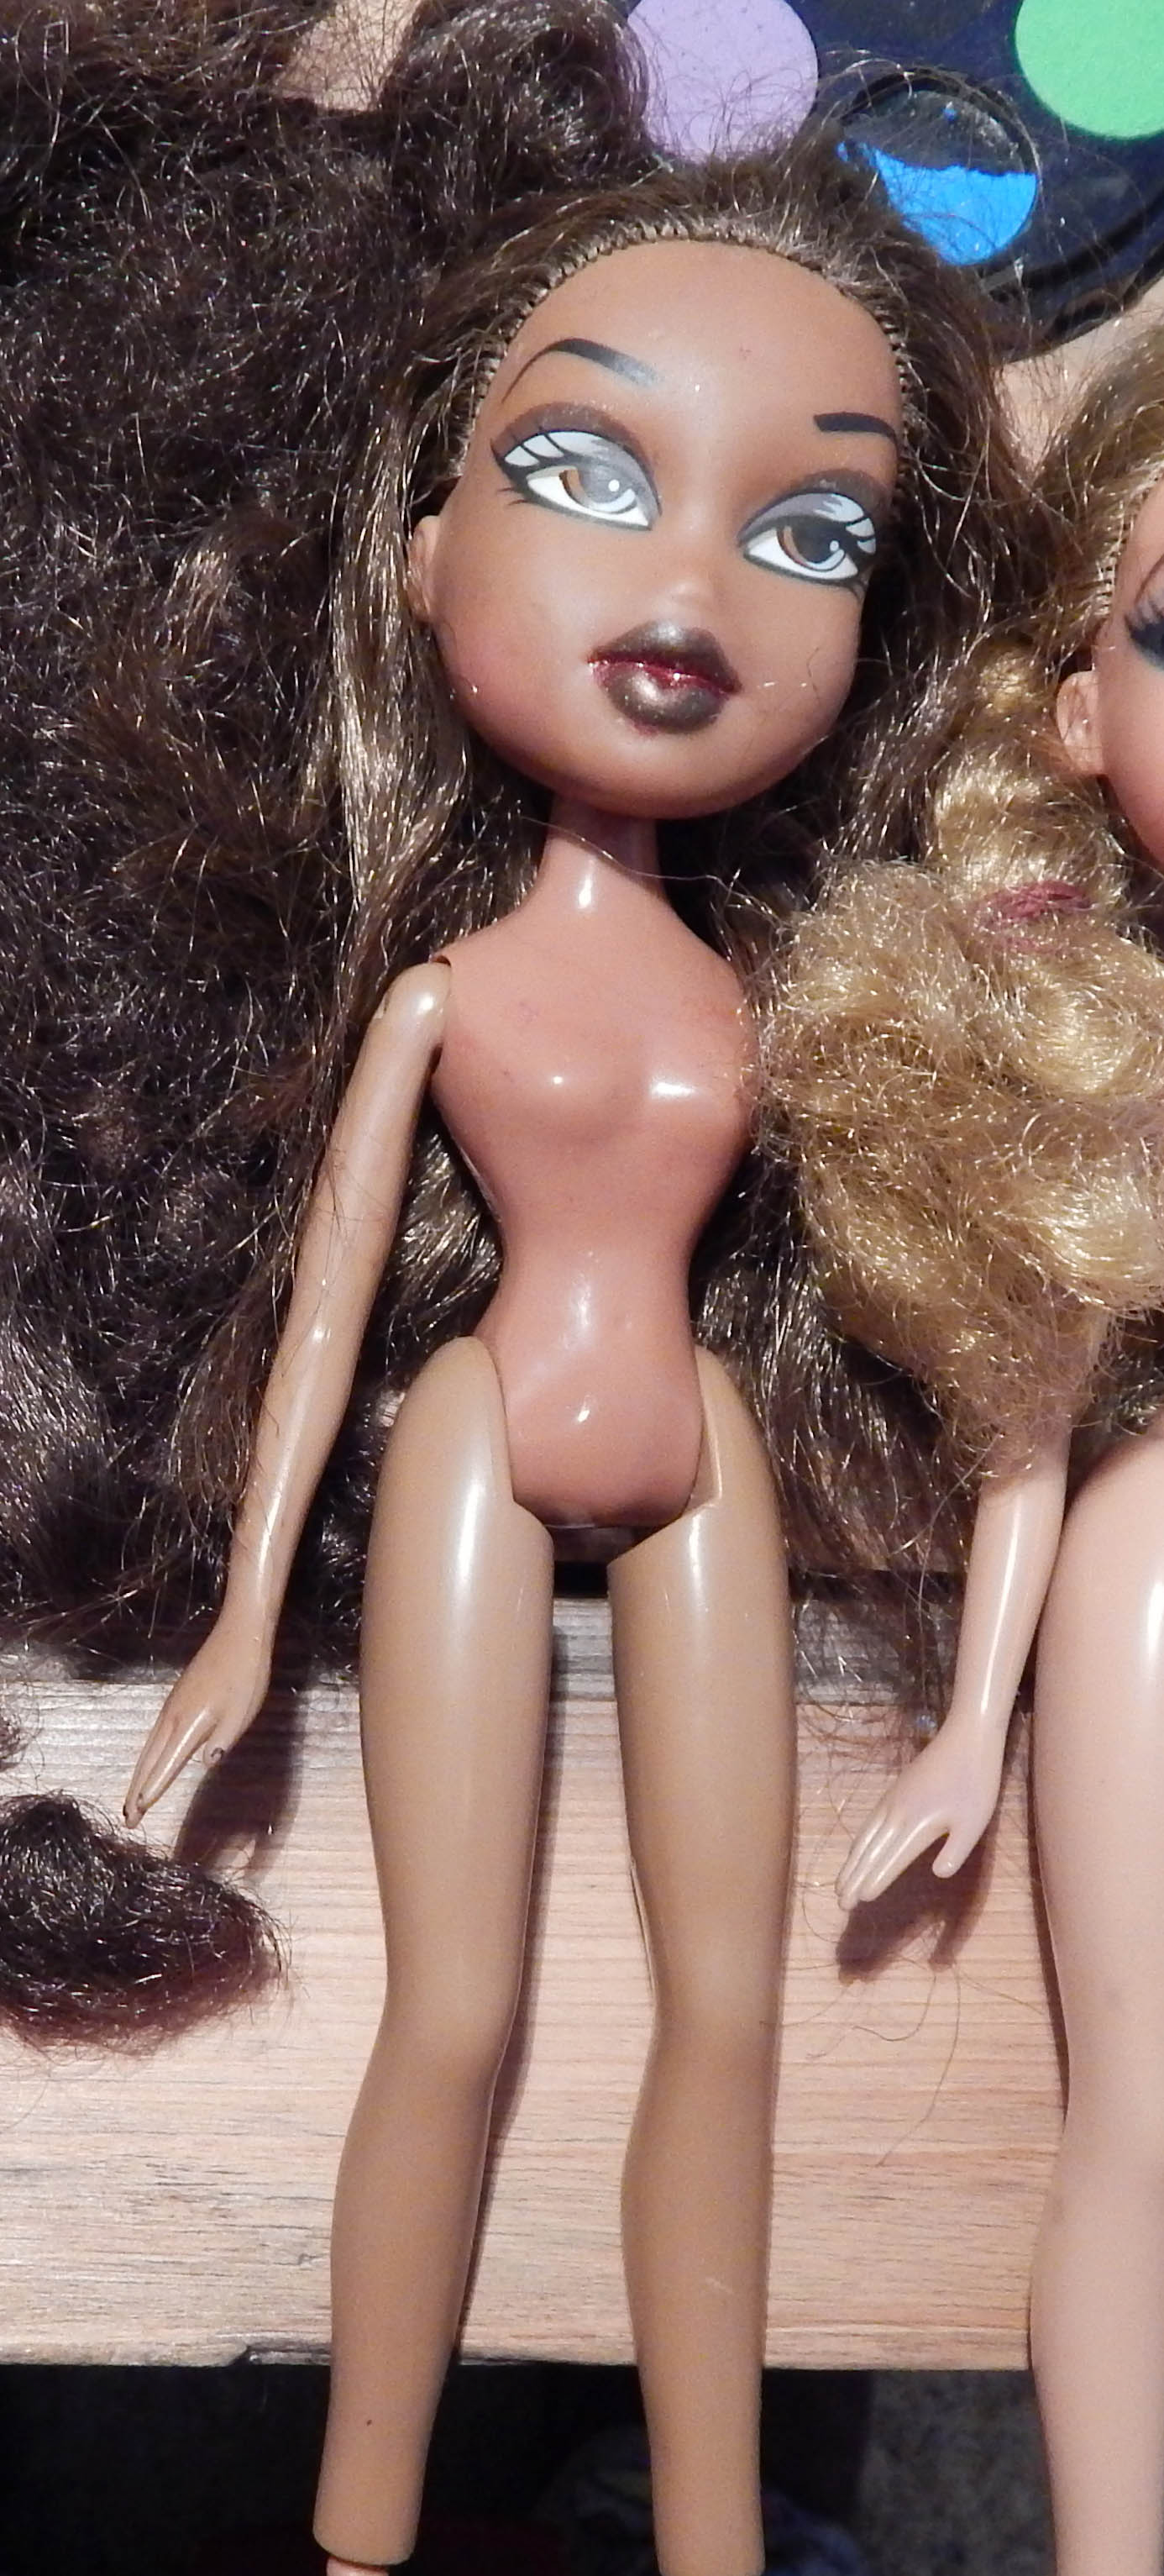
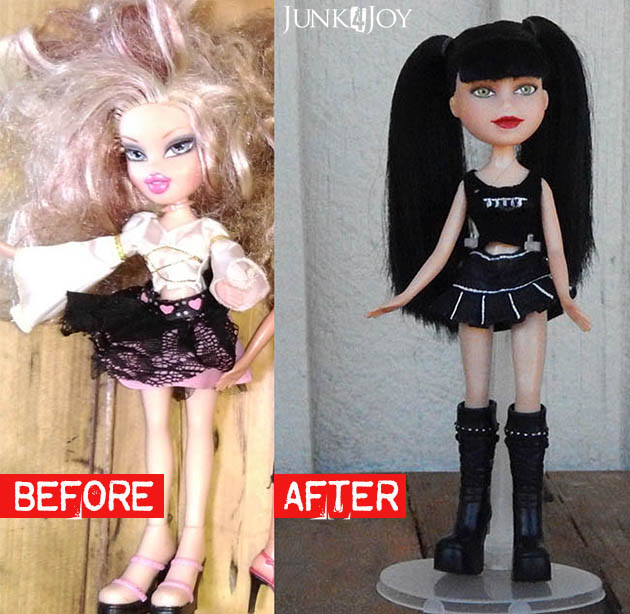
This is what the doll looked like before I started. A typical overdone Bratz doll with wild hair.

carolb3

And this is the finished Carol, complete with a gun, a military warrier knife and bag.

carol2 (2)

In Carol’s case I did a repaint of the face, gave her a haircut and coloured her hair grey. I made all her clothes and made a pair of Bratz sandals into boots by painting and adding laces.

carol5 (2)
carol4 (2)

I miss remaking dolls. Its one of the things I planned to work on in winter but never got around to it for two winters in a row. This winter I was working on sculptures and last winter who remembers… All I know is that time never seems to be enough.

And I get bouts of laziness and inspiration blocks.

I should really be working on things like this constantly but instead I spend hours doing all sorts of things instead of creating. I really work best when I have a ton of projects going at once cause then I can pick what I want to work on at any given time. Space becomes an issue in a 2 room flat.

Last night I was up till 12.30 working on one of my new (old) cabinets. I didn’t even realise what time it was till I saw it was pitch black outside.

I love it when I’m in the zone like that.

z

brienne of tarth – lockdown 2 day 13

Hey, finally a project to share.

One you’ve already seen a preview of.

Brienne of Tarth, that big strapping woman made out of a skinny big-headed Bratz doll. Sort of the opposite of the real Brienne – here is the real Brienne:

And here is my Brienne:

And her armour and sword:

Ok, so the pictures suck. I haven’t yet found that sweet spot to set up my lightbox. Or any spot for that matter. (sigh). I’m doing what I can with what I have but turns out the best photos are those taken outside on overcast days when there isn’t a storm on outside.

Today is not that day. Rain all day, cold, intensely windy, and just downright unpleasant. I can’t find Lainee’s raincoat so she had to wear a knitted jumper. Warm but not waterproof. Poor girl. The things she has to put up with…

Anyway, here are some in progress pics of Brienne – who I began back in Tasmania…

Step 1 in Brienne’s costume.
Working on Brienne and Cersei at the same time – doing hair.

I always start with the hair first – detangling and fixing, cutting or replacing if necessary. Then I work on the face, going on to the costume, but the final setting of the hair has to be done after I’m done man-handling the doll. Hence the naked ladies above. It does look odd when I have various naked dolls around the house in different stages of work. Like some kind of serial killer in training.

Ok. Time to find something to eat. Its been another on and off creative day. Time to give up and relax.

z

doll house envy – lockdown 2 day 11

I’m not sharing a project today. Mainly cause I need to take better ‘hero’ pics of a couple of finished projects.

But something’s been eating at me since I decided to finish my Brienne doll (from my Game of Thrones series of dolls)…

Since I was already in sculpture mode I decided to finally make Brienne’s armour out of polymer clay. I’d tried making stuff with it before with mixed success, but over the last couple of days I’ve finally finished Brienne. It only took me 3 years… It reminded me how much I love working with dolls… Aaaaaaanyway….

What I want to discuss today is this serious case of dollhouse envy I have. Its a chronic condition, I’ve had it since I was a little girl when I would make doll houses out of shoe boxes for my tiny teddy.

This is what my Tiny Ted is (not my actual TT) – a shuco bear perfume bottle. Only I never knew about the perfume bottle till I googled him much much later in life. He’s only about 2in tall. Ideal for a shoe box doll house.

Anyway, I grew up but my fascination for miniatures and doll houses never left. I still look at them longingly when I see them anywhere. And there are so many of them online…

My dream was always that one day I would make my own doll house from scratch. From the design to the building of the house itself, to the making of all its fittings and furniture. It was something I pictured myself working on slowly over years…

In a way my doll display boxes kind of led from my love of creating those small spaces, but I’ve never built a real doll house. Just these display boxes for some of my remade dolls.

Why? Well… time for one thing. Space to keep a doll house is another. And finally, chosing a way to go. There are so many great ways people have made doll houses on Pinterest, upcycling things they already have.

For instance, making a dollhouse out of a cabinet.

Or out of a bookcase.

Or, more along the lines of my display boxes, create a different room in each box and hang them on the wall together to create a whole house… Not something you can play with since each box is covered in perspex, but rather rooms you can look into. Dioramas basically.

Right now I have a few frames I could use or I can just make boxes as I’ve always done. Sure, its not a proper house… but doll houses can be BIG and take up so much space. Space I don’t have.

Maybe I should stick with the idea of making my diorama rooms for each of my dolls and get my doll house fix that way.

But really… should I be making stuff for MY dolls* when I really would love to actually earn some money from the things I make?

Oh its hard to let go of the doll house desire.

z

*I have a small collection of original 1960s Barbies I want to put in their own display boxes one day. My uncle was right. I’m a grown women who still plays with dolls!

another abby

abby3

Yes, its another Abby from NCIS.

What can I say? She’s a popular girl!

This is the last of the 3 commissioned dolls I just finished.

With this one, I once again had to re-root a barbie head. Have you ever noticed how many of the old barbies are blonde? Not many black haired ones among them!

I bought black hair from my favourite aussie seller again ((Custom Doll Hair AU)Ā  and began work.

abby1

Another faceless head on a stick…

Then I used watercolour pencils, pastels and watercolour to give her a new face.

abby1 (2)

abby4 (2)

This Abby has the tattoos as well. My first Abby doll didn’t have those, but this time I went further even though you can’t see most of them when she’s dressed. Authenticity you know…

abby2 (2)

Once Abby’s face and tatts were finished I put her back together and began dressing her. I bought a pleated black skirt on ebay and found a singlet top I thought would work well in my barbie clothing collection.

abby5

I gave her a Monster High belt I thought the real Abby would appreciate, and made her a leather dog collar.

abby4

I couldn’t find knee high boots so I bought some gorgeous over the knee socks from a maker on ebay. I painted a pair of boots I had in my collection and added straps to make them look a bit more Abby-like.

abby6

I figured that Abby wasn’t totally complete without her lab coat, so I made one for her. I even rolled up the sleeves so she’s ready to get to work.

abby7abby8

Overall I’m pretty happy with how she turned out.

I do love those long socks!

z

katy perry doll

katy4

Yep. I tackled the cupcake dress!!

This is another of the dolls winging their way to the UK and she was the one that took the longest to make.

Obviously.

katy2

Most of the hair rooted – faceless doll heads on pens is a common sight around here…

Firstly I had to order blue hair from my favourite local seller (Custom Doll Hair AU), then I had to re-root my barbie head with said blue hair. And paint on her face, of course.

katy3 (2)

I bought a dress which was suitable as the base for my cupcake skirt. And some cupcakes from ebay. There was no way I could make that many cupcakes in this lifetime…

katy5

The only way I could figure out to make the skirt was papier mache. My old standby. I love papier mache and can make anything with it. I’m pretty good at it, even if I do say so myself. šŸ™‚

So I built myself a ‘scaffold’ from cardboard (ok, its more like a layered cake) and tissue paper. It only took 3 goes to get it right. I gave it 3 coats of white acrylic paint and made 2 different layers of ruffles which I hot glued to the bottom.

I made a matching ruffle for the top of the dress, which I stitched onto the straps and neckline. I then cut the dress to the right length and attached it to the skirt using hot glue. Not while it was on the doll.

Obviously.

katy4 (2)

Headless doll. Another common sight around here.

Once I picked the shoes I preferred and had her all dressed up she was ready!

katy3

She needs one of those stands that holds her up by the legs cause there’s no way that skirt is going to allow her to have a regular ‘around the waist’ stand. What can you do? Its the price you pay for looking so fabulous!

z


another amy

amy9

My life seems to have been dolls dolls dolls for the last few months. But the good news is I’ve finally finished the last 3 custom dolls so I can now maybe do something else with my spare time!

And since they’re now finished and will soon be on their way to the other side of the world, I can share them!

First up is another Amy Winehouse. This time made using a second hand barbie doll. You can see my first Amy doll here.

In order to do this Amy I began by removing all the (blonde) hair from the doll. I wanted to try using felt for her incredible hairdo so I used a combination of glue and the rooting tool to attach Amy’s beehive and messy hair.

amy1 (2)

Then, of course, I had to give her a face…

amy6 (2)

No Amy is complete without tattoos, and this girl is no exception. She has all the tatts, even the ones you can’t see under her funky 1960’s style shorts/dress.

amy7 (2)

amy2

amy4

amy7

I couldn’t find black boots so I painted a pair of silver boots and gave her a black belt to tie in the outfit.

amy1amy6

The outfit Amy’s wearing is actually an original Barbie outfit from my collection of clothes and I chose it cause it really seemed to suit her style.

amy5

I’m quite pleased with how the hair turned out.

… next I’m going to try using felted wool to make Captain Jack Sparrow!

z


amy doll

beforeafteramy1

Time to share another doll repaint. This is Amy. Winehouse of course. I decided to make her for a couple of reasons: the beehive hair and the tattoos. I like both of those!

This doll began as a Bratz doll with a really messy head of thick black hair. She was ideal. I didn’t have to re-root her. Phew. Re-rooting can be fun in its own way… its a kind of repetitive, zen-like kinda thing. But it can take so long! So when I get the chance to skip it… well, I’ll jump at the chance!

amy2

I loved doing her tattoos. Not an easy task of such thin arms, but fun to do nonetheless.

amy3amy4

When I made Amy she was a doll I made for my own amusement. By that I mean I was only pleasing myself. I dressed her in original Bratz clothes that I felt suited her style and listed her in my Etsy shop. She was sold to a lady in Spain. Yay.

amy5amy6

With the sale came a request for a bit of customization. Her new owner wanted bigger eye liner and a different outfit. I made a black and white checked dress and a Blake hair pin. The photo below isn’t her finished unfortunately. I think I somehow missed taking finished photos of her. (oops.)

amy9

This photo shows the dress un-hemmed, the belt undone and untrimmed, and the first attempt at the hair pin.

Trust me, she looked better when it was all finished.

z

Shared at:

1-Funky_Junks_Party_Junk_link_party.29-AM

abby doll

beforeafterabby

Given that I’ve been flat out lately, spending my days grooming dogs, working on custom dolls, watching TV and wasting time, I thought I should share some of the dolls I failed to share.

Abby from NCIS was the first doll I ever tried re-rooting. (Which is not something rude, but the act of replacing the original hair with new hair.) I did it ’cause I needed a Bratz doll with pale skin and black hair. And I didn’t have one. So I watched some YouTube videos and went ahead and bought some black hair from CustomDollHairAu on Etsy. She sells luscious hair blends and tools as well. I now have a collection of gorgeous hair blends and a lot of doll heads I plan to re-root one day…

reroot1..

Anyway… I got started re-rooting with a needle, the hard way. Well, ok, not hard as such, but the longer way… It took ages to re-root the whole head but I loved the result. And to be honest it’s a kind of relaxing zen sort of activity.

Since then I’ve re-rooted 2 more dolls and I tried the rooting tool… I watched the videos. I tried doing it. I stuffed up. I watched more videos. I tried again. I stuffed up again. I broke so many needles it wasn’t funny. I have no idea what I was doing wrong.

I went back to the needle.

abbyfn4

If it works for you, stick with it, right?

abbyfn2abbyfn3

For this particular doll makeover I repainted her face, re-rooted her with black hair and adapted original Bratz clothes and boots to achieve the Abby look.

All in all, I was very happy with my first re-root!

This little girl has been sold through my Etsy shop.

z

helen of troy

Not too long ago I got an order for a Helen of Troy doll. Now that she’s in her new home I thought it’d be a good time to share her.

helen4

I was asked to make a doll to match Helen from the movie. I had a few photos as reference so I found a doll to use and began work.

face2

First I had to buy various beads and gold bits and pieces. Then I had to make an outfit.

Of course, I had to work on the doll too. Most dolls I work with need their hair restored from frizz to pretty (if not completely replaced). This time I was lucky, I was able to restore her hair.

helen1

After removing the factory face, I painted in my own Helen of Troy face.

helen2

I made her a crown and earrings out of the gold bits I bought. I made her some jewelry as well.

helen3

Her sandals are Bratz sandals which I repainted gold. I curled her hair and here she is.

helen2 (2)helen5

helen1 (2)

Her new owner is thrilled with her. And I’m pretty pleased at how she turned out too!

I’m currently working on three more special order dolls. I’ll share them when they’re finished!

Aside from that, I don’t have a lot to share. I’ve been very busy but I have a few little things on the go, so stay in touch!

z

rockabilly diner doll-o-rama

I’m sure I haven’t shared this. Its a post I began ages ago and forgot in my drafts. Ooops. So here goes now.

What’s a doll-o-rama you ask? Its a doll display box x diorama. I mean, its obvious isn’t it?

dolloramalogo

I’ve made a few of them since I started this post, but this is the first one I made for one of my repainted dolls.

I had this Monster High Operetta doll that I decided to repaint into a rockabilly chick. Here is the before and after…

beforeandafter

This doll was crying out to be a rockabilly really. She already had tattoos and bright red hair… it was an easy decision.

After stripping her factory paint, I gave her a new face, coloured in her facial tattoos, gave her a quiff and new clothes, and voila.

rockabilly2

I really wanted to have a proper background for her though. I made a box out of some timber I had and created a diner space for her to stand in. The whole idea was to make it 3D enough to give the illusion of depth, but to make it simple to put together.

doll2

I created the background with royalty free images I found online, putting them into Photoshop and putting them together to create the space I wanted. I printed out the image of a jukebox I found, mounted it on board and glued it in place halfway back in the box.

I secured the doll in place by making a little bracket out of black wire attached to the back of the jukebox. That way the wire ‘doll stand’ was almost invisible and the doll was easy to pose in a natural position – leaning against the jukebox.

doll4

The little holes one the frame are there so a piece of perspex can be attached to the front to keep dust out.

doll1

doll5doll3

All in all, I think its a great little display. I listed her in my Etsy shop for a while but she actually sold at the market.

What fun!

z