small things big impact – the kitchen shelves. finally.

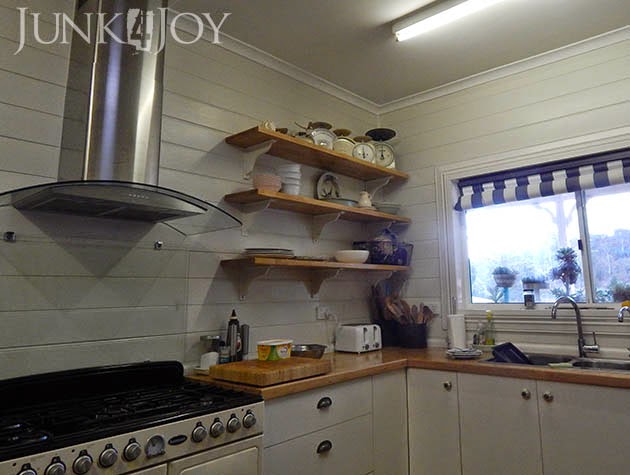
Day 10 – kitchen shelves at last

Do you remember when we finished the kitchen makeover?

In fact, do you remember what it looked like originally?

You’ve come a long way baby!

Anyway, despite how great the kitchen looked after the makeover, it wasn’t really finished cause I wanted open shelves. The plan had always been for open shelves. I have an entire pinterest board dedicated to open kitchen shelves.

We finally have shelves!

Whoo-hoo!

Why the delay you may ask?

Well… I had to figure out what brackets I wanted. I knew what I wanted… the IKEA plain timber triangular brackets. But of course IKEA never has them in stock. Not that we even have IKEA in Tasmania…

Then I started to think I could make my own brackets. After all, I own two jigsaws and am not afraid to use them! But I couldn’t get past the technicality of how to fix them to the wall and my general fear of stuffing up*.

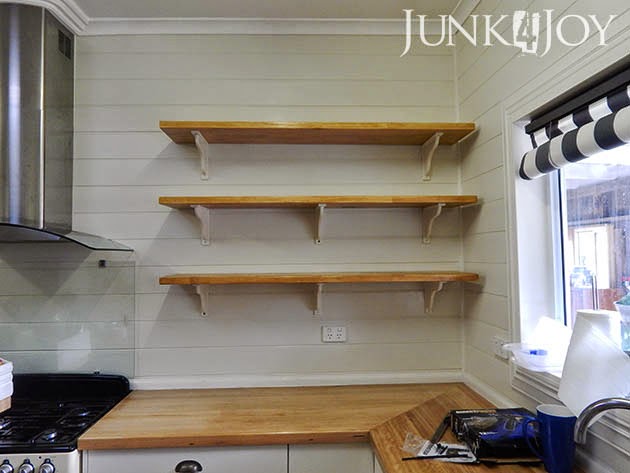
In the end I got the fancier country style IKEA brackets. They work. Though I’m not sure how strong they’ll be. They’re made of MDF (the website said ‘timber’… I guess MDF is a type of timber, but its not very strong). I managed to break one while putting the shelves up – once you pull a screw out of MDF its pretty stuffed. I’m not overly happy with that.

That’s why there are three brackets on the lower shelves – to be sure they’ll hold the weight of dishes. The top shelf doesn’t need three brackets as it won’t be holding any real weight.

Wayne jumps every time there’s a loud noise in the kitchen… he’s sure they’ll come down cause I’ll put too much weight on them!

The timber I used is laminated pine – a big slab of joined pine pieces, 30mm thick for things like table tops or counters. I bought the whole slab and had a nice buy at the hardware store cut 3 shelves at the right size for me.

Problem was pine is nowhere near the same colour as the benchtops, which is tasmanian oak, so I had to stain it. I experimented a bit and ended up using maple stain and three coats of polyurethane. I think the colour is pretty close.

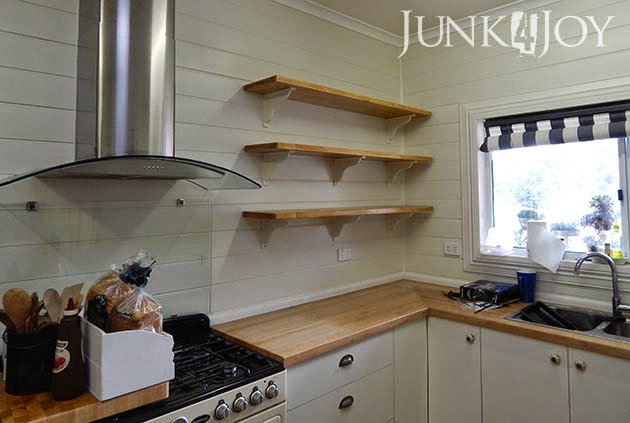
I had a friend help me put them up. No way could I have done these without help, the lifting alone would have undone me. But its the maths I’m not good at. I measure, check, measure again and still stuff up.

*eg. The top shelf… It was meant to be at the same height as the top of the window frame. I calculated that the shelves were 35cm apart. I thought I was so clever when I subtracted 3cm from that for the thickness of the shelf and marked where the shelf should sit before I marked where to pre-drill for the brackets. I measured, marked, checked.. Then I got up lined the shelf up below the marks, not above, so I ended up putting the top shelf in 3cm lower than planned.

Well, I still love my shelves.

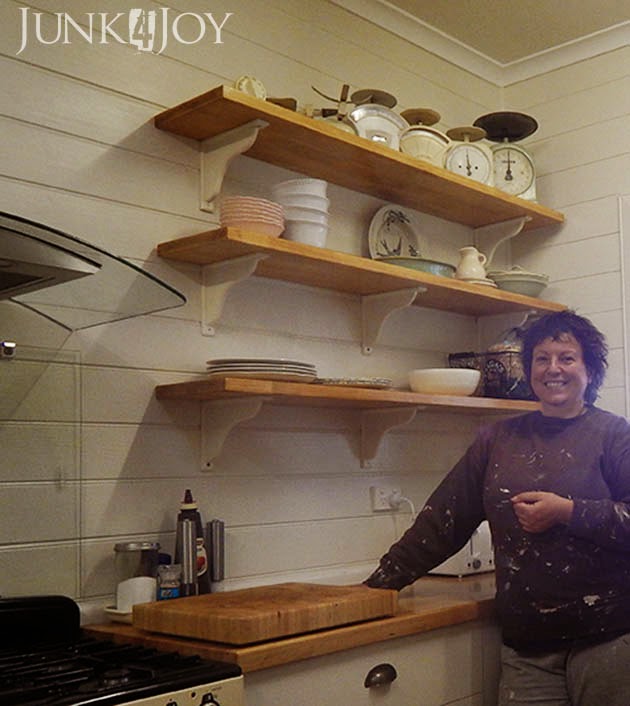
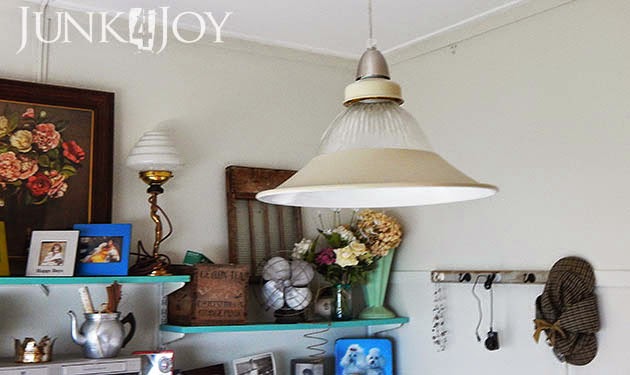
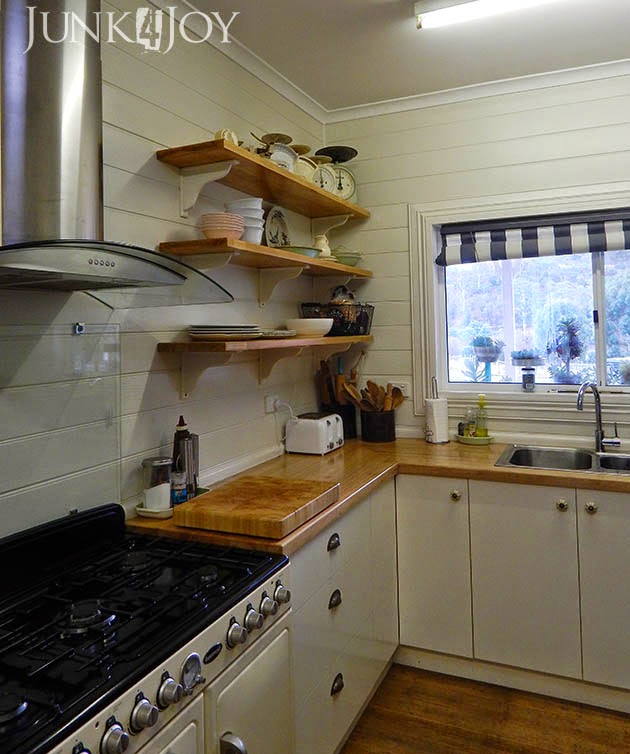
As you can imagine, I was eager to start using the shelves. I couldn’t wait to get out my kitchen scales collection! That end one on the right is one I bought a year ago and have had under the bed, just waiting for the shelves to display it.

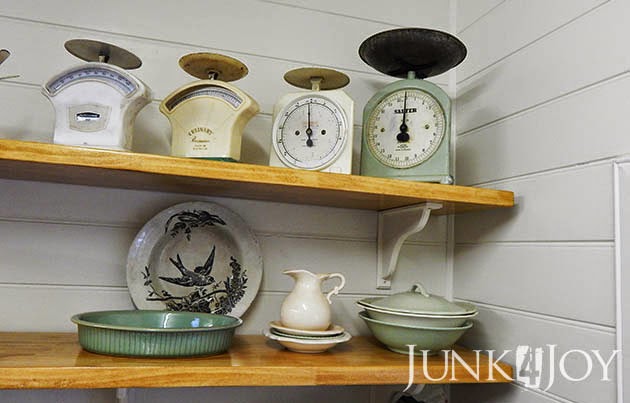
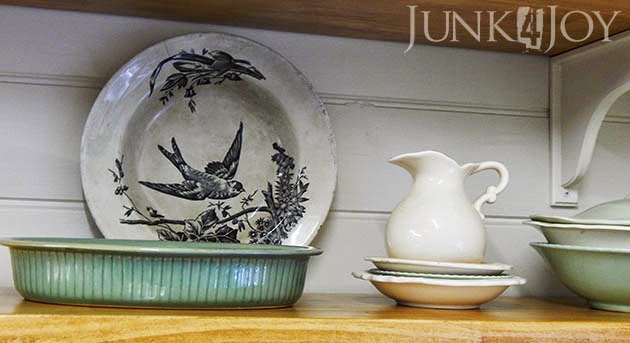
The darker green baking dish is one I got at an op shop yesterday for the princely sum of $3.

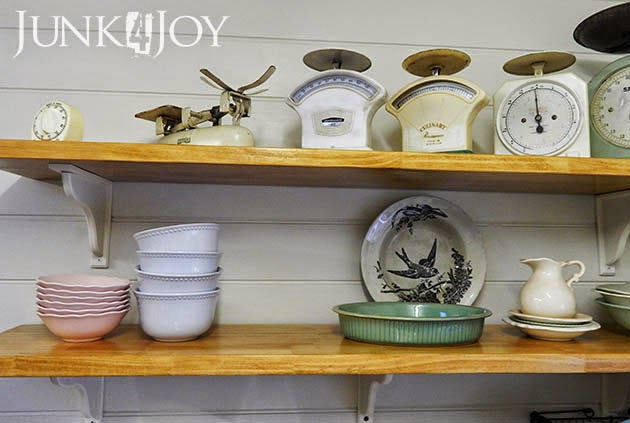
And my crazed and chipped bird plate is on display again!

There’ll be changes to the shelf contents over the next few days for sure, but I’m loving it. And Romeo is loving it!

The idea is to keep everything we use on a daily basis (dinner plates, bowls) on the shelves within easy reach. Also, the my pretty bowls which are both useful and decorative.
Time to begin getting rid of all the not so pretty things we own…

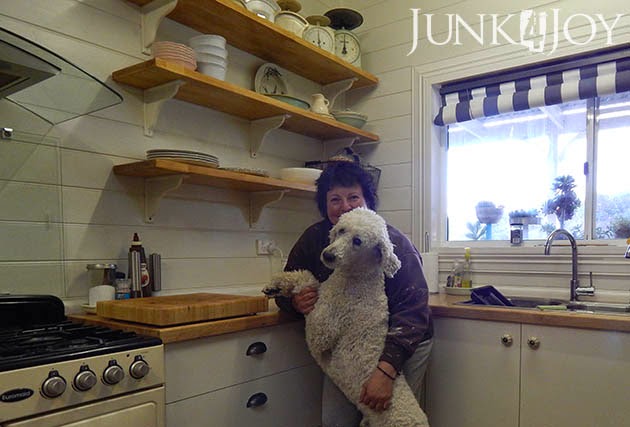
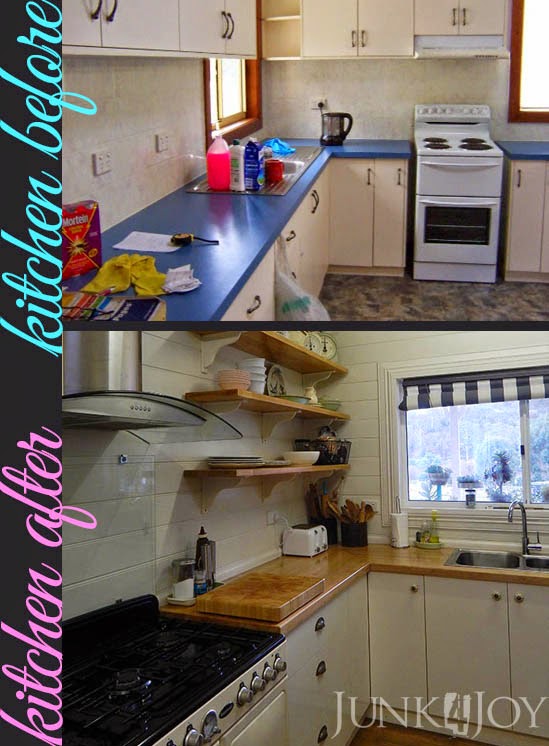
This is the before and after of that corner of the kitchen. Pretty big difference, wouldn’t you say? We moved the window, sink and stove, got new appliances, timber lined the walls, removed the lino, refinished the timber floor and put in all new cabinets with a solid timber benchtop.

A big job but totally worth it!

z

Shared at:

what is a tip shop? and who shops there?

So, what is a tip shop?

Sometimes I forget that not everyone knows that a tip shop it, and in fact, neither did I till I moved to Tasmania.

I’m not sure they even have them on the mainland…

A tip shop is a recycle shop (more or less) which sells stuff which people have thrown away, to other people who:

1. love junk
2. have no money to spend on ‘good’ stuff
3. love old stuff
4. don’t like spending tons of money on ‘good’ stuff
5. prefer to make over stuff they find someone didn’t appreciate, to make something wonderful.

Basically, the ‘tip’ is the rubbish dump. Thus a tip shop, is the rubbish dump shop.

Doesn’t sound so nice when you put it that way, does it?

But I love tip shops, and I’ve gotten a lot of great stuff from tip shops. Even greater once I finish with them.

Let me explain –

First a trip through a tip shop to illustrate what they’re like. Sort of.

Then a few projects made using tip shop finds:

pallet top bench
kitchen table
rubbish bin lid photo display
kitchen chairs
industrial desk lamp

There’s more. Way more. But that explains what tip shops are and how great they are!

z

PS The only reason the armchair in the photo is not already in my shed is cause I have no time!

small things big impact – updating the boring bedroom light

Day 7 – bin chandelier for the bedroom

In yesterday’s post I said take note of the upcycled bin light… cause here it is again! Only a bit fancier now.

This was our light since we moved in. I’ve been dreaming of a better light for our bedroom for a few years now. I couldn’t make up my mind what I wanted, but I definitely wanted something with crystals and sparkle. I’d look at it every weekend, while laying in bed with a cup of coffee, and cringe.

These were the light fittings we had in all the bedrooms. I’m slowly replacing them with more interesting ones.

So how’s this for more interesting?

I had some chandelier crystals, I had the bin with a hole in it, just waiting to be reused… I actually found bayonet to E27 screw in globe converters on ebay so I was able to put in an edison bulb.

A quick and easy job that only took me 4 years and 20 minutes.

A friend of mine said she didn’t like it so much cause… “it looks like a rubbish bin”.

Umm… That’s kinda the point. Its an upcycled bin, not a light fitting. Its a bin with aspirations…

Isn’t the point of upcycling and repurposing to use something for a purpose it wasn’t originally intended for? Well, tick that box.
Anyway, it probably won’t be our forever bedroom light fitting (I have visions of randomly twisted wire…), but for now Wayne thinks its ‘cute’. That’s high praise from him!

What next? No idea.

Stay tuned.

z

small things big impact – the office light

Day 6… The office light

Since we’re on the subject of lights… this is the new office light!

Do you remember the office makeover (part 1, part 2 and then the clean up after it became a mess again)?

Anyway, this is the light fitting I had in there at the time… it was a work in progress which was barely started. A rubbish bin which I’d hung a few crystals on to see how it would look.

Hm. Not quite right. But remember that rubbish bin. You’ll be seeing it again soon.

Meanwhile, the new light is gorgeous. I found it at a tip shop about 2 years ago. Its made up of parts: the rim and the glass dome aren’t connected, they come apart. I mean, the rim is just balanced on the edge there, its not attached. Its a really interesting light and when I saw it at the tip shop I had to have it.

The glass dome allows light to shine all over the room, not just below (as is the case with the hallway light I shared). Perfect for the office where I need to light the entire room.

Of course, it didn’t look quite like this when I found it. Firstly it was grimey. Secondly it was peach.

Sigh.

What is it with me and peach? I’m haunted by that colour!

No before pics. I don’t think I actually took any photos of it at all before the makeover. I just wanted that peach gone!

I sprayed it Rust-Oleum Almond same as the hallway light. I know it looks lighter, but its just the photos.

This light had been living in the pantry (in all its peach glory) since I got it, but it was time to bring it out to be admired. The pantry will get another light eventually, when I make one. Cause as I said, I won’t spend $$$ on light fittings when I can find beauties like this in tip shops.

Another small job finished – the right light in the office.

Meanwhile, got home after work tonight and found the dogs had done some remodelling in the casita. Again.

Another thing to add to my list of things to do: clean up the mess.

z

small things big impact – lighting the hallway

Day 5 – New pendant light

Like my new hallway light?

This is what it looked like when I bought it at the tip shop a few weeks ago:

Plain silver (aluminium I think, soft, cheap) inside and out. Complete with dints.

I straightened out most of the dints and spray painted the outside Rust-Oleum Almond. Yes, we finally have Rust-Oleum products here. But they’re not cheap.

Seriously, paint isn’t cheap in Australia.

Anyway, I love Rust-Oleum spray paint. It goes on so smooth. Not like some of the cheaper brands which was all I ever tried before.

I sprayed the inside gloss white for that two tone look, but taped up the rim so there’s still a silver rim. It looks amazing.

Of course I couldn’t use the pendant kit I had in mind (nothing ever goes as planned) so I had to use another… this one has a brass cap, the top ceiling bit is silver, making it all a mishmash. Kind of like a lot of things I do…

Eh. Who cares. I’m in love with my new light.

In case you’re wondering why the pictures are so close to the ceiling, this is a tiny hallway. So tiny you can stand in the middle of it and touch all four walls and five doors. I decided to hang some of my frames above the doorways. See below:

On the bottom left almost off the frame is the guest room, behind that is the office door, straight ahead is the bathroom door, to the right is the kitchen door. And the living room door is behind me as I take the photo.

I recently painted the hallway (and office) 3/4 strength Dulux China White to match the kitchen and I love the brightness of it. Yeah, the kitchen walls look yellow but that’s just the light in there.
The hallway is where I’ve put my framed fruit labels (I have a collection of them), and I’ve moved the ladder back in there. That was above our bed for a time.

See the difference in colours? Above is with flash, below is without.

But back to what I was bragging about: my beautiful new pendant light which cost me $1 at the tip shop.

I love it when something I got for next to nothing can look so good. And I have a serious problem with spending a ton of money on light fittings when I can do something like this.

z

Shared at:

small things big impact – a bit of a toilet roll holder

Day 3 – a rustic toilet roll holder

When we first moved into this house, the toilet was almost an outhouse. It was on the porch, outside the house. It was, literally a “room with a view”. You could sit there, doing your business, and look out over the valley.

We really haven’t done anything with the toilet since then, other than bring it into the house by enclosing the small porch to make a mud room. Its still ‘outside’ the house and you still freeze your butt off going out there in winter, but its no longer “exposed”.

I’ve been wanting to improve the toilet since we moved in, but its never been a  priority.

I mean, really… its not top of the list of places you want to show off, right?

I do have plans. I bought paintable wallpaper to do the walls, I plan to fix the weather damaged door,  put in a shelf… all kinds of exciting things. Among which was a different toilet roll holder.

I’ve seen toilet roll holders made of non-toilet roll holder items and, being as we’re horse lovers, I always thought a bit would make a good one.

Among all of Wayne’s horsey things was this huge bit for a horse in harness. Its old and the colour is just gorgeous. You can’t really tell in the photos, but it has a green patina to it.

I did consider trying to cut the bit somehow to make it into a roll holder, but I didn’t want to ruin it… so I decided to use it as it is. That way I can recycle it at any time in the future.

Basically all I did was search my stash of junk for a bit of timber which was the right size to hold it. I found this hand sander thingy (I never know what to call these things yet I’ve done stuff with them before). I sanded it (ironic) and gave it a couple of coats of polyurethane, then added hooks underneath to hold the bit.

I had two options for the actual roll holding bit. One was this rusty metal spike (my favourite) or a piece of copper pipe I cut to size and flattened the ends so it would fit through the gaps.

I prefer the rusty spike, obviously.

I really dislike the brackets I have on it now, but it’ll have to do for now. They’re all I could find. I’ll be fixing this up when I finally ‘do’ the toilet.

Oh, I also put on a new toilet seat, but no need for photos of that. We all know what a toilet seat looks like.

These surely were two small changes that had big impact.

z

Shared at:

small things, big impact – improved phone charging station

Its a new month and I’ve had an idea. I’m going to share the small things I’ve been doing lately that make life a little better around here. Its mostly those small things which I’ve been meaning to do for weeks, months, years… that I’m finally making a point of getting around to.
Ok, don’t cringe. I probably still won’t post daily, but for the month of May I’m challenging myself to not only finish a few of the niggly jobs I’ve been putting off for ages, but also to share them in the hopes that I’ll inspire someone to get up off the couch and fix that loose hinge, broken door handle (darn, that reminds me…) or whatever.
I actually started on this challenge last weekend, before I knew it was actually a challenge. Now its all up to me to keep up the momentum.
So, here is Day 1.
Improved phone charging station

I like to change things around a bit… Most of the time I re-arrange furniture (which Wayne LOVES), but I also like to update, change and re-make things I’ve got.

Like this phone station. I made this last year to hold the phone and as a place to charge up our mobile phones. Back then we had normal dumb phones.

Now we have smartphones and they’re bigger than the old ones…

BTW, who saw that coming? Mobile phones kept getting smaller and smaller, then suddenly the trend was reversed and they got bigger and bigger, the bigger the better.

With the new mobile phones and kindles all needing charging…

…and there’s another thing. Back when mobile phones were small and stupid, every single phone had a different charger cause heaven forbid they made things universal. Every household in the world had a drawer full of mobile phone chargers which didn’t fit any phone in the family.

Now, the kindles and smartphones use the same chargers. Will wonders never cease!

So anyway, as I was saying, the new smartphones and kindles didn’t fit on the narrow shelf which used to hold the old mobiles. And sitting them on the top shelf was to risk them sliding off and breaking.

It was time for an update.

This is what it looked like before:

This is what it looks like now with the addition of a couple of timber strips across the front, making a safe charging space.

A small, simple change which makes life a little easier, or neater.

Now if I could just convince Wayne that we should never cook in the kitchen, I might be able to keep the entire room neat…

z

Shared at:

a slightly dirty clock

I had a very busy weekend. A really busy one. I did more cleaning in the casita. I finished some niggly little jobs, I started some projects, I folded and put away washing, I vacuumed the living room.

Yeah, I know.

Wayne was shocked too.

This is one of the small things I finally finished.

I’d got a cheap clock from Kmart when I decided I wanted a clock in the living room. It broke soon as I got it home so I left it in the workshop thinking I’d use the face to make a new clock. I bought a new clock mechanism off ebay and it all just sat there, in the shed, waiting…

We didn’t really need a clock in the living room back then, I had the time up on my TV …but about 2 months ago my TV suddenly lost the ability to speak so it had to go.

Lucky for us, combining two households when we moved in together meant we had doubles of lots of things. Including TVs. We didn’t sell any of the doubles cause we knew that the day we sold them we’d need them. We’ve already been glad we had two washing machines.

Now its the TV’s turn.

Anyway, I can’t figure out how to display the time on Wayne’s TV, so a clock in the living room is a bit more of a need now.

I got the bits together: the new mechanism, the clock face, a battery and an old rusty flan tin. One of those ones with the removable bottom bit. Which I didn’t have anyway as this is a tip shop find.
I’ve had this tin rim for a long time, I picked it up thinking that one day it’d make a great clock. And do it has!

Putting it together was really easy and quick. I didn’t even clean the tin or try to remove any of the rust. I think it adds character.

Its now hanging in the living room above the stacked bookcases and where you can see it easily while watching TV.

I’m loving my new clock.

z

Shared at:

retro flour sifter planters

Last week I shared the new shelf outside the kitchen window.

I haven’t yet moved it down the 6 inches I think it needs to be moved, but I have made one change.

I moved some of the plants to make room for my flour sifter containers.

I think that technically, three of something makes it a collection, so here is my sifter collection. One is really rusty but the others still look respectable.

Not that rust isn’t respectable!

They all have (had) working parts when I got my sticky little fingers on them, so I lined them with hanging basket fibre stuff, then filled them with potting mix before adding a selection of succulents.

Yep. I like them outside the kitchen window, along with the 2 tiered caddies I made out of baking tins.

Other than that, I’ve done a whole lot of nothing at home. Did I mention I was sick for most of last week? Yep. Holidays are not the time to be sick.

Turns out it was food poisoning.

The Dr said it sounded like gastro, along with the flu, just bad luck to get them together. But I watched a segment on A Current Affair last night about bacteria found on chicken. And the symptoms the guy on TV listed were all my symptoms to a T.

Guess what I had for dinner a couple of nights before I got sick?

Makes sense. If it was viral Wayne would have got it too!

I think I’ll avoid pizza and take away food for a while…

z

Shared at:

Beyond the Picket Fence

moving forward on the house painting

We have a week off work for Easter. Naturally my list of projects to do is huge.

Massive.

Long even.

One thing I planned to do, providing it didn’t rain, was finish painting the outside of the house. Its not too much to want a single colour on all the walls…

Around here painting the house is more an ongoing project than a ‘do it once and don’t do it again for 10 years’ kind of thing.

I think I started painting the house about 4 years ago.

I’m a speedy worker.

Its still not finished by the way… the back porch needs the high areas done and, realistically, it needs another coat already due to the exposure on that side.

So, when we built the front porch I had painted all that front area (except the beams up above). Then we put in a new window in the kitchen and needed to patch walls. And we decided to enclose that area of the porch so there was a lot of raw wood to paint.

This past summer I gave all those spots an undercoat and thought that, really, how hard could it be to finish the job with a couple of topcoats?

One thing I’d been planning on from the start, was a window shelf for plants under the kitchen window. I had this little grey one from the living room so put it on the outside of the enclosed porch. The brackets need adjusting so its come off now, but I was dying to see what it looked like.

Kinda cute.
It sits above the gas bottles for our kitchen. Another project for that mythical ‘one day’ is to make a box to hide both the gas bottles and the rubbish bin. Two birds – hide the bottles and keep the bin safe from the dogs.
Not that my dogs rip open rubbish bags. They prefer live chickens… sigh.

I had bigger plans for the kitchen window. This old shelf was in the white timber shed which is being used just for storage. I got Wayne to remove it yesterday and with his help (its a heavy sucker) I screwed it onto the wall under the window.

All I did was give it a good scrub and a light sand to get rid of loose paint. I love the chippy look and the various colours showing through it.

One thing I’m doubting now is its position. I think I need to put it lower. The kitchen window isn’t deep and having the plants overlap the window so much makes the window look narrower, and from inside I feel like I’ve cut out some of the view.

What do you think? I’m thinking of lowering it by about 5-6in.

Another thing I plan to do is cut a frame for that window. All our other windows have aluminium frames which were blue and I’m (still) in the process of painting white. A frame around the window will tie it in with the other windows better.

So, after doing about 2 hours of work on the second coat this morning I had to stop. I felt exhausted, weak, had chills and a bit nauseous. I hope I’m not coming down with something. Not on my holiday!

I think I’ve done enough for today.

z

Shared at:

and