a new/old labrador tray

A while ago a friend asked me to make her a tray featuring labradors. I considered her request and came up with the idea of doing a silhouette of a lab, super-imposed on a star in red, yellow and black. Something that would look like an old fuel sign.

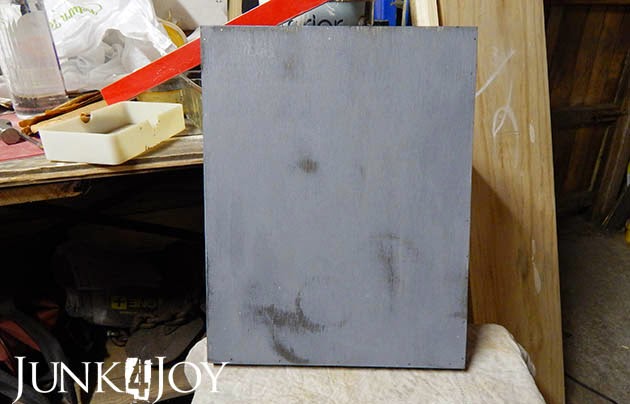
I started by choosing a frame I thought would make a nice tray. I then cut a piece of plywood to fit into the frame I’d painted bright red.

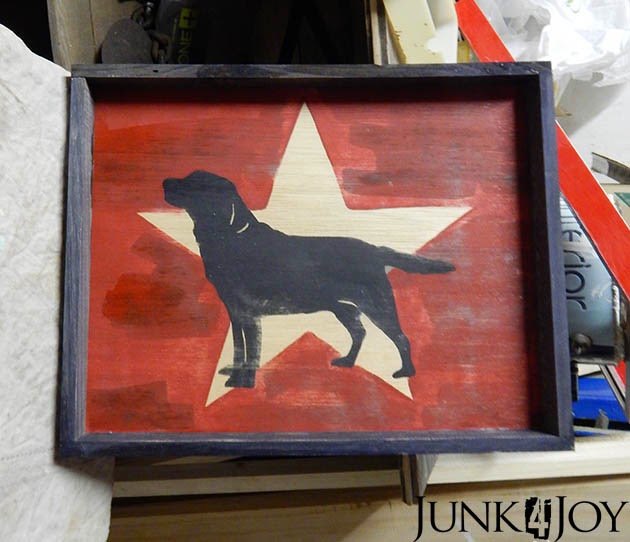
I printed out my design on 2 sheets of A4 paper and (using the charcoal on the back method) traced it onto the plywood.

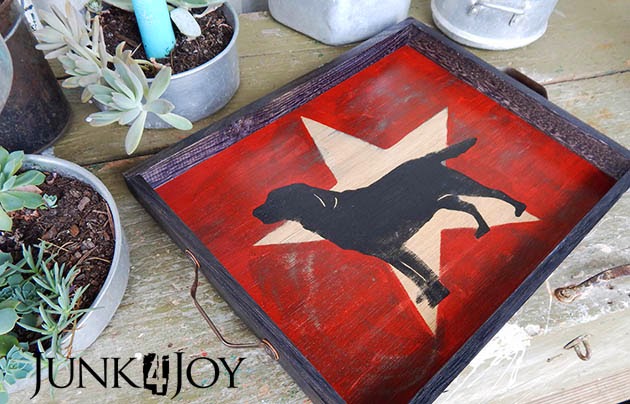
I painted the dog and background using my acrylic artist paints. I loved the natural colour of the plywood so I decided to leave the star unpainted rather than do it in yellow.

When the paint was dry I gave it a sand to make it look old and worn. I tried it in the red frame and didn’t really like it. There is such as thing as too much red.

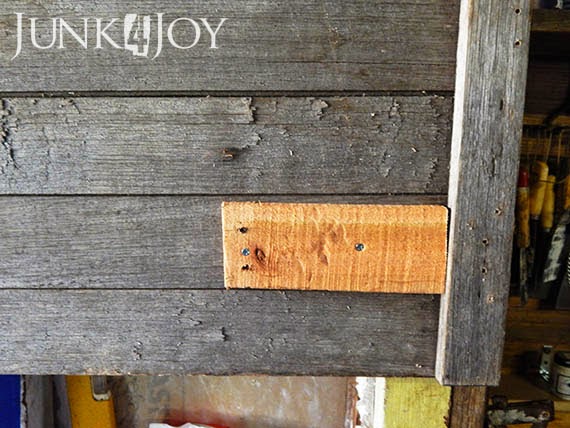
So back to the drawing board. I cut some pieces of tassie oak I’d gotten for free from the hardware store – they were packers in pallets of products they were tossing out.

I did the steel wool in vinegar trick – I planned to age them with the vinegar solution then paint them and scuff them up to expose the aged timber.

Well… something went wrong. I have no idea what or why, but the wood turned black as soon as i painted the vinegar on it!

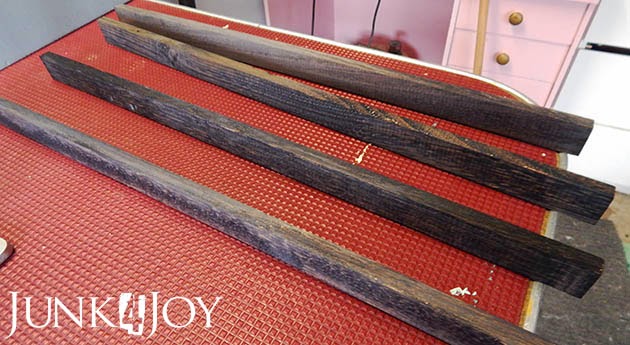
You can still see the grain, but its like I used black stain instead of vinegar. Wierd.

However, in my “go with the flow, all accidents are happy little adventures” frame of mind I decided to go with it and make it work.

I painted the bottom of the plywood grey and painted a bit of the vinegar solution over the sanded areas to age it. It went black too. But it works for me. It looks old and abused.

Then I made my first mistake.

I painted some of the vinegar on the sanded red areas. It left distinct stains.

Oops.

Go with the flow. Its all part of the adventure, right?

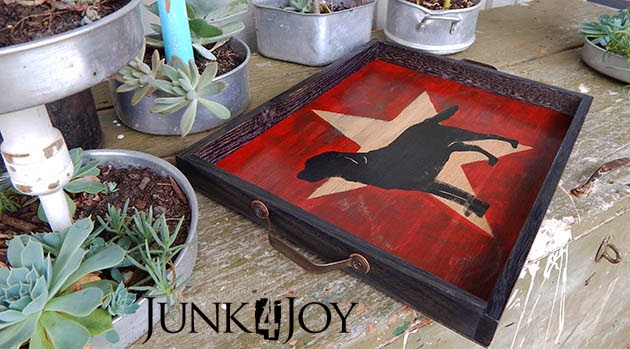
I stained the entire red area with vinegar to try to smooth it out. The blackness bled into the star.

Ooops again.

I sanded it out, did a bit more sanding, then decided it was good to go. Its just a bit more ‘abused’ than it was before.

Since this is a tray, and trays are used to carry drinks and food, I gave it a coat of estapol for protection. That’s causing the shine in the photos. Please look beyond that. I’m sure some use will take care of that.

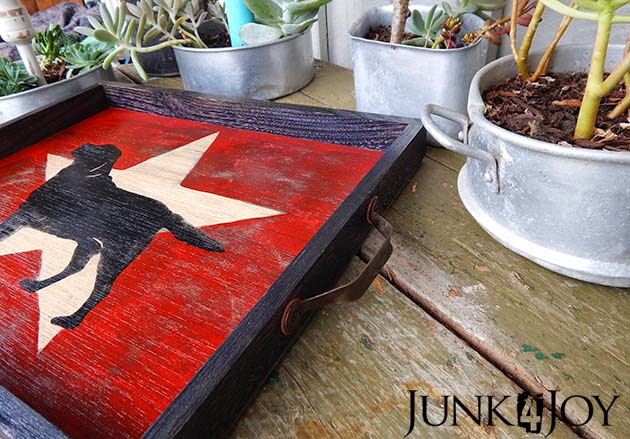
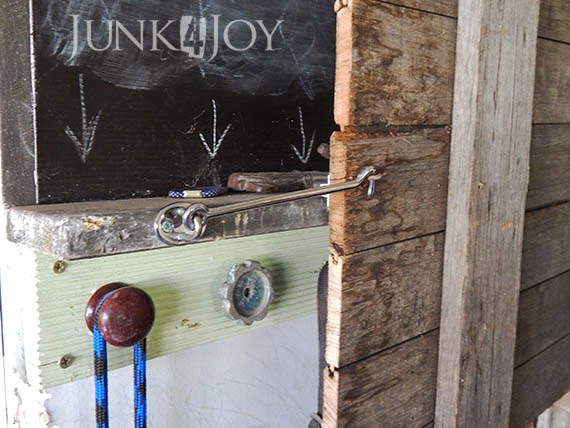
I found a couple of old bent handles I had in my collection – they’d been removed from a couple of drawers I’d used in another project.

I used some pre-rusted washers under the handles when screwing them in place, cause the smallest black screws I had were a tad too long. Didn’t want the pointy end of the screws sticking out on the inside of the tray!

It worked. I actually love the little rusty outline around the handles.

The photos are giving the black a rather blue tinge which isn’t there in real life. Its come up quite good. I hope my friend likes it… Do you friend?
z

Shared at:

the anti-rabbit

I did take ‘before’ photos of this rabbit. 
I did.
But I can’t find them anywhere!

I got him from the ‘free to good home cause they’re too ugly to sell’ pile at the tip shop last time I visited. The poor bunny had one bead eye (as you can see on his right) and the other eye dangled from a thread halfway down his neck.
Pretty gory looking.
He had the pocket and the red striped ears you see, but no mouth and he was just plain… boring.

I thought I could pretty him up a bit… by making him a monster rabbit. The anti-rabbit of Easter, so to speak.

I gave him a zombie mouth, a mismatched eye, a spotty heart and a few darns and patches. I think he looks much better.

So does my little rat-like creature. He’s smitten. Been offering the rabbit flowers since they met.

Hope everyone has a great Easter.

z

Shared at Knick of Time Vintage Inspiration Party!

needle felted rat-like creature

I’ve been looking at a lot of incredible needle-felted animals on Pinterest lately. Some people are so talented! The expressions, the realistic shapes…

I decided to make my own little dressed up mouse. Its been a while since I made a needle-felted animal. I love working with felt but I’m not exactly consistent.

I had planned to make a mouse but he looks a bit more like a rat. Not to worry. He’s still cute.

I needle felted him entirely, except for the white collar on his little orange vest, and his yellow bow tie. 

His eyes are needle felted, with a little white twinkle highlight. I stitched his nose and mouth with black thread.

I had these little metal shavings in my shed… I don’t know what they’re from, I found them on the ground when we took a load to the tip last year. Hard to see in the photos, but they look like little flowers to me. I made a little stem and leaves out of wire and gave them to my little rat-like creature to hold.

Yep. He looks cute in his perpetual grovelling, apologetic, flower-offering stance.

z

Shared at:

some good finds i shouldn’t have been looking for

I was naughty.

I went to an auction.

I couldn’t stay at the auction cause I had to go to work, but I wandered around and peeked into boxes and touched stuff.

Then, despite knowing that I shouldn’t, I put in a couple of absentee bids. Ok. Four. I put in four of them.

I ended up getting 2 items.

One was this gorgeous sign, which I love.

I did some googling. Haywood’s was one of the first large bakeries in Tasmania in the 1870s. Apparently by the 1930s they were claiming to be Tasmania’s largest bakery. I’ve always loved old signs, but at prices of $400 plus, I can’t afford them. I saw this same sign listed on Gumtree for $400 a while ago. I got it for much less than that.

I’m happy.

Its just resting up above the small window in the casita right now, but when I get the chance I’ll be fixing it to the wall properly.

The other item I got was a box of ‘sundry collectables’. Well, it was a whole lot of metal odds and ends. And you know I love metal crap.

Here are some awful blurry photos of my crap. Two very grimey bread tins with some odds and ends in them including metal sink plugs, a spigot, a clamp, some wierd tools… and a gauge who’s numbers move when you move it. I’m sure it’ll come in handy one day.

There was a plastic bucket so beaten up it was impossible to tell what it was made of, full of castor wheels. Some small brackets, what is apparently a pea sheller in the perfect colour for my kitchen, a funny clamp thing I have no idea what for…

This image is a bit clearer… You can see the wierd clamp thing near the tiny strainer. Any ideas what it might be? Its brass.

There’s a funny strainer which I’ll add to my strainer collection. And 2 brass wall mounted candle holders. If I and figure out a way to attach jars with tea lights to them that’s what I’ll use them for I think.

Or I guess they could be used to hold necklaces or scarves… And more mismatched coat hooks. You can never have too many of those.
There were a couple of other metal items of indistinct usage, not included in the pics cause I’d taken them to Wayne for his input.
Lastly in the box was a ‘book’ titled How to Improve Your Bowling by Hugh R. High.

And inside is a lovely old glass flask with two shot cups.

So cute. 
Its in the bookcase now for reading emergencies.
z

small changes in the living room I can live with

Its no secret that I dislike our living room.

Its not the size, I love the size. Its huge.

Its that nothing in there makes sense.

Like the columns in the middle of the room, holding up the ceiling cause the idiots who extended the house didn’t put in the right beam.

And they’re not even in the middle. They’re off centre, creating 2 areas of uneven size.

Mostly, what I dislike about it is the fact that its all so bitsy. We have mismatched items of furniture, nothing that makes sense and ties in together… Its too busy and messy… and I want a new couch. And the carpet is still salmon.

But I can’t remove the carpet yet (I had hoped to do that over summer, and get a new wood heater as well, but that didn’t go to plan). And I can’t afford a new couch. Which is probably for the best cause I still don’t really know what I want. I know I want leather, brown, classic… an old chesterfield would be great. Or a club lounge. And a gentlemen’s club wingback armchair would be nice. In worn leather.

Then I think a modular type with a chaise would probably fit better in our space.

I hate recliners – they’re so ugly, but they’re so comfortable…

In the end I just give up and keep moving things around to try to make the living room more bearable with what’s here now.

Among the most recent of furniture shuffles I thought I’d try a suggestion of Diane’s to stack my two small antique bookcases into one taller piece. I’d pooh-poohed her idea originally, saying the bookcases fit under the window perfectly as they were, that they don’t fit together well upside down… but she had a point. So many of my items were small/low/short. I needed taller pieces.

Then I tried it and I love this new little corner in the chaos that is our living room.

Note the painting of Dancer. I had a nail in the wall… and I had a painting to hang. There you go. 
The old/improved bookcase:

Note the books crammed in the gaps to balance it… I hope no one wants to read those books any time soon…

Its the perfect spot to sit and read or to sit with the laptop on your lap cause its the perfect height and depth of seat.

I’m wondering whether I should redo the bookshelves by colour like in this pin I saw on Pinterest. It looks so pretty, but I bet it’d be hell to locate a book. Our books are a mess right now cause I’ve been shuffling things around, but normally they’re organised by author and topic. ie art books together, dog books together, etc.

Another small but pretty move was the little bookcase I made over a few years ago into the internet corner. I call it the internet corner cause its where the cables come into the house and where, up until recently, the satellite modem and wifi router lived. Its also where the powerpoint is and where the TV lived.

You can see the satellite modem and router on top of the cabinet, and below, you can see our new NBN connection!

We are now part to the modern world, with faster internet! Not to mention a MUCH quieter internet connection! The old satellite modem was LOUD.

So this is what it looks like now – the modem on the wall and the wifi router on the bookcase. Once we’ve connected our VOIP phone the bookcase will move closer into the corner so the wires aren’t so visible.

But just in case you didn’t notice, the barbed wire heart in a base made from curved rusty roofing iron is one of Wayne’s creations.

So there you go. A couple of small parts of the living room which aren’t so bad to look at.
z

‘heap of change challenge’ johnny come lately

There was one project at the top of my list when I decided to join the heap of change challenge last month.

The office.

Not long ago I shared my office makeover (part 1 and part 2) and the blind makeover. It looked great for about a week.

Then things started piling up. And up.

Soon the office looked like this:

And this:

And this:

Actually, to be honest those photos were taken when I put ‘office cleanup’ at the top of the challenge list. Then I went on to clean up the workshop, got tired, ran out of time, got abducted by aliens… I just stopped. Cleaning and organising that is. I didn’t stop piling stuff in the office.

Every time I came across something I wanted out of the way , I’d put it in the office.

Side Note: Have you ever felt that cleaning is just another word for ‘moving things’? Have you ever considered that you will never have the entire house tidy at the same time cause in order to clean one area, you mess up another with things that don’t belong ‘here’ and there’s no ‘place’ to put them… yet… till you create one for them when you clean the next room.

The mess was a whole lot worse than in the pics, but by not sharing those pics I can keep a little dignity… (ha)

Here it is now. After I put everything in the workshop to sort and find a place for later.

Next week I’ll be cleaning the workshop again.

I even put initials on the filing cabinets. One for me and one for Wayne, in case Z and W wasn’t obvious.

The new/old shop rack is now extra storage for bits and pieces.

There are still a few things to do, get rid of the old desktop computer for instance, but I love the new clean office. So much in fact that I don’t think I’ll ever use it again.

z

an unwanted shop rack

I’m sharing this quick project now, even though I finished it about 2 months ago… cause I wanted to share it when I had it in the office as I planned.
Of course, I had to clean and tidy the office first, and that was a job I put off and put off and put off and… you get the picture… But its finally done. Its clean and tidy (for about the next 2 days providing I stay out of it).
Who was it that said they get more cleaning done in the 30 minutes before visitors arrive than they get done in a week? That’s me. Only this time I cleaned 24 hrs in advance.
So, back to the shop rack. I found this sorry little cutie at a garage sale and was quick to grab it. It had been painted silver at some stage, not well, and the base was really wonky, but it had wheels.

Note the wonky base. Held on with string and tape.

I cleaned it up, scraped the scunge off it, disinfected it, and replaced the tape and string with screws and nuts. I gave it a fresh spray of silver, leaving the occasional old paint showing through (for character, doncha know).

Then left it sitting in the workshop for weeks, gathering dust and horse hair.

But today its in the office. Its new home.

Now stay tuned. The office cleanup miracle is coming.
z

not too much of a good thing

There’s one thing you can definitely say about my blog – I never flood you with posts!

I’m a considerate blogger. I don’t bury my followers in post after post, making it hard for them to keep up with all the things happening in my life while they let things in their lives slide.

Yeah right.

More like I just don’t always have interesting things to share. I mean, do you really care that I recently remembered that I know the words to La Marseillaise but didn’t actually know what they meant till I googled it? (Pretty bloody actually.) That I can pledge allegiance to the American flag when I’m not American? That I can quote entire scenes from Monty Python movies?

My brain is full of trivia and stuff.

Not all of it useful.

One of my workmates said she’d really like to look inside my head sometimes, but I’m sure not everyone feels that way… according to Wayne its like an explosion in an op shop in there, and he should know. He has to live with me.

There’s a million ideas and plans in there, all in a jumble. Kinda like a hard drive which saves bits of files here, there and everywhere. The main problem is finding and sorting the bits into some order, then putting realistic timeframes on them. It overwhelms me.

I’m not really good at that.

I’m great at collecting things (thank you Pinterest for giving me a backup for my brain), but not good at prioritizing.

I work in spits and spurts. I get an idea and do it. I get another idea and it remains locked in my head for years till I do something about it, if ever.

Eg: the chests of drawers I did recently which I lived with for years till I felt the need to work on them. The wardrobe (will share soon) is the same. The kitchen shelves… still in my head.

Yet sometimes I’ll get a sudden rush of blood to the head and I’ll hare off and start cutting wood and pounding nails.

And usually these spur of the moment jobs are ones that weren’t even on the To Do list.

So, since I have nothing much to say of value right now, I thought I’d share some pretty photos of the garden before things hibernate for winter.

Succulents in a rusty galvanised bucket.

Armeria in a rusty ammo box with a metal poodle.

A rusty seat with some succulents I tossed a corner near the garage.

A rusty bin with succulents.
A steamer pot with an interesting succulent. 
Have you noticed I have a lot of succulents? They’re the only things that survive the hot sun on the porch. One project on the muddled To Do list in the hard drive that is my brain is a shelf outside the kitchen window for my succulent collection…
Ok. That sentence actually made sense inside my head…
The cute timber shed garden patch is beginning to look like it was meant to be there.

I’m inordinately proud of my delphiniums. I got the seeds and when nothing happened I tossed the pot into the garden. A year later I got flowers!

Another surprise was the nigella which appeared near the garage this year though I never had it before.

The old wood heater from the shed is now a home for many succulents, on top and inside.

Our yard might not be the prettiest one around, with the weeds in the lawn and the bald spots where I poisoned them, but I love my flowers and the little pockets of rusty pieces I’ve created.
I enjoy my garden.
z

the last chest of drawers


Among all the ups and (mainly) downs in my life of late, I thought I’d share something creative and good.

You may remember that when I overhauled the ugly pine chest of drawers a few weeks ago I mentioned wanting to fix up the smaller one to match. Here is an old photo of the two chests side by side in the bedroom as they had been since we moved here.

That top doesn’t actually belong there. I found it in an op shop a long time ago, unpainted and missing its ‘bottom’. I thought I’d make a shelf out of it for the mud room, a spot to drop keys and stuff. I even made a shelf to go on top of it but I never got around to putting it up where I had planned.

Here it is when I first got it and after I’d put some paint on it.

My original idea was to somehow make it into a spot for my jewellery, which is why its on top of the smaller dresser. I even made this mock-up to see how it would look.

Luckily, I decided against that. I just wasn’t sure its what I wanted to look at.

This is what it looks like now (its actually quite straight, the photo makes it look wonky… not that there’s anything wrong with that…):

I obviously don’t stage my photos. There’s a cord between the dressers for the fan. It was hot…

So, what I ended up doing in the end was finding a frame that fit between the posts, or whatever you call them. The one I found was perfect as it was, I liked the white washed colour so I didn’t paint it, just added birdwire.

I then used some small metal brackets to attach it to the posts.

Everything was painted the same shade of off white homemade chalk paint that I used on the other chests of drawers, was distressed a little bit then waxed with clear wax.

Till I started reading DIY blogs I’d never heard of using wax over paint. I thought that’s what you did when you inherited granny’s furniture. But, being the gullible follower adventurous type I am, I bought some to give it a try… and I can tell you I love the satiny feel it gives painted pieces!

Lastly I changed the tiny wooden knobs. I didn’t try to match the black cup pulls on the drawers although I had black round knobs which would have done. I wanted something special… like these little crystal knobs.

Instead of displaying jewellery, I opted for photos. That way I can look at them as I lie in bed on lazy weekend mornings. (Ok, a couple of favourite necklaces have made it to the frame, but most other stuff is out of sight.

A leftover coat hanger wire heart I made a long time ago for some of my windchimes now frames photos of my mom and dad courting and on their wedding day. I love those photos.

Below that I have two old photos of my dad as a toddler with his mother and sister, and one of me as a 3 year old holding my brother while my favourite cousin PG sits beside me.

I have photos of mom as a child as well but want to frame them along with other old photos I brought home on my last trip to Greece.
I also added my favourite card, given to me by my dearest cousin Zefi (aka Little Zefi), her daughter Marouso, and my Aunt Marissa. The card says ‘Having a place to go is home, having someone to love is family’ and its not just that sentiment that means so much to me but the messages inside. Its the best card ever.
Anyway, I realised I’ve said nothing about the chest I finished. Not much to say really. I painted it with the same paint as the other, larger, one. I distressed it a bit, then put the same cup pulls on it to match. Looking back now I wonder whether I should have put handles on the small top drawers to match the top drawers on the large one… but eh, its done now.

There they sit, together, opposite my side of the bed. I like the way they look now. So much neater and calmer that what I had to look at before, the yellowey pine and too neat white mismatched look.
Just a reminder. This is how it looked before:
And this is how it looks now:
I can live with that!
z

a wonky barn door

It seems doors are all the rage lately on blogs.

Last week Donna at Funky Junk Interiors shared this wacky door, and I love it!

And today I saw Angie at Knick of Time had made a mini barn door which is absolutely gorgeous:

Before I knew doors were going to be the trend I made my own shed door in the casita. Up till now we’d had a half door, bottom only obviously (top only would have been plain stupid!) between the casita entry and workshop. Since I sometimes put the poodles in there when grooming customers arrive and leave, I needed to close them in better.

I used to leave them in the house, but with open windows in summer I’m afraid they’ll knock out a flyscreen or three. I won’t let them meet and greet cause they’re very protective and won’t let people into the yard unless I’m there to let them in.

So I decided to keep them in my workshop. The theory behind the top door was less vision = less barking. Turns out it doesn’t work quite that way, but hey, we now have a more gap filling door than we had before!

You’ll notice the crooked gap between the two doors (I blame the door frame, it must be crooked)… the way the timber runs in different directions… the holes in the plaster where the poodles tried their paws at remodelling… Its all part of the charm.

Disclaimer:

I didn’t actually MAKE this door from scratch. I used a door from an old chicken coop I’d demolished when I bought my house in Fentonbury. Since then I’d used this door and its matching partner as ‘keep the dog out of the bedroom’ gates in Fentonbury and here.

So, I basically adapted what I had to create the top part of a door for the casita.

Since the door is heavy, I needed some T hinges which I had to buy. I didn’t have any the right size. I then had to cut a couple of pieces of timber so that the hinges had something to actually attach to. The door timber isn’t that thick.

I kinda like my added bits. They’re sort of like the patchwork of Donna’s door, just not as neat or charmingly random as hers.

I used a hook latch to secure the upper door to the chalkboard dog lead organiser. Since the top door has to swing opposite to the lower door (long story having to do with light switches around corners), I have to keep it open unless its in use to keep poodle eyes from seeing too much.

Since the only time I need to access the lead organiser is when I’m grooming, and since the poodles are usually locked up at that time, its not a problem.

To keep it closed I used a tiny bolt I had in one of my collections and simply put a hole in the door jam.

Easy.

A bit wonky but I don’t mind. I can make a better door if I want. Just look at the door I made for the phone station. I just didn’t want to this time!

In fact, my next door project will be more like Donna’s or Angie’s if I can get the right balance between wacky and neat.

z