a place for my jewellery

You know those days when you just have to make something, and finish it, just so you can feel like you’re actually achieving something?

For so long I’ve been working on things which need time before I can have the satisfaction of the finished job… like working in the garden, planting seeds or working in the casita. It’ll be a while before I can share the fruits of those labours… they’re more work in progress (or an ongoing never ending battle).

So, I decided it was time to tackle something I could finish in a few hours.

For a while now that I’ve known I need somewhere to keep my jewellery. I don’t have tons of it, but I do have a few things I like to wear. And when I finish wearing something I tend to hang it on the nearest doorknob.

Not ideal.

I also didn’t want to make it a statement piece. I like the pretty ideas on Pinterest but didn’t want something that made my jewellery a feature. So I measured the width of the wardrobe and found a long frame I had which would fit on the side. The idea being that it would be there, easy to reach but not on the wall like art.

In the spirit of quick and easy (and cheap), I didn’t remove the print and replace it with something I could screw cup hooks into, I just taped up the frame and sprayed the print with gloss black (cause that’s all I had and hey, silver looks good on black). I then used transparent plastic sticky hooks for hangers.

Did I mention easy?

Since the wardrobe is now white (and still unfinished), the frame looks nice with the original timber and white finish. Maybe I’ll paint it one day, but it will do for now.

z

the answer to everything is WHITE

I like to surround myself with clever and talented people.. (Or maybe clever and talented people are attracted to me cause I’m so clever and talented…) Either way, I have really great friends who inspire me constantly.

One of those friends is my newest BFF, Patrice, who lives just down the road from here. She moved to Tasmania from interstate not long ago and we met through this very blog. She’d just bought a house and was thinking about renovating her kitchen, did a google search and found my kitchen remodel.

Small world.

We don’t see eachother that much despite the fact that you could probably throw a stone from my housed to hers cause we’re both always so busy – what with work and houses to dismantle and put back together… but we love to compare notes and give eachother ideas for even more projects.

Wayne has rued the day I met Patrice.

A couple of weeks ago Patrice got into high gear with her guest room as she was expecting a visitor. I love what she’s done with it. Makes my guest room look downright drab and gloomy.

I’m going to share the pics Patrice sent me of the room before and after. I think the transformation is amazing and its so simple and was done really cheaply.

Basically she just painted everything Dulux Antique White USA and made her own curtains (which she’s not happy with but they’re ok for now or for the next few months or forever depending on her inspiration and financial situation).

This is the room before.

What? Aren’t guest rooms always storage areas?

This is the room now. All fresh and bright.

Painting the walls and bed white instantly brightened the place up. Taking inspiration from the green pillow covers she selected a fabric for the curtains which looked good in the shop but turned out a little too lime for her taste. Ain’t that always the way?

She also repainted this gorgeous little dresser she’s had for years. I think its on its 34th coat of paint now.

It used to be a lot smaller…

You can’t tell in the pic above but she repainted an old chair the same dark green in the cat print. And notice below: no more dark brown door!

Clean and simple, right?

Love it.
I think I may have to find an excuse to go stay over one night.
Just to try it out…
z

which brackets?

 When I finally finish painting the house, I want to put decorative brackets on the posts to really give it some wow.

There are quite a few types out there but I want something simple as our house isn’t really fancy…

I found some I like and put them on the posts using Photoshop (MUCH easier than doing it in real life – not to mention cheaper!). So, have a look and tell me which you think look best.

Option 1.

Option 2.

Option 3. Similar to Option 1 but just slightly different.

Option 4. Much fancier.

I already think I have a favourite but I’m curious to see what others think …

I started cleaning and organising the casita today. I got as far as emptying my workshop area of all the crap I’d piled up, making it impossible to get in and work and making a start on sorting it out.

I cleaned up all the rubbish and put all the odds and ends into the store room (it’ll take me WEEKS to go through all the crap stuff in there to sort it out and put it where it belongs*). I moved the big cubby storage unit to another wall and put a hole in it to be able to access the power point behind it. I removed the square of carpet I had on the floor there and put it under the front porch to stop weeds from coming up. I brought in the metal frame of an old workbench that belongs to Wayne so I can make it into a workbench for myself.

Would you believe he was going to throw it away?

You’ll see how that’s sacrilege when you see it.

Of course I couldn’t put the bench together cause we didn’t have any bolts for it, so I had to go into town to buy some. I also need to find the right wood to make a top for it as well as a bottom shelf.

I wasn’t able to do all the stuff I had planned cause I ended up being out about half the day having meetings and social gatherings.

Eh. I’m on holidays!

z

* The dream is to sort all my junk out in boxes so that when I have the need for a spring, I can go to the spring box, or go to the rusty washer box for a rusty washer. Cause you never know when you’ll need a spring and a rusty washer.

I can’t wait to be able to work in there again and get started on things again!

new office blind, the cheap way

One project finished.

And what an adventure it was!

You already saw a preview yesterday…

This is what the blind in the office looked like before.

Salmon.

Like everything else in this house when we bought it.

Gack.

I wanted a new blind. I’ve been wanting a new blind forever, but since I made over the office its been a lot higher on my list of ‘wants’. But I didn’t want to spend a ton, or even a little…

Enter the painting the blind idea.

First I planned to paint stripes; paint the blind white, then paint stripes in pale grey with a distressed look… to kind of match the kitchen blind but to not be identical.

But I didn’t have any light grey paint. I did have aqua, so I mixed up a batch of light aqua and got ready to paint stripes.

Have I ever mentioned my bad relationship with numbers?

I hate measuring things… hence my slapdash creative methods.

Well, suffice it to say I stuffed up the stripes.

So, I did what any self respecting DIY-stuffer-upper would do… I painted the whole blind aqua.

Then I decided to try chevron … cause its so much LESS numerically demanding!

I have no idea what I was thinking. I was in the zone.

I looked up ‘how to DIY chevron easily’ on Pinterest and found a suggestion that I grid up first. I used a book as my ‘slightly off-square’ shape and pencilled in a grid.

I then used an off-cut of timber to achieve the width of my stripes… and very soon ended up totally off my grid.

Eh. No one’s perfect.

I masked off my stripes and used a mini roller to paint in the stripes. I only gave them one coat using the chalk paint mix I was using on the chests of drawers and wardrobe* so that the effect is a bit uneven and ‘washed out’ in spots. The old look I was after.

The masking tape lifted up a few small spots of aqua as well, thus giving it an even older, more distressed look…

Oh well, it may not be perfect, but it looks ok… As my mother likes to say “many will see it, few will notice”.

This morning I erased all the darn pencil lines and painted the back all white. One happy accident was the difference in the aqua vs white. The aqua is semi gloss and the chalk paint is matt so the blind now has both colour and texture.

However, this is one adventure I’m not likely to repeat soon. If ever.

I do enjoy painting, measuring not so much. And painting on the floor I can live without.

The difference in the office is amazing.

Take another look at how it was before:
And now:
Much better!
Today I also went a little crazy and added pom poms to half the window.

Why?
Cause I could.
Cause I had the pom poms and didn’t know what to do with them.
The photo sucks, but the pom poms are kinda pretty. As long as you ignore all the bird poop on the window and the view of the garage.

All in all, its been nice to finish something, even though it wasn’t really on the To Do list for this week.

z

* My DIY approach is simple: once you get a paint out and start painting, paint anything and everything you can in that colour while the brush is wet.

Shared at:

lazy no more

Well, the wierd lazy thing I had going on at the beginning of the weekend is over.

Since my post complaining about my lack of energy or desire to DO anything, I got this urge to start something…

First I decided I’d vacuum the bedroom. Which lead to moving furniture. Which led to deciding, well… since I’ve emptied the furniture to move it, why not paint it? I’ve always meant to after all..

Then, since I had the paint out, I decided I could paint something else…

It just escalated from there. I didn’t go to bed till 3am last night (morning?) and I woke up at 6.30am cause I was eager to keep working.

I’ve been working on my projects all day again today and I’m exhausted and just want to go to bed…

But right now this is what the bedroom looks like:

I’ll have to move all that stuff and un-bury the bed before I can go to sleep.

Here are a few glimpses of what I’ve been working on… first my first (and absolutely last) attempt at a chevron pattern:

My chests of drawers:

And my boring pine wardrobe:

Still a way to go.
I’ll keep you posted.
z

farm fresh

This is a little project I did a couple of weeks ago in another burst of inspiration I didn’t ignore. I mean, if you just sit down and wait, it passes and you can continue to just be lazy.

But while organising the pantry, I decided it was high time I put the baskets I bought off ebay to use. See, I bought these little beauties cheap on ebay (and paid way too much for postage) so I could keep onions and potatos in style.

Problem is, I had nowhere to put them!

You’d think the perfect spot would be in the dark and gloomy entry, near the pantry. But there’s absolutely nowhere to put them in there. Not enough room on the wall near the door, behind the door won’t work, alongside the wall where the fridge is just interferes with the door opening… Its already so squishy in there you can’t have one person at the fridge while another is trying to get in or out of the house.

So what do do?

Well, I decided that the only spot I could conceivably put them as on the side of the kitchen cupboard. But no way was I going to put hooks onto that!

I measured the side of the cupboard and went out to the casita for a scrounge. Sure enough, I had the perfect thing. This was a narrow door off something I picked up from somewhere sometime long ago.

I put one of those galvanised shed hooks (for brooms and gardening tools) on the back and just hooked it over the side of the cupboard. Perfect.

Excuse my blurry photos. Taking photos inside is always dodgey without proper lighting. I have proper lighting… I’m just too lazy to get it!

I did have to do some cleaning, some sanding, remove the rotted support slats on the back and replace them with new ones… and paint a sign.

It might have been easier to just make the thing from scratch with pallet wood… but it wouldn’t have that “I just got saved from the rubbish pile” look to it.

Its kinda funny too, cause today I saw this project by Denise On A Whim… we seem to have had similar inspiration on our signs. Of course her writing is much neater than mine.

Unfortunately I couldn’t leave the baskets ‘au naturel’ because the bird wire has spikey rough edges. I can just see reaching in for an onion (smaller, top basket) or potato (bigger, lower basket) and ripping your hand to shreds.

Or more like Wayne reaching in and ripping his hand to shreds.

So I lined the baskets with a table napkin (top) and a flour sack (bottom). I guess that’s better anyway cause it keeps the contents in the dark. Dark is good for potatos and onions…

z

sag drag and fall

(as opposed to flip flop and fly)

I have no idea what’s wrong with me.

I can’t seem to find the energy to do anything. Or the desire to try to find the energy.

Yesterday I did get one paint of topcoat on the woodwork in the tiny hallway (4 door frames) and the window in the bathroom. But I was seriously dragging my feet as I did it and then I forgot to wash the brushes cause I got sidetracked feeding dogs and feeding and rugging horses…

I did 4 loads of washing, groomed two dogs, cleaning the living room and tried an alternate furniture arrangement (it sucked) and sprayed all the weeds I could using one full load of the backpack sprayer. Then it rained and all my good work went down the drain.

I didn’t even bother trying to get the clothes in off the line.

Ok, when I list the things I did yesterday it doesn’t sound like I was lazy, but trust me… I was. This is not normal behaviour for me. I get up in the morning and I start doing stuff, starting with feeding animals, then moving on to whatever I have in my mind for the day… usually changing them as I go cause I get distracted and sidelined. Like weeding. I see a huge weed and grab the weeder, then, before I know it, half an hour has gone by.

Normally, I’d be painting in the hallway, cleaning or organising things in the house, then I’d find a project I want to do and get onto that. Somewhere along the line I still manage to finish the cleaning and organising jobs I start and do a second coat of paint.

Right now I’m finding I really have to push myself to get off my butt.

Then, instead of getting online and posting on the blog or catching up with all the emails in my inbox, I watch tv like a couch potato.

Wayne says its cause I need to rest.

I say its cause I’m feeling a bit down when things don’t work out. Like the living room re-arrangement. Or the waste of weed spraying.

This morning I gave myself permission to be lazy. I got up, fed animals, pooperscooped the yard, did some weeding (see? all it takes is a walk across what passes as a lawn and I can’t help myself), put up some wire trellis for the sweet peas which didn’t hear that they were supposed to die in winter and are trying to crawl up the porch rails. I also put a trellis up for the jasmine which I want to encourage to grow up the side of the casita.

Its blowing a gale out there and I am trying to convince myself to do another coat on the woodwork (do I really need to? Its just a tiny hallway. Will anyone notice?) or something else productive. Like sew a liner into the large laundry basket I got. Or clean up the wire shelf thingy I got for the office. Oh and tidy the office. Again. And clean the kitchen. And bathroom. And bedroom.

Or maybe just pick one of those and do that.

Right now I just don’t really care to do anything.

However, just so this isn’t an entirely boring whining post, here’s a little something I did to the kitchen wall last week during one of those short bursts of inspiration and energy. I put my two antique food covers and a grain sieve I bought in Greece (you’ll recognise this one Zef) on the wall above the cupboard in the kitchen.
I’ve had these for a few years now but never had anywhere to put them. Now they have a spot and when I need them I can just use the new stepladder to get them down.
Yes, a new stepladder. I realised that the 60s stool/stepladder I have is probably not as strong as it should be for me to climb up to reach high places… I bought a folding stepladder which is slim enough to fit in the gap between the pantry and the wall in our tiny entry way. Its already come in really handy. I’ve used it to organise the pantry last weekend and while painting in the hallway.
Here are some photos of the hallway with the newly painted walls (which should really have had a third coat but I ran out of paint and its only a tiny hallway anyway, who will notice?
I decided to hang some of my fruit labels above the doorways to cheer the place up a bit. This is above the office door.

Above the bathroom and kitchen doors where I need to put a nice light fitting. Love my Tasmanian fruit label with a poodle on it! Ironically I bought it on ebay from the USA many years ago.

Last, the living room door and the spare room door (on the right).

I know have a blank wall on the left where I’m considering putting some hooks for our bags so they don’t sit on the floor or any available surface in the kitchen.

Here’s a look at the ugly, but now organised, pantry in our squishy entry.

When I was doing this last week I made a small shelf out of some leftover bamboo flooring to double the space for the small containers.

I think I know what my problem is… power tool withdrawal. I need to make something. I felt energised when I made the stupid little shelf last week. But I can’t make anything till I clean out the casita so I can actually get to the power tools. And find anything else I need.

Maybe I’ll have more energy tomorrow.

z

an outdoor firebox

This last weekend I did a little work in the garden.

Actually, I’ve been doing a little work in the garden for a couple of weeks now. The emphasis is on little… I’ve had a friend helping me and he’s been doing the heavy lifting. I’ve had him help me move some plants, put in new plants and prepare the vegetable patch for planting.

We have a cement slab in our yard which used to hold a water tank many years before we bought the place. Its just a useless concrete slab in between the house and the Hill Hoist (Australian icon, aka clothes line) which tends to collect ‘stuff’. You know the stuff I mean, the kind of stuff you think “I can’t be bothered taking that back to the right shed now, I’ll just leave it here…”

When we first moved here I asked Wayne to build a trellis there to block the view of the clothes line and water tanks. I had visions that the clematis and banksia roses I planted in front of it covering the trellis and providing a gorgeous screen.

Here are a couple of photos of the trellis from two years ago. First a view of from the clothes line towards the house.

Looking towards the corner of the casita – you can see the clothes line and one of the water tanks.

And looking back towards the house from the other side. The plants are more than double in size since then, but still nowhere near the gorgeous screen I envisaged.

Here are some pics taken on the weekend of the same area. In this one you can see the clothesline behind the trellis. You’ll also see the copper artwork I distressed to get the green patina. Its now garden art.

This spot is great for sitting and relaxing in the afternoons, once the sun heads down behind the trellis. You look over the middle paddock towards the hill, the dam and stable, back up the valley behind the house, and all the front yard. So, when Wayne decided to get rid of the big wood stove he had in the garage and asked if I wanted it as a garden ornament, I jumped at it.  Its perfect for my little outdoor relaxing area.

What would an outdoor post from me be without horses and a gratuitous poodle in the shot?

The wood stove is heavy and very rusty. Just gorgeous. Wayne removed the door and side panels so you can see the rusty metal sides in all their glory. I put some potting mix in the box itself and put in some succulents. They’ll get full morning sun there but shade in the afternoon. I added some of my favourite pots: a once red bucket, a once red biscuit tin and an old jam pan. They’re filled with succulents as well. Only succulents will survive that position in pots in summer as it gets full sun almost all day long.

While I was at potting up succulents, I did a few more. Here’s another favourite of mine. The old mop bucket!

Oh boy, I used to hate those things when I was growing up.

I love spring. I love looking at the garden and seeing the flowers bloom and what new flowers pop up that I don’t remember putting in.

z

Shared at:

the costumes are finished. finally.

The good news is that the costumes and props are almost entirely sorted. I managed to finish the costumes this week and will have all the props ready by the end of next week. We won’t start filming till the end of August due to program staffing changes, but here’s hoping!
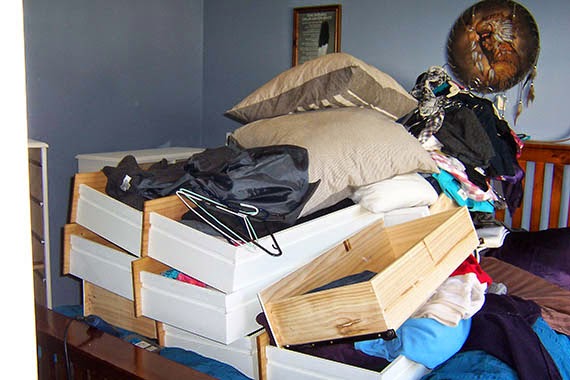
So here are the costumes. I put them together for each character so that everything a person needs is on one hanger.
Before looking, please remember I’m not a great sewer, not very neat and I make tons of mistakes. Plus I shortcut where I can. I made all costumes using fabrics, clothes, beads etc from op shops and donations from friends (and my own stash). Ditto for trims, lace and props.
Having warned you, this is the cook’s costume. This comprises a plain white apron, a frilly white cap, a beige tunic and skirt. The tunic is one I made myself. The skirt is a tiered skirt I bought at an op shop. It was white so I dyed it using coffee so it matches the colour of the tunic. The point was to make the clothing darker than the apron and cap so they would stand out.

No cook would be complete without a rolling pin so I’m lending one from my collection for the film. The cook is only in one brief scene at the beginning of the movie.

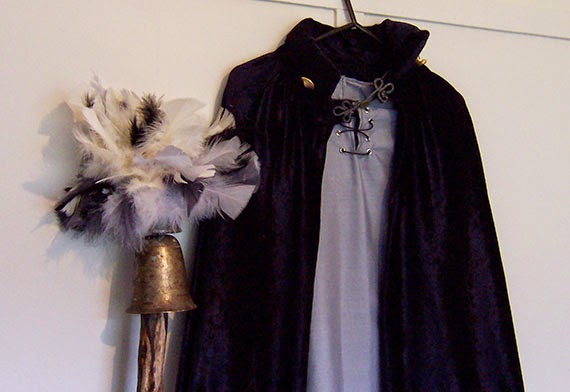
Another small part is that of the guard. He’ll be wearing the grey tunic, black leggings, puffy pants, ‘boots’ and a blue cape we already had in wardrobe.

The guard will also be holding a staff when he guards the King’s chambers.

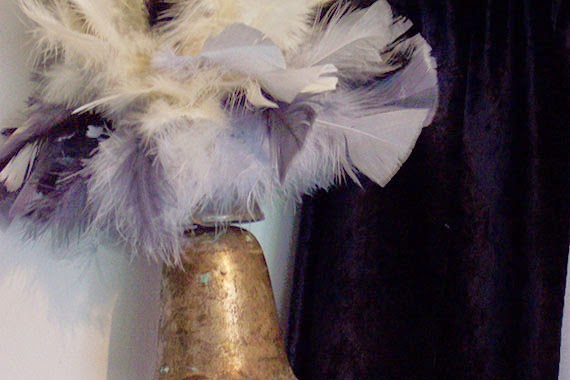
Note: the kingdom where our story is set is a peaceful one (till evil makes an appearance) so there’s no need for weapons. Therefore the guard holds a glorified feather duster instead of a sword.

Wayne made the staff for another production and I repurposed it for ours. I created the feather puff ball using a styrofoam ball and used hot glue to stick feathers into it. I then glued it to the brass bell Wayne had attached to the large stick.

All self respecting guards need a helmet, so our guard has one I made using a very thin foam sheet I found in the bottom of a shopping bag. I was about to throw it away when I realized it was the perfect material to make the helmet out of.

I used some metal beads used for hanging multiple strands together – they look like military insignia, and finished it off with a gold button on the top.

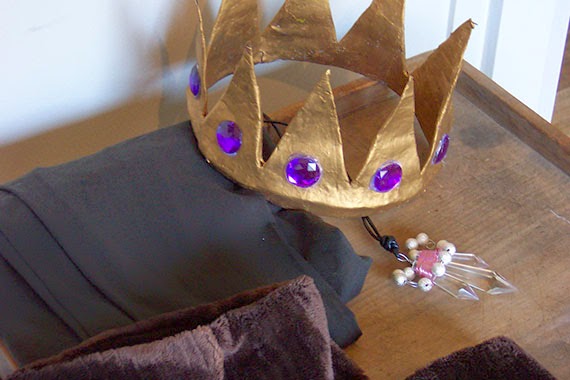
There are 3 kings in our movie so I gave them each a colour to keep things easy to sort. The first king is King George. His main colour is brown. For his tunic I used a black top with gold strands through it and added a fur collar and a couple of gold buttons with a chain.

The shawl (a table runner!) adds a dash of ‘je sais quoi’… although when he’s being more formal he’ll wear his cloak made of a shiny heavy brown fabric with a wide dalmation collar.

The costume is completed with brown leggings, brown ‘boots’, a crown and the ‘good magic crystal’.

The crown is papier mache and rhinestones. The ‘good magic crystal’ is 3 chandelier crystals wired together with silver beads on a leather thong.

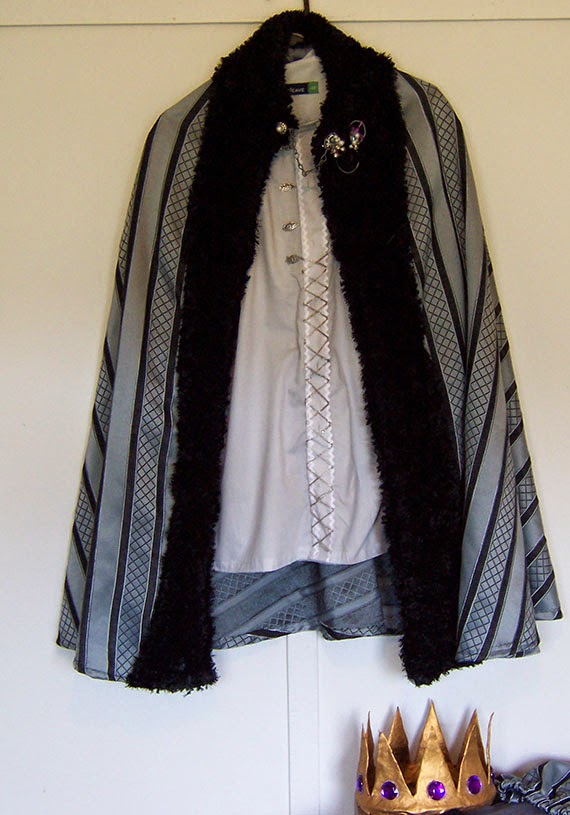
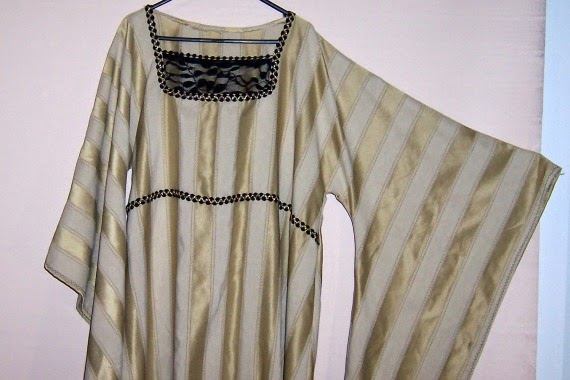
Next we have Prince Oscar… before he becomes a king, Prince Oscar wears a puffy sleeve tunic in 2 tones of grey. I used an old shirt and puffed the sleeves by adding in slices of extra fabric. I made some changes to the trim on the front of the shirt since I first posted about it. I removed the black laces and added silver decorations. It looks much better.
Prince Oscar wears a silver cap with black and purple feathers, matching puffy pants, grey tights and black ‘boots’.

When Prince Oscar becomes king he replaces the cap for the crown and wears his fur lined cape.

Plus the ‘good magic crystal’. Of course.
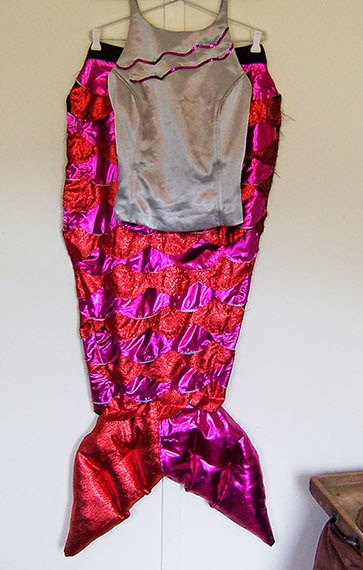
Lucy is a mermaid. Her costume couldn’t be blues and greens cause we’re using a green screen so I had to be imaginative. The top is something I found in an op shop. I added pink sequins to make it match the tail a bit. Since its too small I’ve added lacing at the back so we can adjust it to fit. The mermaid will only be seen from the front in our film.
I’m the director. I decide how to film it!
The tail was a bit of a challenge. I had to make something which was easy to make, easy to put on, easy to move around in, yet still look like a mermaid tail.

What I ended up doing is cutting red and pink fabric into scalloped strips to give them the look of fish scales. I then attached these to a black ‘apron’ of fabric. The apron tapers in towards the feet where it joins onto a tail which is stuffed with filling to give it body. The tail ties on at the waist and has 2 large elastic loops which hold it in place against the legs. There is no back to the tail and will be worn with black leggings.

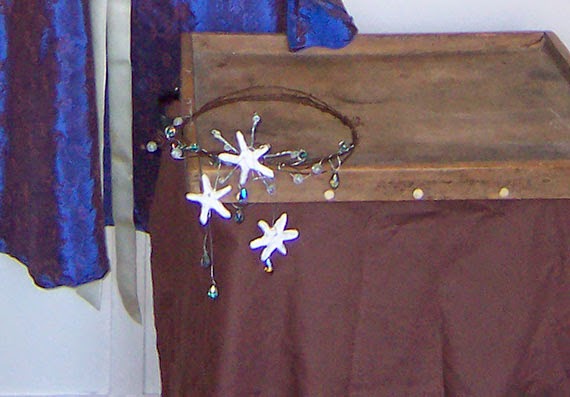
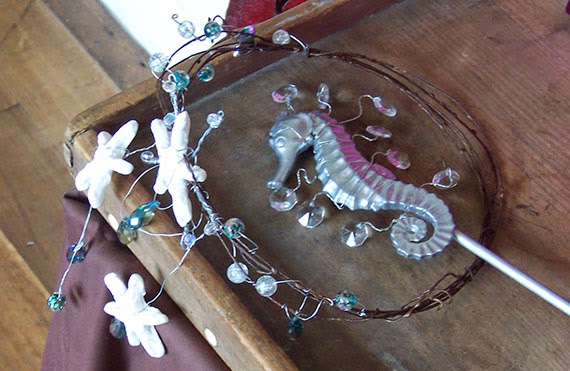
The mermaid has a great crown I made with brown florist wire, crystals, silver wire and starfish I made using a porcelain clay recipe I found on Pinterest.

Sorry about the blurry photos.

She’ll also have a magic wand (cause mermaids are magical creatures, at least in our story!). I made the want using a plastic seahorse, a bamboo stick, some wire and crystals.

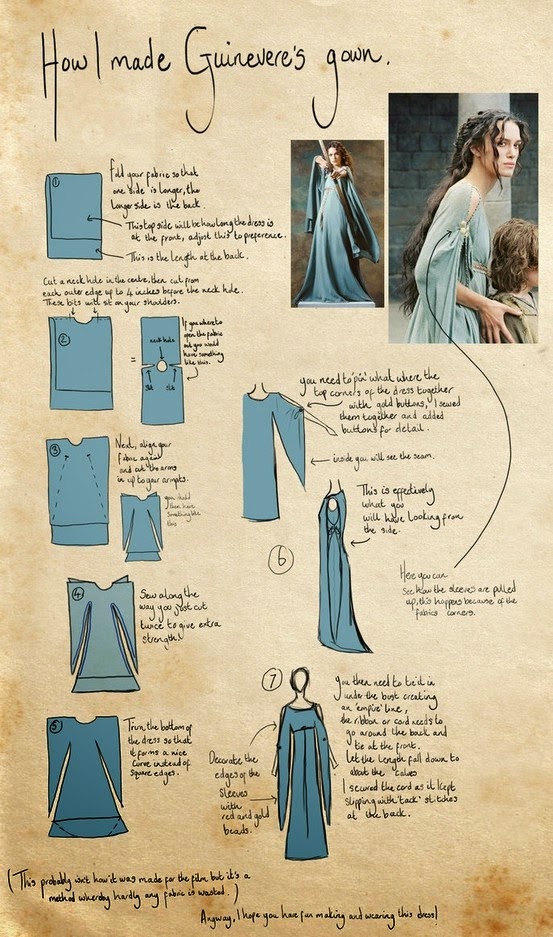
When Lucy the mermaid becomes human she’ll be wearing a gorgeous blue dress. I made this dress using the easy pattern I found on Pinterest, with the smoother armpit cuts. I absolutely love this dress, the colour is just beautiful and the lace and pearls on the sleeve are so pretty.

When she’s human Lucy will still wear her mermaid crown, though she’ll add some pearl necklaces to her outfit.

Another character who only appears briefly in the film is the peasant who leaves a baby at the castle gates. The peasant will be sharing the cook’s costume but, instead of an apron and cap, will be wearing a scarf I brought back from Greece wrapped around her head and partly covering her face and will carry a baby in a basket.
 
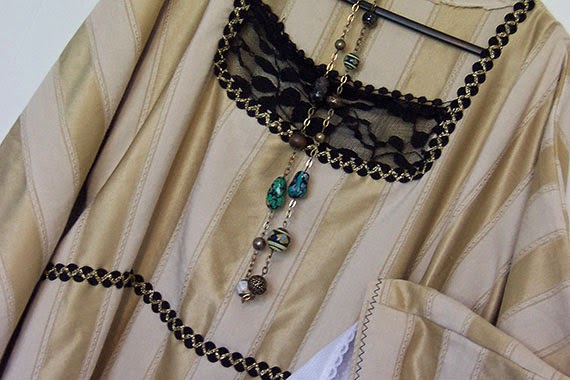
There are two queens in the movie. The first is Queen Mary who’ll be wearing a burgundy and gold dress trimmed with gold braid and gold beads. Made from an old doona cover.

This dress wasn’t made the easy way. I didn’t have enough fabric to make this dress using the simple fold over and cut pattern. I had to make it the normal way which involves cutting a bodice, sleeves and skirt all separately and joining them together.

It turned out quite well considering.

Queen Mary will be wearing a gold necklace given to me by my friend Merrill. Only borrowing Merrill!

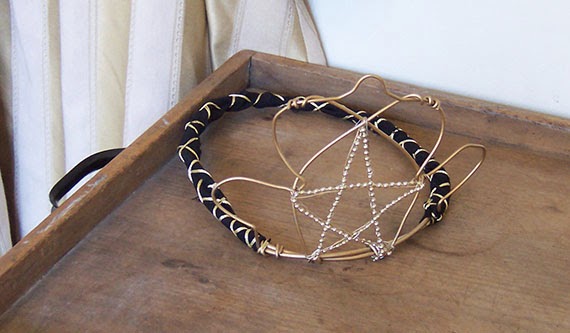
And of course she’ll be wearing a crown. The wiring for the crown was done by Wayne. I finished it with the black and gold band and the gold beads.

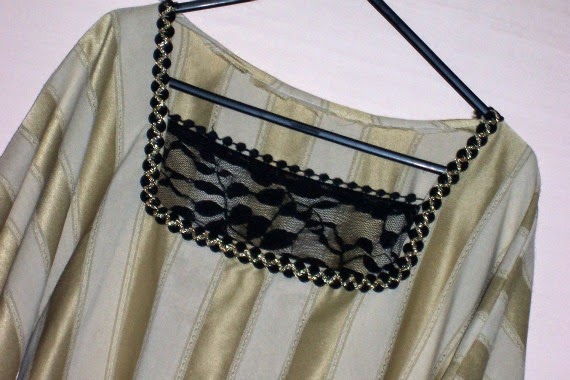
Queen Sophie will be wearing this gold dress with black and gold trim, also made from a doona cover. Since Queen Sophie is being played by a guy this dress has a lace bit in front to hide chest hair…

Queen Sophie’s dress was the first one I made so its made with the same easy dress pattern which involves cutting two pieces and sewing them together. None of the dresses have zips or buttons… Given that the waist measurements are wide enough to go over the shoulders there’s no need for them.

Queen Sophie spends a lot of time crying so I made her a fine lacey hanky out of a scrap of white cotton and some lace.

Then there’s the bad guy… He doesn’t start out bad. At first he’s just a normal guy. When he’s normal he wears an off-white gathered sleeve tunic with a red velvet vest.

The tunic is made in the same simple way as the dresses but I didn’t have enough fabric to make the sleeves long so I added bits to it, hence the gathered sleeves. I made the vest without a pattern. I used a singlet to figure out the size and where to cut the arm holes and then just winged it. It actually looks great on.
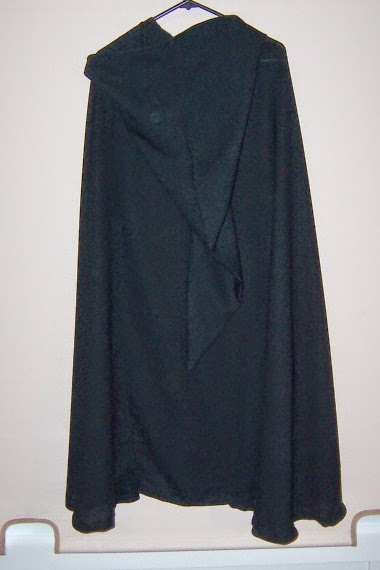
He’ll be wearing black leggings and black ‘boots’ both as a good guy and then as a bad guy. When he turns bad though he’ll wear a black tunic made from a black pin stripe shirt and a black cape.

And he’ll have the ‘bad magic crystal’. Of course.

Since the ‘bad magic crystal’ and the ‘good magic crystal’ are related they’re made in the same way using chandelier crystals, wire and beads, but whereas the good crystal is pink and silver, the bad crystal is black and silver.

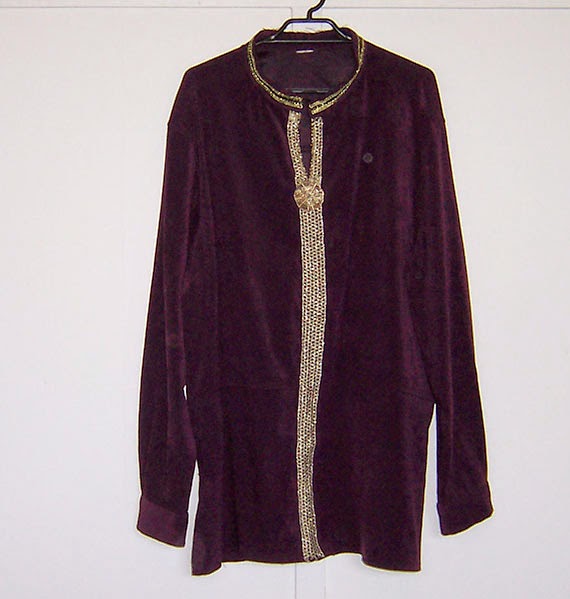
Then there’s Wallace. He starts out as a prince and wears a burgundy tunic trimmed with gold braid made from a velvet-look shirt.

With this he wears burgundy leggings and black and purple ‘boots’.

In case you’re wondering, the ‘boots’ I keep referring to in quotation marks are obviously not real boots. I’ve made these to be worn over the leggings and sit over the top of the shoes. The guys will wear black shoes and the boot tops should make it look like they’re wearing proper boots.

I made the first pair by cutting out fabric and folding it over at the top and adding velcro for attaching it.

Too hard. For me. I kept attaching things to the wrong side and having to unpick them…

Instead, I bought stretchy pants from the op shop clearance rack, cut the legs off around knee high, added tops to them and voila… boots!

Back to Wallace though. When he becomes king he’ll wear a shorter burgundy tunic (another velvet look shirt) and puffy pants.

Only they’re not puffy pants… its a puffy skirt I found at the op shop which makes perfect puffy pants!
King Wallace will also wear the crown and have the ‘good magic crystal’.

Lastly there’s the rabbit, Robert. When Robert is a human he’ll be wearing a white tunic, white pants and white shoes. He’s the cook’s son after all, a commoner, so nothing fancy for him.

I made the tunic out of an old flat sheet and added a bit of lace and a black shoe lace to tie it at the neck. There wasn’t enough width to the fabric using the simplest pattern, so I had to add extra bits to the sleeves.

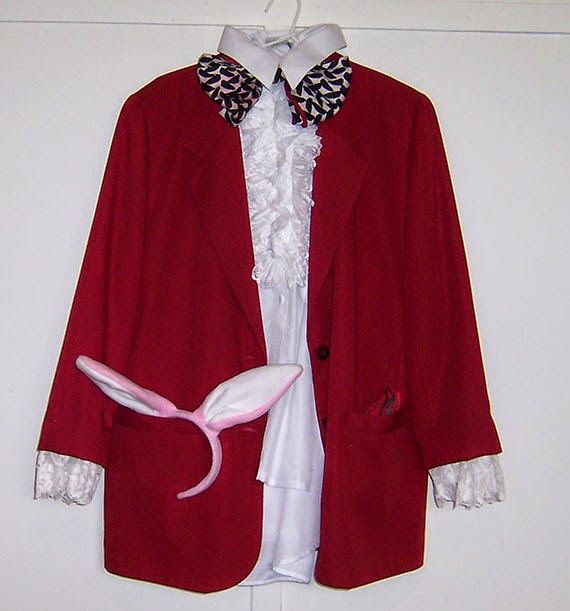
When Robert becomes The Wonder Rabbit he’ll be wearing the white pants and shoes, a frilly white shirt, a red jacket with lace at the sleeves, a large bow tie and rabbit ears.

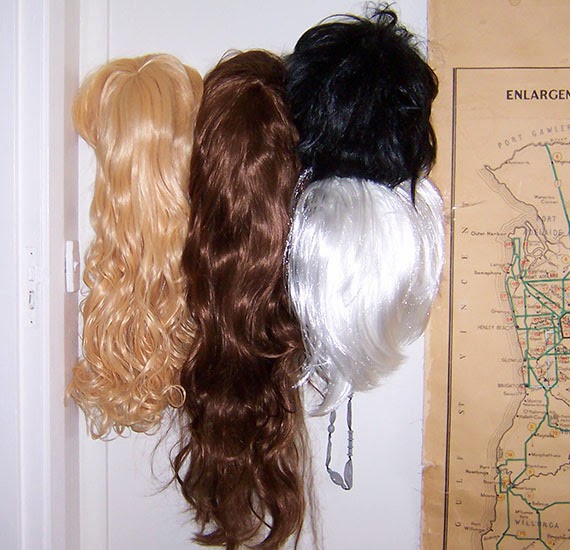
I have the wigs organised. Robert will be wearing the red wig. The short brown one will be shared by Prince Oscar and Prince Wallace as they’re not in any scenes together.
King George and Oscar, when he’s older, will be sharing the white wig. The blonde wig will be worn by Lucy and the long brown wig will be worn by Queen Mary. The short black wig will be the bad guy’s wig.
We have a couple more wigs which will be worn by Queen Sophie, the cook and the peasant.
I’d say we’re ready!
z

costumes, stepping up the hardness factor – part 3

When I first started this project I thought ‘easy, just alter and adjust clothing to create the look I want’.

Yeah. Right.

As I said before, shirts might sound like a good way to make tunics but they’re not. They have buttons down the front and pockets and the sleeves aren’t nearly wide enough for a full puffy effect. My first attempt at making a puffy sleeve shirt was to add slices of fabric to shirt sleeves.

This was the result:

First I removed the buttons and collar. Then I sewed the front shut and added braid to fancy it up. It wasn’t enough, so I added criss cross in silver thread. Better, but not great. I tried buttonholes for the laces.

Monumental fail.

Turns out I’ve completely forgotten how to do nice neat button holes. And you really need more than one layer of thin cotton to do them properly anyway.

That’s my story and I’m sticking with it.

I removed the cuffs and added elastic to the sleeves (the shirts are way too big for some of the guys I’m making costumes for).

Last, as I explained, I wanted puffier sleeves. So I cut out some long ‘slices’ of grey cotton fabric and inserted them into the sleeves. Two on each sleeve. They work okay.

Tried the shirt on the king and the shoulders are like, halfway down his arm. Sigh. I’m putting in a kind of capped look which I’ll fill with padding.

It’ll do.

Next came the dresses for the two queens and the mermaid-made human. Three dresses needed.

I’d found this design on Pinterest, sorry, no website attached to this one:

How perfect is that? So easy! Just a couple of cuts and viola, a dress!

I found a fabulous old doona cover at the tip shop which was perfect for the first dress and made it up using an average measurement of the two actors playing the roles (one is a girl, the other a guy). Basically, I made the dresses to fit me cause it ends up they’re more or less the same size as me in the bust area (though obviously distributed differently).

The dress turned out great though I did shorten the sleeves. The doona was the same on both sides so all I had to do was follow the pattern and cut out the shape. Easy.

I added a bit of black and gold braid at the neck and under the bust, then added a bit of lace to hide chest hair (cause this is the dress a guy will be wearing – a comedic touch as he’s so much taller than the small statured king).

However, one catch. That pointy armpit thing doesn’t work in real life.

So I amended the pattern. Later I found these patterns which are more or less what I did to fix my dress.

This pattern is great, however I didn’t need any waistlines… Which is good cause by making the dresses kind of square at bust and waist there’s no need for zips.

On to the next dress. This fabric was donated by a colleague. Another creative, collector of ‘things that will come in handy one day’. Its a beautiful blue shimmery satiny type fabric and there was enough to make the dress using the first pattern. With the rounded armpit of the second.

This time I added lace to the neckline, facing inwards in a medieval fashion. I then added a ribbon which is stitched in place at the back, then goes through loops at the side and ties up under the bust.

I also kept the sleeves open a la Guinevere’s gown above and sewed on a string of tiny pearls to decorate the sleeves. It looks amazing.

The sleeves are a little long, but turns out the actor can put her hands through the last gap in the sleeve and it looks fantastic. And intentional!

Happy accidents are my friend. I create in such a slap dash manner that I really rely on these windfalls!

For the evil character’s cloak I used a pattern I found on YouTube by a guy who makes his own medieval costumes the easy way. Pretty cool dude.

The basic pattern is the same folded over, half circle pattern as the capes I made before, but this time I had to do some patchwork to get enough fabric to create the length of cape needed… I didn’t have any single piece of fabric big enough. The only black fabric I had was a slippery type I have no name for, but it has some weight to it so it will swish well on film.

At the neck I put a simple black button, nothing flashy about this bad guy’s cloak. On the hood though, I went with a more evil/ku klux clan type of hood, long and pointy.

Disclaimer: All these photos have been taken in the office against my awful peach blind with indoor lighting. The pics aren’t the best but I had nowhere else to take them in better conditions. You’ll get to see the costumes on humans later.
I have an old 60s-70s Singer sewing machine my father bought me at a trash and treasure market about 25 years ago for $10, and I don’t own an overlocker. I either pink fabric edges or zig zag them. And I’m no seamstress. My grandmother (who was) would turn in her grave if she saw my butchered finishes.
z