saddle storage in the workshop

Sharing another project I did before the eye/cataract saga. Back when I could lift things and bend over without fear of detaching a retina…
Eh. Its only a temporary setback.
You may or may not remember that we’ve been storing the saddles and other tack in the workshop area of the casita. 
My workshop.
Where I keep my tools and do messy things with paint and sawdust.
Anyway, we can’t store them in the feed room for obvious reasons so its basically that or move them to another shed which is out of the way and we have to carry things when we want to use them……. though, with the amount of riding we do lately, would that be such a bad thing….?
Hm…
Must think about that…
Meanwhile, it doesn’t matter cause I’ve finally sorted out saddle storage in a way that takes up less space, is safe for us (ie no saddles falling on heads) and is safe for the saddles (ie no saddles falling on heads).
It was easy. Basically. It just took a long time to do from inception to completion. And I used only things I had on hand.
I have a fence in the middle of the workshop area of the casita. It was there cause the shed was being used as a shearing shed when we bought here. When we cleaned the place up and put in a new floor, we didn’t worry about removing the entire fence. Its been handy for tossing horse rugs and even hanging saddles off.
The problem of putting saddles over the fence, however, was that they took up space on both sides of the fence, thus limiting what I could do on the other side. So what I did was basically make a kind of saddle ‘tree’ to hang them off, thus limiting the spread…
I began by attaching a long piece of hardwood to the fence in several places and up onto an exposed beam in the ceiling so it was secure. This became the ‘trunk’. I then made three triangles out of timber and attached them to the trunk, each one a ‘branch’ for one saddle. The bottom branch holds Wayne’s western saddle (very heavy) so that got an upright support as well.
To finish it off, I used an old piece of pipe I had, cut to length, to create a rounded rest for the protection of the saddle upholstery. Mind you, I also put saddle blankets over the pipe and over the saddles for added protection.

The other side – minus saddles hanging over, taking up space. I’m can now push cabinets and other things up against the fence and have more room to work.

While sprucing the place up, I even sprayed the side of this old locker gold for a bit of class…

Looking good, in a messy/creative/working kind of way.

Of course, there’s always more to do. But the saddles have a home now, so cross that one off the list.

z

what to do with the foundry cogs

When I saw these little beauties I just knew I had to have them.
No idea what I’d do with them.
I just knew I wanted them.
They’re cute.
“I have no idea what this is, but I love the shape” has lead to a whole lot of interesting acquisitions!
Anyway, I was thinking about what I could do with them and went into the workshop to have a little look…

What do you think? Aren’t these the bestest jewellery holders you’ve ever seen?

These are the two smallest of the cogs. The bottom bits are lamp bases which I’ve had for a while (cause I knew I’d need them for something special one day!) They’re not attached yet as I was just trying them out. When I do finish them I’ll need to put small nails on the ends of each tooth to hold the chains on effectively.

The tops make great spots for earrings or bracelets. In fact, I’m thinking I’d need to keep both cause they’re just perfect for different items… longer chains, shorter chains…

The largest cog is currently trying out this tall base I have… I’m not really sure what this is from and its not perfect. If I decide to go this way I’ll paint it white cause I love the black and white look…

The biggest cog has way more space on top for smaller items of jewellery too.

So, what do you think? I have to go ahead with this, right? I mean, they’re perfect!

I was thinking of wall art, maybe, but without any real plan… can you think of anything better?

Go on. I challenge you… Tell me if there’s anything you can think I could use the cogs for and I’ll consider all ideas. Otherwise I’m making these permanent! 🙂
z
Shared at:

a measuring cup pencil holder, a wire shelf and a shutter shelf


A little more cleaning up…

Its not finished yet. There is still another 3/4 of the workshop to finish, but I made a start last night.

Before:

After:

Of course, I would have gotten more done if I didn’t get distracted. The way I seem to work is: stare at the mess, dither about where to start, pick up something, put it down, move it over to another surface, look for a container to put it in, think a shelf would look nice there, look for things to make a shelf out of, necessitating moving more things over just a bit to make space, find a measuring cup I got at a tip shop and decide it would make a great pencil holder, find wire to make that, then start cutting wood to make brackets cause nothing I have will work, then make a shelf out of a broken wire basket cause I always planned to do it but never got around to it, and now I have and its good to finally do it, but oops, there’s still a huge pile of stuff to put away so I pick up things and put them in their place, realise there are now too many things so create new places for things and labelling them so I can find them again… and suddenly its 9pm and I’m blowing black stuff out of my nose.

But my new toolbox is now full of tools…

and that wall is looking like a working workshop instead of a jumble sale.

The drawers are only there temporarily… till I find my electric plane. Then they’ll go back into the tv unit/divider.

You may notice a few other things in the picture above… the stencils given to me by a good friend cause she knows I’ll love them and cherish them and call them my very own. My new measuring cup pencil holder (that dark little triangle lost in the gloom), my new wire shelf and, last but not least, the new recycled shutter (louvre door to be exact) shelf.

The one I always planned to put up but didn’t have the necessary bits or the patience to buy them. What the heck, right? Make do is the name of the game!

Don’t try this at home.

Hey. It works. Don’t judge me cause I’m imaginative!

Meanwhile let me share my gorgeous new pencil holder. Its a measuring cup I found at the tip shop last weekend. I’ve never seen one like it before.

Please ignore the hole in the wall. I didn’t do that. The wall came pre-punched.

Do you wanna see the wire shelf?
I’ve had this wire basket for quite a while and the wire on the corners has come undone and its not in the best condition. I always thought it’d make a good shelf.

So, while in the middle of cleaning and organising my workshop, I naturally had to stop and make this little fella.

Firstly I had to wire the corners to stop the wire bits from sticking out and causing bad things to happen.

Then I trimmed some offcuts of plywood as the shelves. The bottom shelf just sits in place but the one in the middle is wired in place. I drilled holes to feed wire through and hold the shelf in place.

I attached it to the wall with those plaster wall plugs… which of course weren’t the right size for the job. Oh, they’ll take the weight ok, but the screws weren’t long enough to clamp the wire back in place properly.
Thats ok.
As long as its pretty!
z

eat more fish!

My brother is in the fish business.
In fact, most of our family is in the fish business. I’m sure it had nothing to do with the fact that my grandfather was a fisherman or that we’re greek and sea water runs through our veins, or anything like that. 
Its pure coincidence.
However, fish is what our family does. I can’t tell you how many years I spent my holidays working in the family fish processing plant – packing fish, pulling apart squid, stinking of fish…
My brother has a fish shop and seafood distribution business in the ACT, my cousins work in fish or, if they don’t work in fish all the time, they fill in when they’re needed just to keep the tradition going.
We’re a pretty smelly bunch.
But I digress.
I wanted to share with you this little present I made for my brother’s shop. 

Get it?

Its a lamb… and its saying we should eat more fish.

Ok, yeah. You get it.

Pretty appropriate with Australia Day coming up, when everyone needs to eat lamb or be labelled un-australian!

I actually had the little sheep. I made him a long time ago and had him sitting on a shelf in the living room.

And the idea isn’t mine. I have to confess I saw it somewhere and thought I’d use it… I mean, hey! I had the sheep, I have a brother in the fish business… can you blame me?

All I had to do was make a sign, a post and twist one of the little sheep’s legs to hold it.

Done.

Cute, topical and relevant.
A thoughtful gift if you ask me!
z

the divider – stage 1 & 2 finished

Remember the 
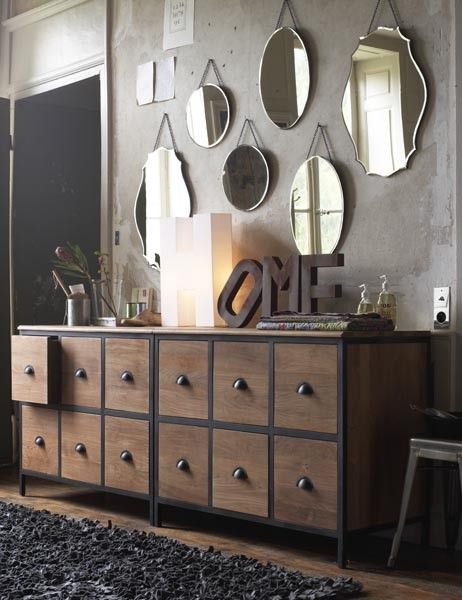
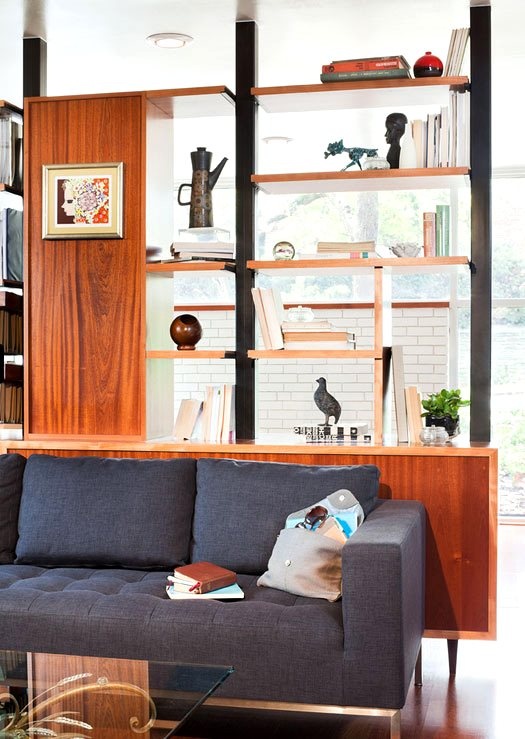
room divider post a little while back? I was using these two images below as my inspiration and starting point:

I had a CD cabinet similar to the one above, though much smaller… and I have metal poles in my living room like below (only uglier)…

My thought was that since it was too much work (and expense) to remove the poles, I’d embrace them and make myself a room divider which included them in a kind of farmhouse industrial style.
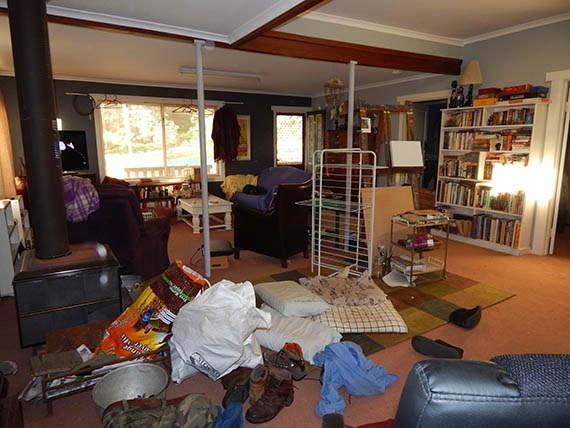
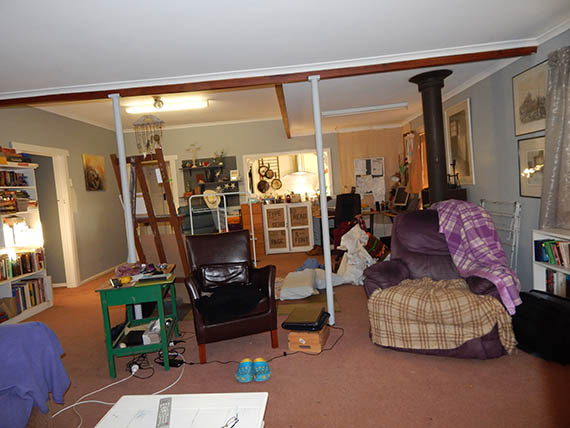
Now prepare your eyeballs for something really, really horrible… the view of our living room in mid-chaos a couple of years back. Not sure what I was up to then, but somewhere in between I decided to take these photos…
From the kitchen side:

From the front door side:

Beautiful poles, dividing the room in half, totally limiting what you can do with it, making it hard to decorate, ugly… what can I say? Not to mention the three different ceiling heights in our living room as different rooms were opened up or added to create the big living room (before our time).

Below you can see the CD cabinet, in amongst all the crap bits of odd furniture we were using as part of Wayne’s office in the living room.

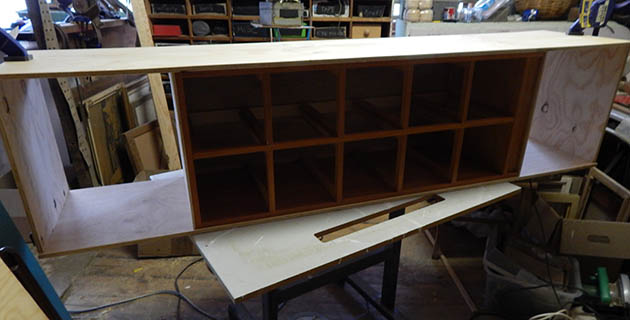
I started with the CD cabinet as my base. I’m not good at making furniture from scatch (how do I know? I’ve never tried it, but given my problems with measuring I’d say it was a fair bet!

… I found that the drawers were square and would fit in it either upright or on its side. I considered recycled timber but I decided to go with plywood. You can get it in large sheets so I wouldn’t have to join a million pieces. I used 12mm construction ply. Plenty strong enough for what I needed. I gave the guys at the hardware store the measurements I needed and they cut it for me using their wizbang saw.

I built a box around the cabinet with open shelves on either side to extend the cabinet to totally fill the space between the poles. I actually measured that really well. Its a really tight fit but it fits!

We won’t be moving this in a hurry…

I had planned to use some 60’s legs on it, but they were too spindly. This sucker is heavy. In the end I found some chunky round metal legs at Bunnings which were almost a perfect match for the poles (I got the slightly taller ones than the ones pictured. I bought 6 of them to make sure there’d be no sag, not that I expected any, but to appease Wayne who was concerned about the weight on just four legs.

I painted the poles satin black to match the legs and it looks like the poles were part of the design.

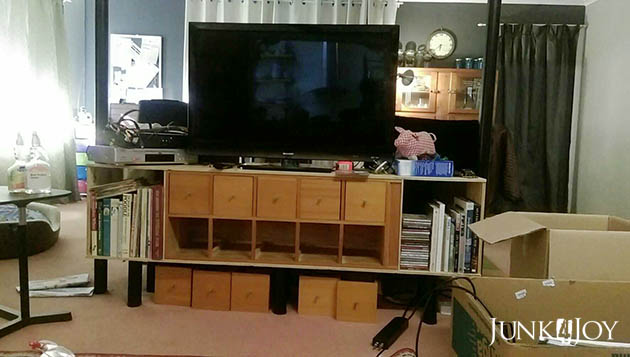
I build the unit/divider in two stages. First I made the base box around the CD cabinet, put legs on it, moved it in and gave it three coats of polyurethane.
I put the TV on it so we could use it while I built the top section to hold the PVR, DVD player, etc.

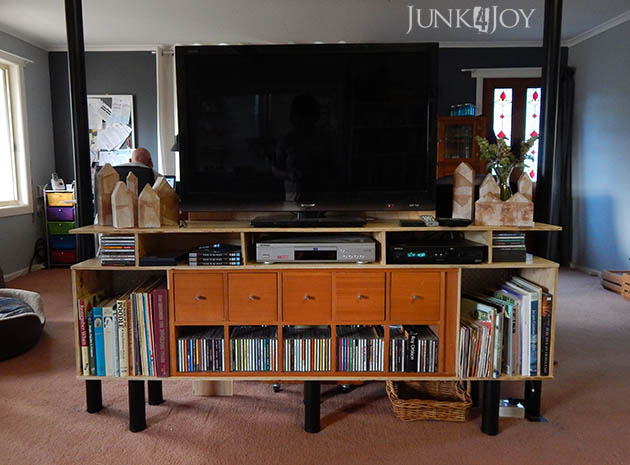
I made the top shelf as a separate box with dividers and back, but no bottom. I measured the PVR and DVD player and built cubbies to fit them, leaving one middle one free and two end ones open. Once that was finished I brought it in and just put it on top of the base. It wasn’t connected to anything at that stage.

Of course, you always need a back on a TV unit so the TV doesn’t go flying. Especially when you have a poodle like Romeo who not only watches TV, but likes to protect us from all the scary animals living in it!

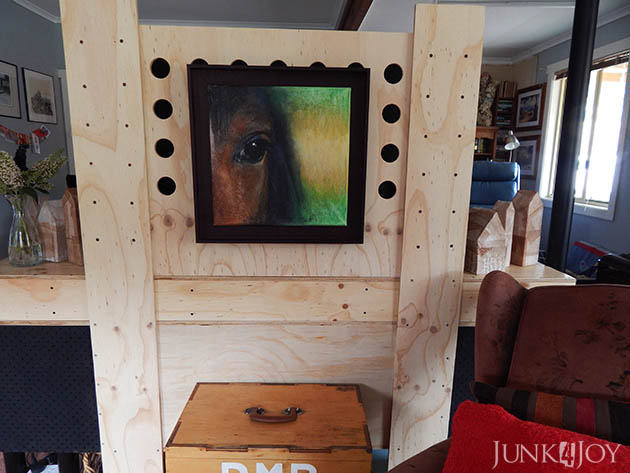
I built the back out of ply offcuts. The two uprights go all the way to the ground for more stability and the top section (with air holes) sits on top of the upper shelf. I attached this to the base at the back with screws. I used mostly black screws for this job as I wanted the contrast between light ply and black metal. When I ran out of black screws I used regular ones (way cheaper) and just coloured their tops in using a permanent marker.

Now the back side of the unit is a small sitting area and you don’t have to look at the back of the TV.

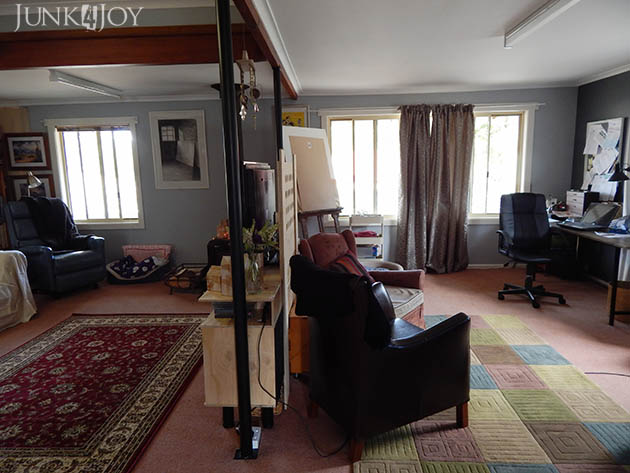
This is what it looks like from the side. The living room area is now closest to the kitchen and you can watch TV from the kitchen through the opening, the office area is now on the far side of the living room and much less visible when its a mess!
At the last minute I decided to put backs on the side shelves of the bottom unit to hide the electric cables. Since the power points are on the wall, there was no power in the middle of the room.  I had to get the electrician to come put a power point in the floor just next to the pole, you can see it in the photo above. 
Stupid me – forgot to ask him to bring the antenna cable up too… sigh. Now I’ll have to do it myself or find a willing sucker friend to do it for me.

I used leftover bits of peg board from my linen cupboard makeover for that. I put the white sides to the front and the brown to the back but sprayed them gloss black – they look mat cause its a rough surface and they kind look like the stuff old speakers were made of.
I had my painting of Dancer framed and have hung it on the back side of the unit to give it a cosier feel. My first aid box sewing basket acts as a side table.
The divider/unit isn’t finished. There will be either one or two shelves above it taking it up to the beam, and the back bit needs to be polyurethaned. I just ran out of time before Christmas. I can easily polyurethane it a couple of evenings after work.
So what were the boo-boos in this project:
Well, of course there was the failure to bring the antenna cable over so now it has to sit under a rug and its visible.
There was the original plan to use galvanised iron for both the legs and between the shelves – I don’t know how all those bloggers in the USA build gorgeous shelving units out of that stuff… here its SO expensive! I paid over $60 for 6 legs and it would have cost MORE if I went with galvanised pipe!
The dividers between the PVR and DVD players aren’t totally straight… it was hard to attach them so it was a bit of a hit and miss process.
And best of all, with all the movement and weight, the bottom drawers of the CD cabinet no longer fit in their place! I’ll have to plane them off a bit. So till I do that I have the CDs just sitting in there like its a bookcase. 
Eh. 
It works.
And I love it!
z
Shared at:

tea bag village – a recycled work project

How do you decorate your home for Christmas? I like to do things a little differently. Not the usual kind of stuff in other words. Well… except for candy canes. I love them cause I eat them when they’ve done their decorative dash. This year I used them to bulk up my pitiful collection of Christmas cards. I love email but I mourn the loss of cards at this time of the year. (I never send them myself either!)

You’ve already seen my Christmas tree this year…

So it’ll come as no surprise that I used a recycled tea bag and papier mache project as part of my Christmas decor.

This is a project I worked on at work with one of our participants. I made up little houses out of milk cartons and other small cardboard boxes and he papier mached them in plain white paper.

Once the white paper had dried we covered them with tea bags! I’ve been collecting tea bags for a long time and for this project I soaked them, split them and thew out the tea leaves, then dried them flat. The colours are just amazing.

I did try writing on them but didn’t like it. They’re all plain tea bags now.

Below you can see I used them on each side of the new TV unit and on top of the wood heater.

On the wood heater I wound some fairy lights around them and light them up in the evenings. They look beautiful.

They’ll be going back to work after Christmas to be exhibited next time we have an art show. I just needed to get some nice photos of them and hey, while they were here… I might as well put them to use!

z

propeller (fan) light fitting

Time just flies, doesn’t it?

Every day I think about posting on here but something comes up. I think “I’ll do it later, tonight”. Then tonight comes and I’m wiped out and it takes all my energy to change TV channels.

So, given its been two weeks or so since I last posted, I thought I’d better share this project. I finished this weeks ago and just never got around to posting about it.

Not only has it taken me a long time to share this project, its also been a few years in the making. I bought this propeller for Wayne for Christmas ages ago, with the aim of making it into a light. Its been gathering dust in the casita up until a couple of months ago.

I’ve put it in the enclosed part of the porch where I used to have the fry basket light fitting before. I like this one better and it was time for a change anyway.

Please ignore all the electrical cords. We don’t have enough power points and I’ve got extension cords everywhere for the time being.
I’d originally thought I’d put this light over Wayne’s desk, making his office area more industrial… but the living room ceiling isn’t high enough for a large pendant light. I could just see him knocking himself senseless every time he stood up at his desk.
Not to mention this is one heavy sucker. I doubt I could find a beam in the right spot to hang it from in the living room. On the porch I can see the beams! 

When I first got the propeller I had a friend weld a chain to it for hanging. I already had the bits to make the light part so it was just a matter of joining things together and adding a globe. I chose an LED edison bulb for bigger shine. There’s already a light fixture nearby so I put a bayonet end on the cord to plug into the socket.

Funny how the house looks yellow in the photo… I hate pale yellow houses and picked this grey/brown tone to change the look of the house.

I’m loving the new light. It makes me smile every time I walk through the door.

z

Featured at:

Shared at:

zip junk necklace


Have you ever looked at junk or steampunk jewelry and thought “I want to make one of those”?

I do every time I see them on Pinterest, so I decided it was time to try making one of my own… my own way.

It was so much fun! I’ve always had tons of junk (obviously!) so I had a lot of things to choose from.

I started with an old zip as the base. Then I began building on it using old bits of jewelry, buttons, beads, a tiny spanner, rusty safety pin, bits of chain… even a rusted through bottle top… all kinds of things.

(I really am a magpie!)

Its not just a necklace, its a piece of art! I had it entered in the Salvaged Art Competition last month but before that I had it hanging on the wall and it looked great.

z

another thing you can make with old shutters

This is a project I finished last weekend but which I couldn’t photograph till this yesterday. It was still gloomy and overcast but better than trying to photograph it in the dark after work.

So, here it is! Our new ‘gas bottle and bin hiding’ box!

This is what you’d see as you came to the front of our house – my little window shelf with the pretty succulents and a small cement slab holding gas bottles and stuff to go to the rubbish bin. Not particularly attractive. Which is why I never have any photos that show it.

I always planned to make some kind of cupboard to hide them. I had these old shutters (louvre doors really) which I’d bought at an op shop a few years ago. I’d used them to make a screen to cover the hot water cylinder when it was on the front porch. When we moved the hot water cylinder to the side of the house we no longer needed the screen.

But I never throw anything away if I can help it. Things have more than one lifetime around here.

The shutters were too big for the new gas bottle box so I had to cut them down. I had two narrow ones and two wide ones so I worked out which would work best – the narrow ones on the sides, the wider ones in front as doors. 
They were already painted the same colour as the house so they were perfect. I cut them down to the right height and joined them at the corners using hinges. I used small brackets to attach the sides to the wall and keep it all in place.  
The lid is hinged above the box so that it slopes. This is for two reasons. Firstly I just thought it looked nice. Secondly I don’t want this to become another flat surface for things to accumulate.
Now all we need to do is lift the lid, use the hook to keep it open, then swing the doors open to access the gas bottles. 
There’s a small bin in there for empty bottles and I put the kitchen rubbish on top of it every night cause I hate stinky rubbish in the house. In the morning we take it down to the bin on our way to work. Having the rubbish inside the box means less temptation for the dogs to go excavating for goodies. 
Not that they would.
My dogs are well behaved.
But in case a possum comes visiting. You know.

Of course, nothing ever comes together easily. The leftover bit of door I planned to use for the lid wasn’t long enough. The solution was obvious: I found an old bit of timber to extend it to the right length. 
I even added some initials.

Did I ever show you the gorgeous little watering spout I got at a garage sale?

So here it is. Our new gas bottle box.

Ok, one thing finished and crossed off the list.

Another 5 million to go.

z

Shared at:

scarf organisation

Everything in our home is multipurpose. I mean, it can (and often has) been used previously in many places and for many different uses.
Take this little pig with her piglets. She once lived in the kitchen to hold keys. The old enamel house number is from Wayne’s childhood home, it also lived in the kitchen at one stage.

Now, they’re together again as part of my new scarf hanger.

This was a quick and easy project that took me weeks to photograph and share. Between us, we have a zillion coats, jackets, beanies, hats and scarves. I made a whole lot of coat racks to hold the hats and coats, I put up an antique coat rack which I got from my grandmother’s house in Greece for our scarves and beanies… but I wanted to keep my prettier scarves separate from the practical warm ones.

I looked around at what I had and found this chippy bit of timber lining. All I did to this was wash it and scrape off the loose bits of paint.

I found a thin leather belt I’d collected from a tip shop, and a small bit of leather which was probably some kind of collar, maybe… also from a tip shop. I cut these to the right length to make loops to hold scarves. Mainly cause I didn’t have anything I liked to act as hooks for this project.

I left the buckles on a couple of the leather straps just for something different.

I added the pig for other odds and ends and added the number just because.

Its the first thing you see when you walk into the mudroom, hanging between the door to the house and the door to the toilet. Below it, on a small cabinet, is a rustic box Wayne revived, now holding gloves. That box used to be my ‘in house’ toolbox in a previous life.

So there you go. A little something new for the house to make life a little more organised.
I hope.
z
Shared at: