dog bandanas – something fun

Just wanted to share a quickie tonight. A quickie project I mean. Mainly cause I really enjoyed making these little dog bandanas out of scraps of fabric.

The idea of these is that they can be put on a collar, taken off and washed then put back on. They’re colourful and fun. I got the idea from a little bandana a friend gave me and I thought I could put some of my millions of fabrick offcuts to use to make something different and special for the dogs I groom.

I didn’t use any large pieces of fabric to make these, just small squares. First I joined two pieces together, then folded, ironed, and stitched the sides for neatness. Lastly I folded over and ironed to create a sleeve to put the collar through. Then ironed again. Easy peasy. If you don’t mind all the ironing.

If I can do it, trust me. Its easy.

Ok, so you noticed the crooked stitching on the dog paw bandana. Yes… it was my first try… Not an excuse, I basically lost control of the sewing machine. It happens. (To me, it happens too often…)

No two-tone effect for that first one either, justvery crooked stitching. That’s what makes it special… hehehe

I used black thread for all of these – there was no way I was going to change the thread and bobbin colour to match each one. Too fiddly and too much work for a fun little project. I put these little bandanas on grooming customer dogs cause it makes me happy to make them look good.

I want to make more. I have tons more fabric offcuts to mix and match. I just need to find the office desk. I know its in the office somewhere… under 3 metres of fabric…

z

one chair-back, three ways

What do you do with a broken chair? Fix it or throw it away, right? Or… you can re-use it as something else. For instance, you can make it into a shelf, a photo display or a coat rack. I know. Just look at Pinterest. There’s tons of ideas there. 
I couldn’t make up my mind what I wanted mine to be, but I found the bits to make it into an adaptable chair-back – it’ll adapt to any situation you put it in! Just pick a room and it’ll fit in with what you need it to do. Or be.
The best bit, I think, is the antique curtain rod holders I found. I’ve had these rusted and bent things for a few years, just waiting for the perfect project to use them on. They’re just so cute with their little flower topped screws for holding in the curtain rod.
I got a couple of bulldog clips – with the requisite amount of rust on them – and added those to the back to hold things… 
So, here are some options: 
1.  Kitchen utensil hanger. It can hold handy kitchen tools and recipes.

2. Garden tool hanger. The bulldog clips are a handy place for seed packets and gardening gloves.

3. Hand towel holder. The clips can hold shopping lists or notes.

I also tried the variation of a tea towel on the rod… it works, but the I think it works best as a hand towel roll holder. Hand rolls really struggle to look good in a kitchen and this kind of dresses it up in my opinion.

So where will it live? I’m not sure. I have to think about it. All three ideas work.
Till then it waits to find its home…
z

Featured at:

Shared at:

electric heater mantle clock?

Some time ago I picked up this old electric heater. I can’t remember where, but I do remember why. It was the shape. I loved the shape of it. I saw it and thought “hey, I can make something out of this”.
I brought it home and snuck it past Wayne so I didn’t have to listen to a lecture about bringing home more junk.
Then I proceeded to bury it under a ton of crap in my shed. Not in order to hide it.

So, when I started my whole ‘clean out the shed, get organised, streamline my life, find the circular saw’ kick, I found this little beauty and briefly considered tossing it out.

Briefly. Very briefly.

I just couldn’t do it. Sometimes a vision is worth pursuing.

I was seeing it as a lamp. Or a clock.

A clock doesn’t need wiring so that won out. I bought a clock mechanism on ebay and proceeded to rip the guts out of the heater. Actually, I didn’t rip it all out. I loved the coiled springs so I kept those, just took out all the wiring.

I had to drill a hole in the front mesh to fit in the clock, then put it all back together.

Then promptly pulled it all apart again… The clock mechanism I got came with simple black hands which just didn’t work. Too dark.

I took it apart and sprayed the hands with Antique White USA gloss. Much better.

I put it all back together. Admired it a while. Then daylight savings ended. Now I avoid looking at it cause I have to take it apart again to change the time.

I really like it. Its a mantle clock with a difference. I mean, how many people have a retro heater which is now a clock?
And its not that hard to open up… I just have to get out the screwdriver and take out 4 small screws. How hard is that? Not hard at all.
…When I find the screwdriver. I know its on the bench. Somewhere…
z
Shared at:

more on that embarassing desk makeover

Once upon a time I decided to make a new/bigger desk for Wayne – who’s office is in the living room. I had been through two desks up till that point (three if you count the original desk in the office he never used!) and Wayne was sort of over it.

Anyway, the desk I decided to remake was one he’d had in the garage since we moved here – a big, heavy solid piece with a ruined top due to it being used to hold chainsaws. The thing with these old desks is that you have to have the legs of a Monster High doll to fit into it without banging your knees at each turn. So, I decided that since I had to replace the top, I may as well separate it into two drawer units and put an old door across as a top… cause don’t old doors make the best tops? They’re huge and the ones I had were gorgeous.

This is the first attempt at the desk… ugh. In a nutshell, it started like this…

Step one: paint it white. With chalk paint. Obviously!
Put castors on it, stencil on it, top it with a shed door. Obviously.
It didn’t look right. So repaint it. Just the drawer fronts. Chalk paint. Dark grey.

Okay… not quite right… Still wrong somehow.

Wait till Wayne’s away for a few days and sand it back, then lacquer it in gloss… hm. I like it better.

I may have left a bit too much paint on the drawers, you can see the grey, the white and even some of the stencils… I like it. Its so me.
Yes, its not my desk… I know that. But its in my living room. I have to look at it all day, so I wanted something I didn’t dislike. This blends in much better with the room divider I created so I’m happier.
Won’t Wayne be happy when he comes home and finds I’ve changed something again? 
hehehe.
He hates it. In fact, every time he’s going to be away for more than a day his last words to me as he waves goodbye are: “Don’t knock down any walls.”
He didn’t say I couldn’t rip up floors though… hmmm…
z
Shared at:

cluttered easter sideboard

I don’t usually do special things for Easter. In fact, I barely do special things for Christmas… I mean, who remembers the chalkboard Christmas tree when I was too lazy to make a real one? Or the book stack tree? Even when I did make an effort, it was minimal.

Well, this Easter, inspired by the anti-bunnies I’ve been making for my Etsy shop, and finding a rusty rubbish bin in my stash, I’ve gone all out.

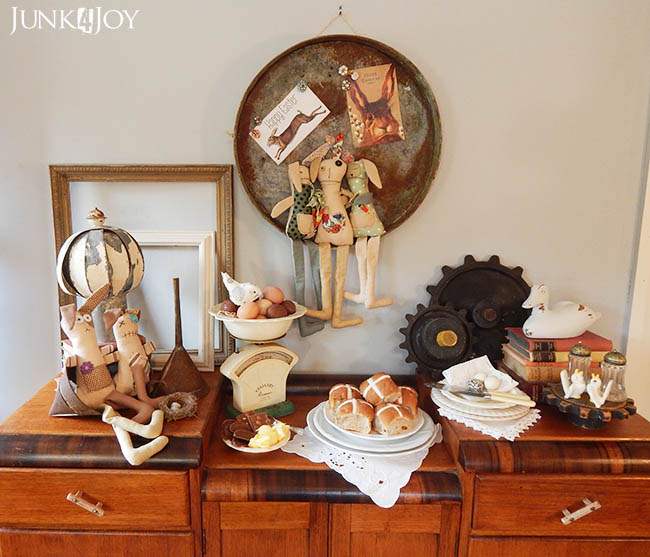
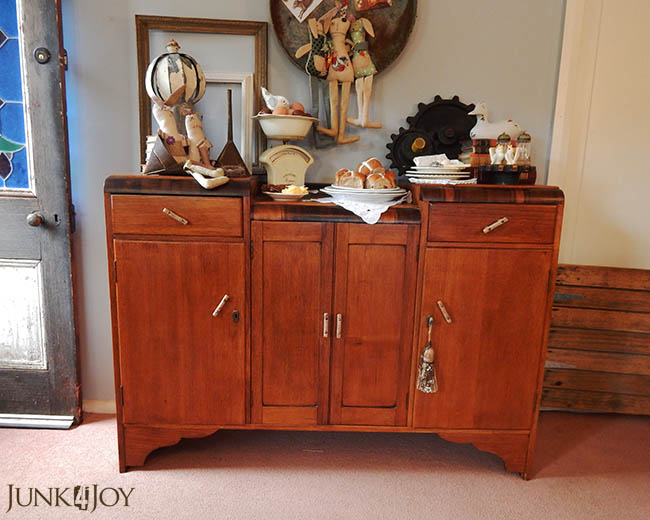
Working on the theory of more is more, and the design principle of clutter is good, I’ve decorated our sideboard with a mix of vintage, rusty, junk and food.

I like it.

Of course, unless the hot cross buns get eaten soon they’ll have to be covered, ditto the chocolate, but hey, for one day it looks great. When the food is gone I’ll just add a few other things to maintain the cluttered look.

Its not like I don’t have a lot of junk.

So, what’s taking up space on my sideboard today?

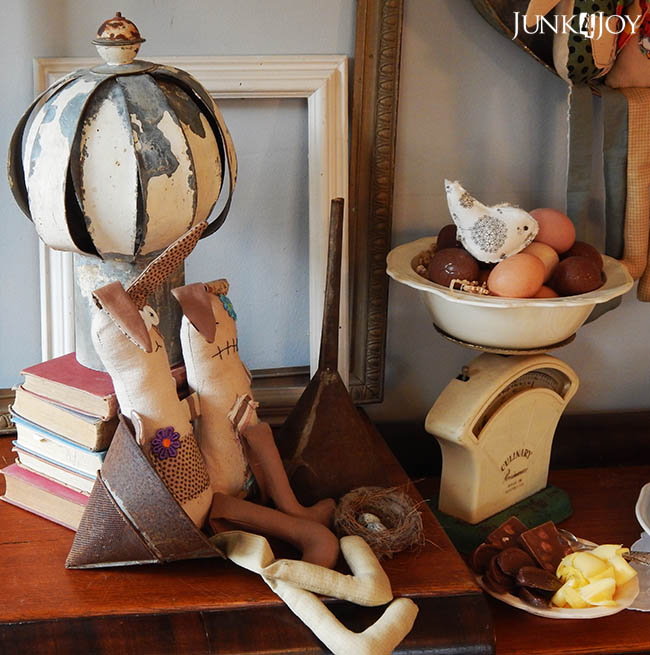
Starting on the left, a couple of empty frames I’ve moved from one house to another and never got around to filling ‘frame’ (hahah) an antique vent I found at a tip shop. Just had to have it. I mean, could you resist that shape? Sure, its not exactly your average sideboard decor…

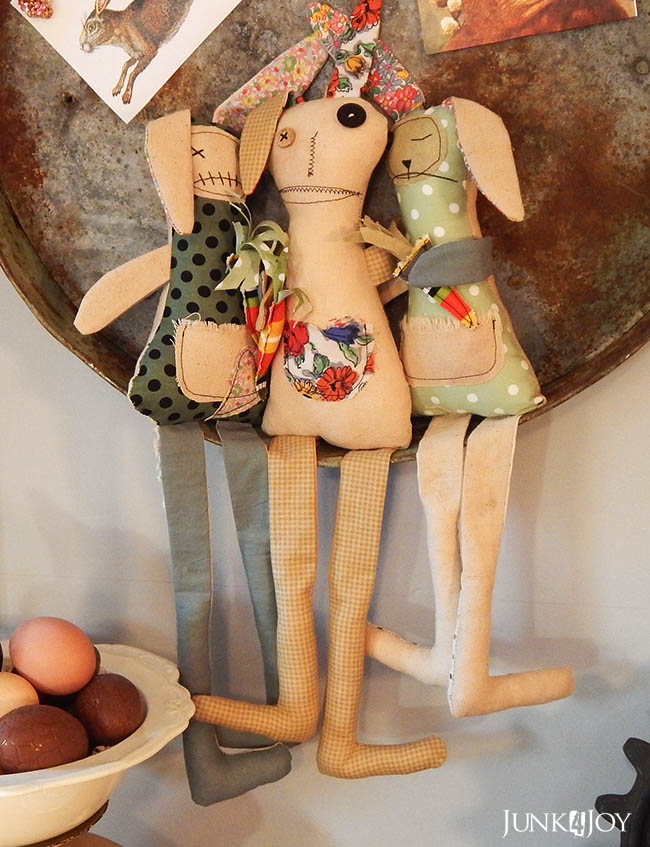
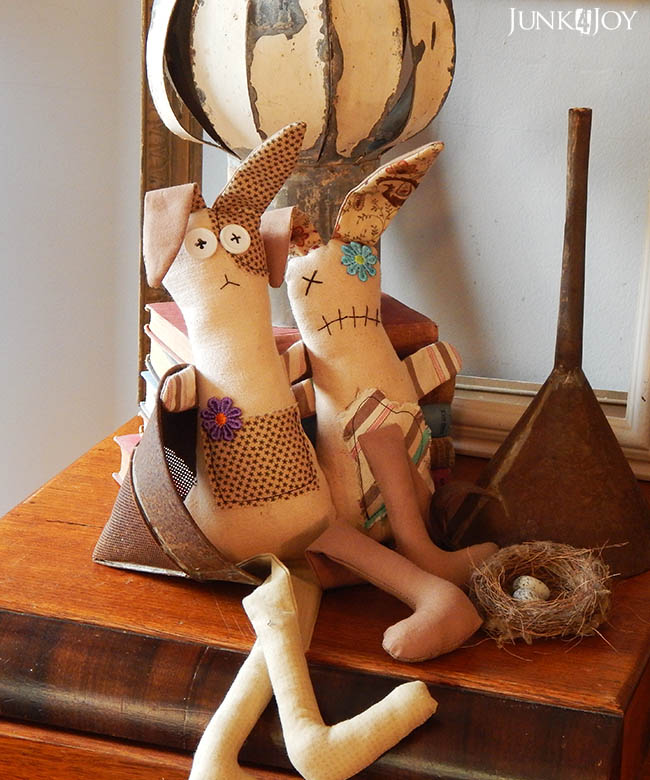
A couple of funnels add the necessary (in my life) rust factor. And a couple of anti-bunnies sit back and enjoy the view.

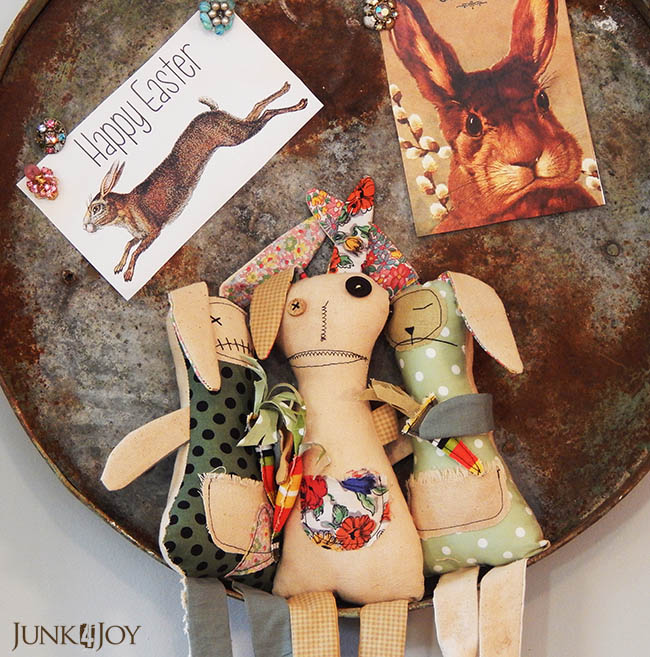
What are anti-bunnies you might ask? Well, they’re scrappy monster bunnies, kind of the opposite of cute Easter bunnies. Not that they aren’t cute. These guys are cute as. They’re made of a mix of recycled and vintage fabrics. I recycled bits of fabric out of an antique armchair the poodles pulled apart. Turns out it was stuffed with fabric scraps. Who knew.

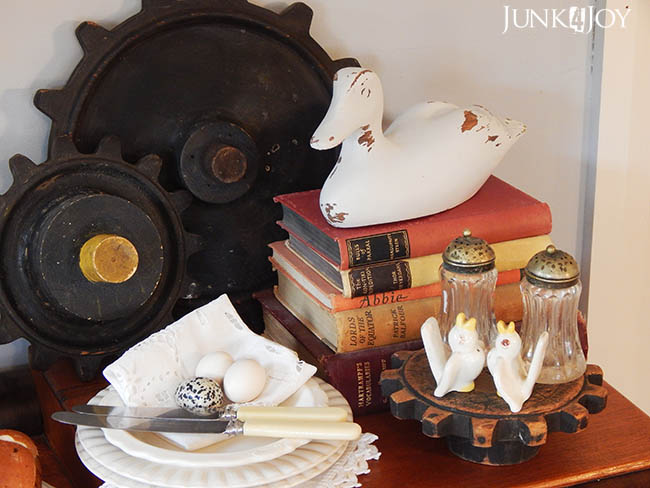
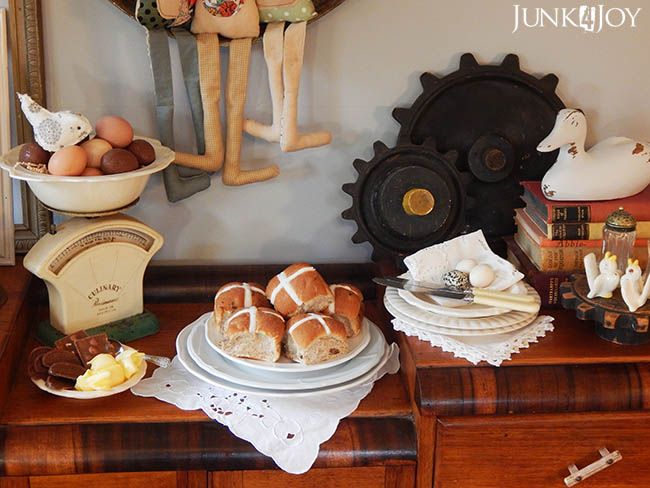
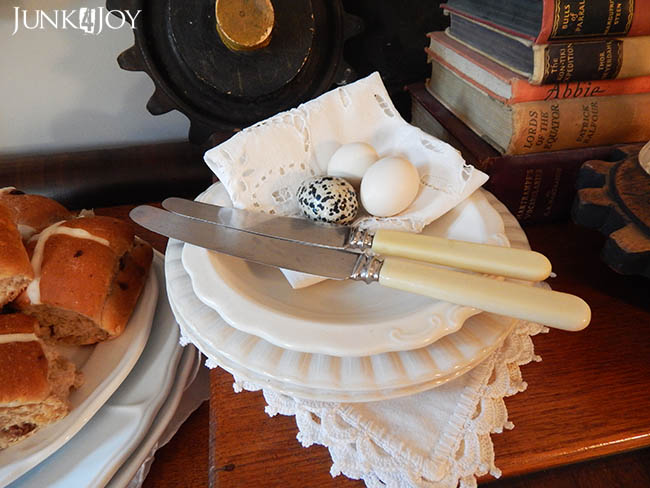
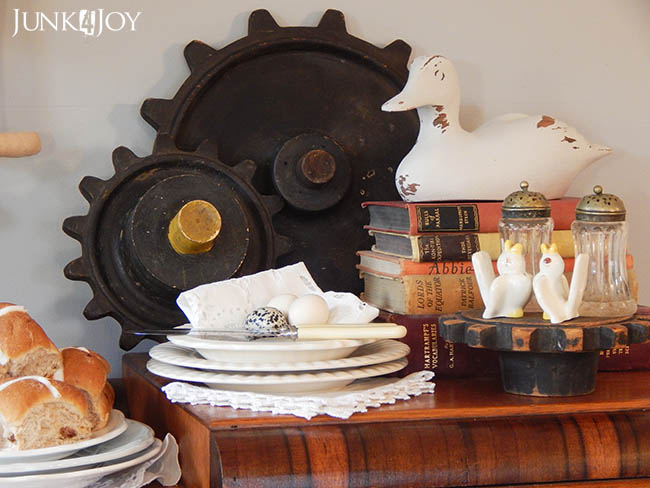
The middle section is the serious section – ie the food section. Since I sold all my cake stands and haven’t made any more (yet) I’ve had to improvise using one of my retro kitchen scales and an antique serving dish. The dish holds eggs of both kinds: real and chocolate. I bet you know which I’ll be going for…

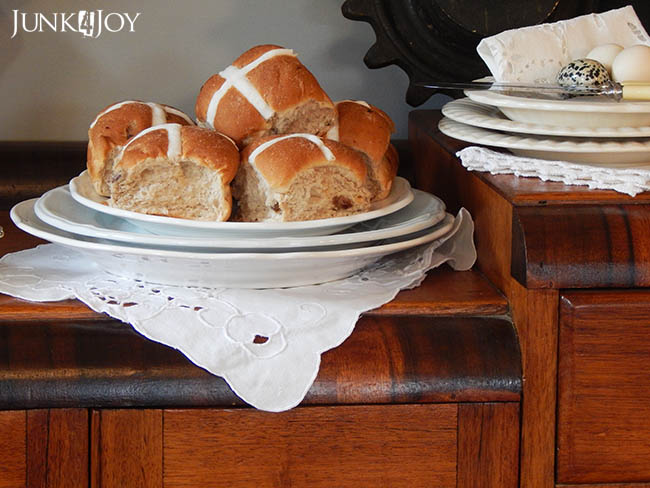
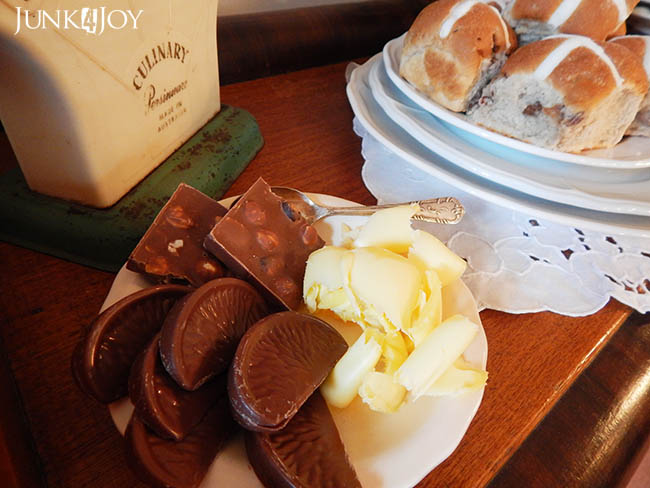
You can’t have Easter without hot cross buns, and naturally you need butter for those. I don’t have a butter curler so I’ve had to make do. The napkins are vintage ones I’ve collected over the years from different places. One on the right under the side dishes was given to me by my aunt Marissa in Greece – it used to belong to my grandmother.

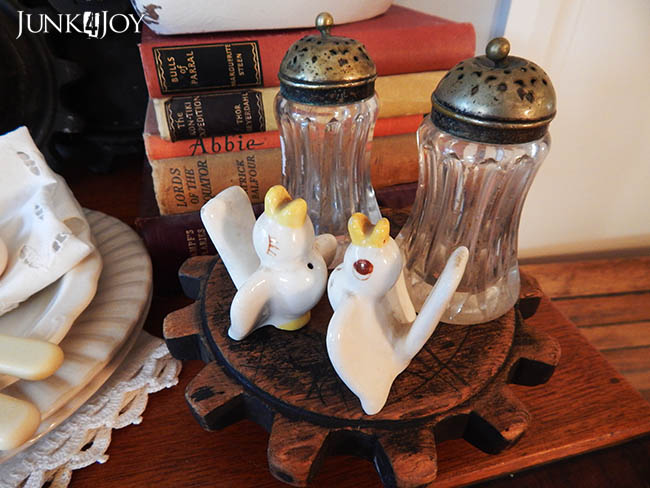
On the right its ‘help yourself’ with a stack of smaller plates and knives. But it can’t be too practical… Old timber cogs, old books and a couple of sets of salt and pepper shakers, topped off by a wooden duck finish the look… Cause what sideboard is complete without a duck?

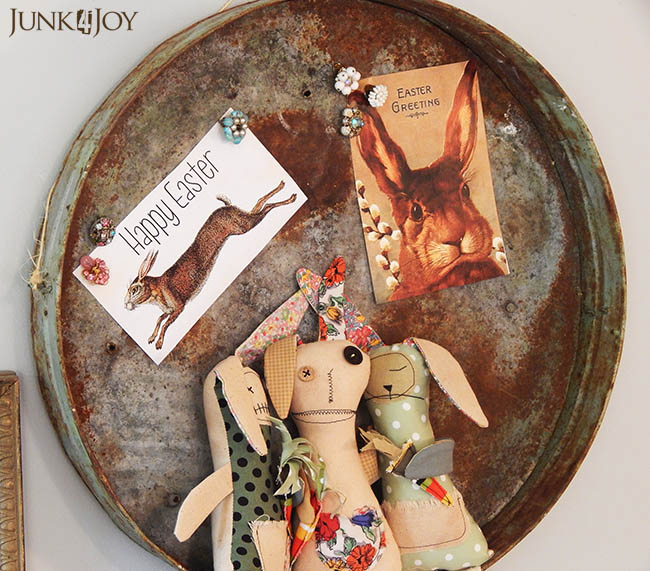
Above it all hangs the masterpiece. A rusty galvanised bin lid I scrounged from somewhere years ago. Does anyone remember my previous bin lid projects? I love rusty bin lids. This one holds more anti-bunnies and a couple of vintage Easter greeting cards I found online. The cards are held in place by vintage earring magnets (also for sale in my Etsy shop).

This rusty lid has little hooks on the side so I tied a bit of hemp rope to hang it with. I placed a few of those floor protector felt pads on the back to stop it from marking the wall.

The sideboard itself is something I acquired via barter. Barter = good. A friend of mine had a sideboard I’d admired and he admired the oriental cabinet I used to have my TV on. We swapped. Everyone is happy.

The sideboard is a very heavy solid tassie oak piece, made in Tasmania. It holds all kinds of useful things and doubles as our bar. Its very useful and very pretty.

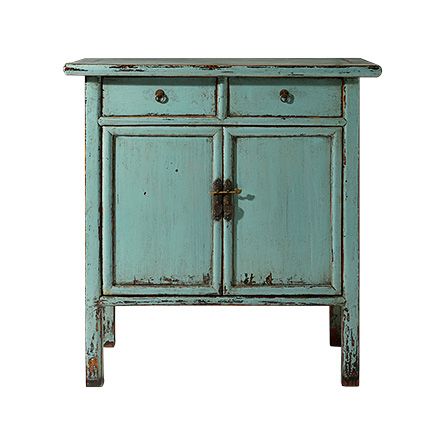
Speaking of sideboards and cabinets, I saw this one in my online browsing and fell in love. I want it. Its nothing like the oriental – or ‘ming’ cabinet I had my TV on and swapped for my sideboard (ie it has the same ‘locks’ on the doors)… its way better!

Anyway, back to reality, you know what its like with these vintage cabinets – they have keys and if you lose them you’re in trouble. I think I have one key to share between 3 bits of furniture – including the small cupboard in my office.

In order to make this key less prone to being misplaced, I’ve added a tassel I made of jute string. It was okay, but a bit too plain. I thought the sideboard needed a bit of bling so I steampunked it up a bit with bits of chain, crystals and other bits from an old necklace.

Much better.

There you go. Our sideboard is finally all dressed up.

Now… what else can I decorate…?

z

Shared at:

fun junky planters

I’ve been a bad blogger. I’ve let other things (like working and earning money to eat) get in the way of sharing all the exciting things going on around here. I know you’ve missed me and are dying to hear how things are going at Wind Dancer Farm.
Well… not much really. Except that I’m about $1200 poorer thanks to Romeo. First a couple of weeks ago while grooming him, I found he’d got a grass seed in the sheath of his penis. Yikes. And while investigating that I saw he had a lump on his flank. It didn’t look like a grass seed but I took him straight to the vet. There was nothing in the privates, whatever had got in had got out thankfully. He got a course of antibiotics and it cleared up.
The other thing, the lump, the vet was concerned about. The ‘c’ word was mentioned. So Romeo went in for surgery to have the lump removed and a biopsy done. We then waited a week to hear. Romeo limping uncomfortably cause he also seemed to have a grass seed in his left front paw. I searched but couldn’t see anything so I waited to see if it would improve.
The biopsy said the lump was cutaneous reactive histiocytosis. Not something usually found in poodles or even, for that matter, on that part of the body. Wierd. We are waiting and seeing if it was a one off… I’ve got my fingers crossed.
When the stitches came out I asked the vet to check his foot which was not improving. He couldn’t find any indication of a grass seed either and thought Romeo might have broken his toe. He gave him anti-inflammatories.
Well, it got worse and worse till I saw that there was now a hole in the webbing between his toes. I searched and pulled out a grass seed spike and took him back to the vet. They kept him for the day and searched but didn’t find any more foreign bodies. They cleaned it out and sent him home with a red bandage, antibiotics and he’s also on anti-inflammatories again. It should clear up now but till then we call him Limpy.
Poor Romeo.
Other than that all is well. The garden is looking shocking but given that a reader commented on my old toolbox planter I thought I’d share some of my whimsical plant containers.
I have quite a few old and rusty galvanised buckets. This one, one of my favourites, sits on the porch cause the begonia doesn’t like it too hot or frosty.

Last year I bought this gorgeous 60s planter from a garage sale and have put small pots with succulents in it, as well as a cutting of a beautiful pinky white geranium I’m growing.

At the end of the porch I have my lovely old mop bucket. We had one of those things when I was growing up. I much prefer it as a planter.

Since its now autumn the garden is looking pretty awful. Most plants have finished flowering and look ratty. But some are coming up again. Like the sweetpeas in the rusty old washing machine tub and the columbines in and around the old ammo box.

The steps up the porch have some new seedlings in them, alysum and lobelia which will fill and overflow the old pots and loaf tins they’re in.

I’ve replaced the succulents in the bike basket with plants which will overflow and cascade as well. Cat mint, which has purple flowers, in one pot and a pink groundcover I’ve forgotten the name of in the other.

In three pots in a basket on the back of the bike I’ve got a white daisy like plant, some alysum and lobelia. The white will grow upwards and the others should cascade. One day it’ll look great… one day.

The succulents I put in my stacked containers are coming along nicely. I have three of these but the third isn’t looking too good yet. I made these a couple of years ago for indoor storage but decided they’d work better with plants in them. They’re made of spindles and baking tins.

I made hanging baskets out of old strainers and steamers, put succulents in them and hung them on the wall near the door. Only succulents do well in planters with so many holes as they dry out very quickly.

I’ve had this old cane chair for many years, I bought it in an op shop when I was living in Fentonbury. When I got it it was dark brown, I used a wire brush to brush off the flaking paint and sprayed it white. The paint is flaking off again now so I decided to relegate it to a garden ornament.

A bright petunia will full the jam pot. Next spring I’ll put in another one – this time in spring so I have flowers through summer.

I used to have a lot of old toolboxes with succulents in them but this is one of the last ones. I sold a few of them at the market stall I did in January. I love old toolboxes and this one in blue and rust is just gorgeous.

The last one is the one on the back of this little tricycle.

You’ll notice the flour sifter near the old (cheap) half barrel planter that I can’t move without it falling apart. I have 3 sifters but this is one in best condition – ie the plant is still thriving.

One of the other sifters lies next to an overturned pot full of succulents. Hopefully the succulent in it will grow and spread. If not I’ll just put another in there!
This little area is in a wasted corner of the driveway where the retaining wall meets the steps to the path. I envisage that the succulents will grow and fill the area.
The other side of the retaining wall is decorated with some more buckets and drums.

And more ammo boxes… with more seedlings in them!

Do you get the feeling I love rusty old things? Well, you wouldn’t be wrong!

I do need to get out into the garden and begin trimming things back for winter and, if things go to plan, there’ll be a ton of flowers next spring.
I’ve been holding myself back waiting for the right time to cut things back. I get the urge to do it as soon as things begin to look ratty. Well, time is fast approaching. Time to tidy the garden, plug up all the holes the birds use to nest in, continue making the yard safer for the dogs next summer (ie keep them safe from snakes).
Lots to do.
Always.
z

sometimes you just gotta stop and admire your new boots

Yes! I got new Blundstones!

I love my blunnies. They’re the Aussie country footwear of choice. And now they come in all kinds of new styles and colours.

I bought my first pair of blunnies the year I moved to Tasmania. I mean, if you’re gonna live in the country you gotta have the right footwear, right? I wore those things till they began to fall apart. Then I glued them back together and wore them some more. I repeated this process till I all I was wearing was bits of leather, rubber and glue.

Then I bought myself another pair. I seem to get somewhere  between 8-9 years out of a pair of blunnies – that is, the ones which were made in Tasmania. Not sure how the new versions will hold out given they’ve moved production overseas. We can only hope.

They’re the most comfortable boots ever. Seriously. They take a while to break in, but once they do they’re like a second skin. As I said, I live in mine. My current brown everyday work on my feet as we speak pair have paint on them, have had the tags chewed off by a dog (what is it with the tags that say ‘chew ‘me’ to every dog that sees them?) but I am not willing to part with them yet.

It was time for another pair that I could wear out without embarassing Wayne.

They come in so many styles and colours now it was a hard decision but red seemed frivolous enough for me. Next time I’m getting another brown pair, with coloured elastic, or striped elastic… Ditto with the pair after that… which will be black…

Can you tell I like my blunnies? Or have I been too subtle?

Just call me Imelda Marcos of blunnies.

But enough about that. What’s been happening at the old homestead you may ask? Well, my dog grooming business is going well. I’m still working on new signage but should be finished by the end of the week. If I get cracking.

I’ve finally cleared out the casita workshop and am now selling things I don’t need on Facebook just to clear out room to move. Its a slow process but eventually I’ll only have projects I’m working on in there and not a pile of stuff I ‘plan to work on one day’…

I found my circular saw – and have used it! – since the last post. And I finally re-opened my Etsy shop which has been closed for years. I’m now selling my make-over dolls in there. Please visit and share. I’m a poor starving artist after all…

This is Abby from NCIS, new to the shop. I’ve also got characters from Game of Thrones and The Walking Dead. More coming as I finish them.

So I’m getting there. The To Do list gets items crossed off all the time, but new ones are added daily. Now the hydrobath is clogged up so have to fix that… but all in all things are progressing slowly but well.

Its going to be a hot week which means no work in the garden. That’s good cause I was planning to put it off a little longer anyway. Any excuse will do!

z

new grooming room… almost done!

My new grooming room is almost finished. I mean I’ve been using it for weeks, but I’ve almost got it how I want it now. Not that I’ll ever stop making small adjustments and changes – I am who I am, after all. Being able to say its finished is a big thing for me.
Last week Wayne made me a ‘portico’ for the entrance. I love it. I just wanted a plain old canopy over the door but he created this wonderful little space which protects the door (and room!) from the wind and rain. He used materials we already had – some cedar boards a friend gave us, leftover bits of laserlite and treated pine from the stable makeover.

You can see where I’ve put flashing to stop water from seeping into the concrete. Hopefully that works… we’ll see when we get the next big rainfall.
Of course, you may have noticed there was one problem with this design… Its dark. Too dark. The three single fluoro lights in the grooming room didn’t seem bright enough any more. But I have a cunning plan…. watch this space.

The outside area is almost finished. I put two large pots out there with cuttings from my white hydrangeas in them. Both are doing well even while the original bush the cuttings came from seems to be dying. Even if its not dying it will die soon as I plan to dig it up. Its just not doing well at all.
Anyway, back to the groom room yard… last week, feeling energetic, I decided it was time to fill the yard with pine bark. I’d already lined the ground with newspapers, old rugs, old carpet, whatever I had lying around to stop weeds coming up. I’d ordered a load of pine bark which was sitting in the driveway… I had a shovel and a wheel barrow… what more could I want?

I’ll tell you what: a younger back. 
Or more sense.
I did something like 24 wheelbarrow loads of pine bark. I was breathing hard. I was tired. I was aching. But I kept pushing on. I kept thinking ‘not much more to go and it’ll be finished’…
Big mistake. I stopped about 3 loads short of finishing cause by then I was too sore to move.
I couldn’t walk for a week.
The original plan had been to put some sweet peas along the fence but I’ve decided against it. With the snake incident I’ve become a little bit too scared to let my dogs outside unless I’m home… However the snake lady who came to visit gave me some advice I’m following. She basically said two things: 1. get rid of the food source (ie keep all horse and chicken feed in sealed containers which won’t attract mice and rats) and 2. don’t try to keep snakes out – they will get in anyway if they want to – allow them a way out if they do get in. ie The one thing you don’t want is a snake trapped in with your dog.
So, I’m not putting plants in the ground in my little yard. I’ll let the sweet peas grow on the outside of the fence so if a snake wants to rest in a cool spot, its outside the fence. And if one gets in somehow, it will have plenty of gaps to escape through.
As for the embankment with the tyres – where the snake was – the snake lady suggested we fence it off. Again, using what we have, we decided to put an electric fence across it, thus stopping dogs from climbing onto it, and again, allowing any snakes that may get into our yard a way out.
Lets hope no snakes come into our yard again.
Its looking good though, isn’t it? I have little metal poodles which will have arrows on them to point the way, and a large sign on the wall. Hopefully people will then know where the grooming room is…
Inside is still a work in progress. I have hooks for my dremmel and clippers. I have paintings and photos on the walls. The door has a window and a handle!

Okay, not in this photo, but it does. My first ever door handle! I’m so proud of myself! 
I still have tools lying around everywhere so excuse the mess.

I even made myself a scissor rack. What self respecting groomer doesn’t have a scissor rack?

I have a cute little stool for visitors…

Of course I have a cd player, and a cute poodle planter holds my business cards.

Pictures, paintings, old ads featuring poodles… my aprons on a huge nail and a plaque painted by a friend many years ago.

I bought this mantlepiece years ago and have never had anywhere to put it. I decided I’ll use it as a shelf for now – to display some of my poodle items.

Eventually I’ll have all my poodle collection on display in there, along with items for sale. Since I now have a separate area for drying dogs things don’t get covered in dog hair in the room. Its such a relief!
Anyway, I’ll take more photos soon, as things progress – like the signs and the change to the portico…
z

one thing at a time

Disclaimer: This is a post I wrote last week, before Erik took huge chunks of our hearts with him. I was in a great mood and words came easily. I haven’t felt like blogging since, but I saw this and wanted to post it. Life goes on, doesn’t it? It has to.

I know I’m not alone, but it sure is nice to see confirmation that there are others out there struggling with the same serious, debilitating issues as I am on a daily basis.

The problem is ‘zoning’ or becoming too focused on one thing till it takes over and eating up your time and overwhelming your brain.

What I’m trying to say is I have a problem. I look around me and see so many things that need to do be done (or I want to do) that I become paralyzed by the choices. Cause one job isn’t just one job. One job is a week of mess and hard work.

I read Donna’s post on Funky Junk today and she has the same problem. Turning “10 minute tidy job into a week long event that requires a trip to the dump”.

I can relate!

Cleaning up my office isn’t just tidying the office. Its starting to pick crap up off the floor and putting it away where it belongs, then putting up shelves so I can store things better, which means cutting wood, painting it, finding brackets, putting them up. It involves buying cheap boxes and spray paint to paint them all white so they match, which means a couple of days of layers of paint, then labelling them and finally filling them with stuff and putting them on the shelves. It means filing all the paperwork I picked up off stacks on the floor. Picking up and sorting all my fabrics into stacks according to use, colour, whether I’m likely to use them or not. It involves filling bags with rubbish and boxes with stuff that needs to be elsewhere – some of it needs to be photographed and listed for sale on Facebook or ebay, some of it needs to be scattered around the place in better spots.

Needless to say, cleaning up the office has been a week long job and is still not finished.

The grooming room? Well, that’s on the home stretch now. The main stuff is all done, Its usable but there are still things to do… and will always be things to do cause I know myself.

But an offshoot of doing the grooming room (and moving into it) is the old grooming room – now crying out for help. I go in there and am instantly overywhelmed by the piles of boxes and drifts of dust, dead bugs and dog hair which have accumulated in corners over the last 7 years. Aided by the ripped bag of dog clippings. Thanks poodles.

And the workshop? sigh. Remember the garage sale that never was? All the preparation that went into that… locating everything I wanted to sell and moving it into the workshop for easy access…

Well, most of that is still there!

I can’t work in the workshop cause, well, its full of stuff I need to get rid of.

When I want something, like a screw driver or my circular saw, I have to step over power tools, squeeze around chairs, lean over frames and, oh no… its not there! Look on the bench, under the boxes and drop sheets, oh, there’s my hammer. I’ve been looking for that for 3 days!

z

PS. Have you seen my circular saw?

i was featured!

I’m still not in a place where I want to share much. Its not just what happened with Erik this week but ongoing issues in my life that have to do with my employment…. not my dog grooming.

That’s all I’ll say about it, but the stress of it all has come to a head and with what happened this week I find I’m not coping well at all.

One lovely thing that happened is that my blog was featured on Talk of Town Link Party! I feel so honoured. I’ve never been a great blogger, I’ve been intermittent with my posts and all over the place with my projects.

To be featured is so amazing!

Thank you guys.

z