my new toy

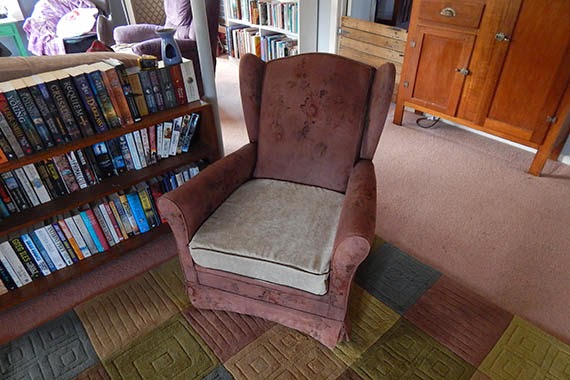
I did it. I broke down and bought myself a router.

A mini router. What they call a ‘trimmer’.

I’ve wanted a router for ages. Firstly I wanted one so I could make my own frames. Then I wanted one so I could do fancy edges on things.

Mainly I wanted one just cause I wanted one.

You know. To round out my tool collection.

“And here is my workshop, there’s the drill, the circular saw, the contra saw, the jigsaw, the drop saw, the scroll saw (a build-up of saws), the belt sander, the orbital sander, the corner sander, the hand tools … and the router!”

One thing I have to share though, is that I’ve always been more than a bit afraid of routers. Probably cause someone once told me that they’re very dangerous cause they spin faster than any other tool.

Like, just cause a circular saw doesn’t spin as fast it can’t do as much damage. Like cutting off your foot is way less intense than edging your hand…

I have no idea why I was so scared of routers. But I was.

So, when I got this baby (pun intended), I took it home, read about how to put the bit in and got set up to try it out. Safety goggles, a piece of scrap MDF (soft stuff to experiement on) and clamps.

I tried the bit it came with first and did a few freehand curly bits on the MDF. Ok. A bit wobbly. The thing kinda tried to get away from me.

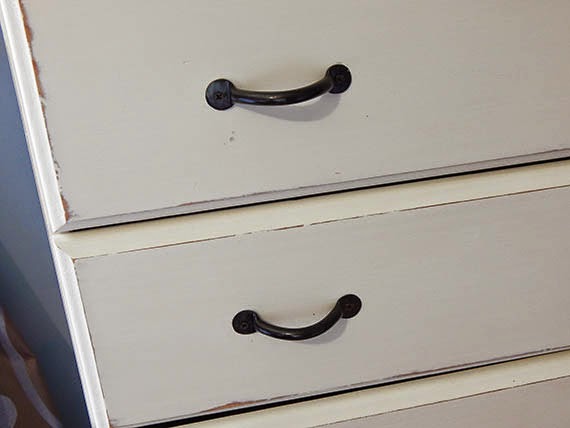
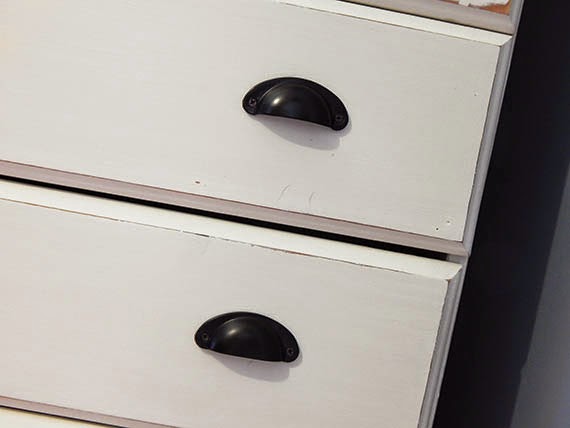
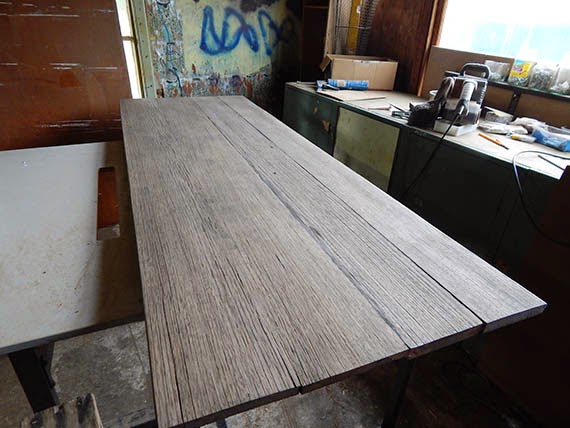
That was boring though, so I tried an edge with a curved bit. That was easier and more fun!

So I took out my jigsaw, drew a wavy line and cut it out slowly and carefully*, then did that edge.

I’m so proud of my edge. I could never quite get how you could edge something freehand without guides, but I did it. Its not perfect but I did it!

*The jigsaw and I have never been good friends. I’ve never been able to get it to work as well as most of the DIY-bloggers I follow seem to. Maybe its a crappy jigsaw (its over 10 years old and was a cheapie)… Most likely its the crappy user.

I think I figured out what I do wrong. For some reason I’ve been a bit scared of my jigsaw and never seem to press the button to full throttle.

Funny as I play free and easy with my circular saw all the time, waving it in one hand, not a care in the world. I use that tool so much its almost like an extension of my own body.

I think I never used the jigsaw properly. It was something Kristi (at Addicted 2 Decorating) said that made me realise I was doing it wrong. She said that I drive the jigsaw, it doesn’t drive me.

Up till now I’ve never been able to cut along my lines. I’d put the jigsaw to my wood and just let it lead the way. My jigsaw has always had a mind of its own, veering off here and there till I give up in disgust. But last night I kept Kristi’s advice and took it really slow, going full throttle on the blade so it cut smoother, and cut carefully and followed my lines almost perfectly.

With that and the edge I managed to do first time, I feel very proud of myself!

Though, I brought myself back down to earth with a crash when I made the worst box known to mankind. I’ll share that with you when I share the workshop tidy up at some later date.

I’ll leave this post on a positive note of achievement.

z

rusty rustic lamp – take two

What do you do when you have a desk lamp without a base? I bought an old desk lamp from a garage sale, you know, the kind you’d see everywhere in the 80s which clamped onto the side of the desk.
I saw it, thought “hey, I can fix that” and took it home. Wayne made a base for me and I did use it for a while, but really, that base was overkill. I got a hernia moving it.
So, when cleaning out the office for its makeover (see it here and here) oh-so-long ago, I took the lamp apart and started on the road to remaking it. 
The idea was to make it industrial looking to go with the industrial/rustic desk I had planned for Wayne.
I did finish the desk, he’s been using it since before Christmas and I promise I WILL take photos as soon as he leaves the house long enough for me to clean up his office area…
Anyway, I was saying, I had the desk finished but the lamp was still in bits in the casita.
I went out there this afternoon on a whim and finished it.
Five minutes. That’s all it took. Eight months and five minutes.
See, I’d run into a problem. I had this round rusty metal wheel thingy I’d picked up at a tip shop ages ago and I knew I wanted to make that the base. However, it had a pokey outey bit on the bottom so it wouldn’t sit flat. And the other side of the wheel thingy was boring so I had to find a way to have the whole thing sit flat with the good side up.
I thought a block of wood was the way to go when I started working on it. I drilled a hole in the wood to poke through the long screw on the lamp. The screw thing was too long for the wood block so I cut it shorter using the angle grinder. I found that I’d stuffed up the block of wood cause I drilled it one width all the way through so there was nowhere for the nuts to hold on…
That’s when I sat it in a corner and proceeded to ignore it.
Until today.
Today I went into the casita and thought “I must have something I can use as a base which will be easier to screw the lamp onto”.
In fact there were a few things…
In the end I selected a small wooden bowl from my collection of wooden bowls (cause you never know when you’ll need one). I drilled a hole in it where I guessed the middle was, just wide enough for the screw, then piled the lamp, the wheel thingy and the wooden bowl on top of one another and screwed them together using a couple of nuts.

Its pretty stable. The wheel thingy (yes, that is the technical term) is really heavy so won’t overbalance.

Gotta love the green mossy patina… I didn’t clean it. I just blew the worst of the dust off it. I also didn’t seal it as the rust doesn’t come off on your hands.

There was only one more thing I did to the lamp… It had a couple of scratches on the rim of the lamp so I painted it with black chalkboard paint. Now I can leave notes to Wayne on his lamp!
This is how it looks in the corner of the kitchen. One day I promise I’ll take a photo of it in its new home on Wayne’s new/old/industrial/rustic desk.

Not bad for an eight month five minute job, huh?

z

Shared at:

no longer an ugly duckling

You’ve come a long way baby!

(Does anyone remember the Virginia Slims ad? or am I just too old?)

I am loving my home. I get so much enjoyment out of stepping out the door onto our front porch and just looking at it and the garden. Sure, the back deck (or the poop deck as its affectionately known) is still a mess, it really needs a roof and bird evictions, and there’s still a healthy farm-like amount of crap around the place… but its home and its becoming beautiful – and I love it.

We went from this:

To this:

What’s not to love?
You can read more about the before and afters here.
Here is the back deck, unpainted, exposed… I have plans for that… one day… till then I pretend I can’t see it.

The deck is welcoming and cosy now. The potato vine has gone bezerk and provides dappled shade in one small area.

Soon the pale yellow banksia roses on the trellis should also hide the water tanks on the left. And once the potato vine spreads a little more to both sides there’ll be more shade in the afternoons.

The plan is that when we roof the back deck we’ll just put more trellis on the corner and make it sort of like an arbour area where you can sit in dappled sunlight with plants growing around you. Perhaps a pink banksia rose… I’d love a purple potato vine but they’re not so hardy, and I’d love a jasmine but I’ve killed two of them so far.

Maybe I’ll stay away from them.

Ah… home. In this pic you can almost not see the bare spots on the weeds lawn where I sprayed Roundup. As I keep saying, if it wasn’t for weeds we’d have no green. 

There is still much to do but at least I can say I’ve managed to do something over the Christmas break. I finished painting the front of the house where we had bare timber from moving the kitchen windows. I undercoated the enclosed porch area ready to paint. And I put up my corner brackets, something I’d been planning to do for the last couple of years.

Now, if I wasn’t such a clutz I’d be out there painting today. Top coating the enclosed area and all the window surrounds.

Instead I’m sitting in the ugly purple recliner trying to move as little as possible.

Why you ask?

I was climbing ladders, on uneven ground, for days painting and screwing in brackets and I was fine.

All I did was water the embankment yesterday and I think I’ve cracked a rib.

I need to rethink riding again… I don’t think I should get on anything with its own feet. I can’t be trusted on my own two feet.

Let me explain: the embankment is made up of old tyres. A bit redneck but in the spirit of recycling, which I’m into big time. Its a steep embankment, impossible to walk up at the best of times. The other day I’d walked along the top tossing down the tyres from the top line that I thought were unnecessary.

Obviously, I didn’t put them out of the way or stack them nicely. I left them where they fell.

My bad.

So, while watering last night I was walking along the bottom of the embankment, a small channel which catches rainwater and directs it away from the house, when I tripped on one tyre, stepped back to get my balance and stepped on another, bounced off it and landed like a sack of potatos.

Hm… not quite. A sack of potatos keeps its shape.

I landed like a sack of potting mix. With a big splat, on my left side, on my left arm and on my ribs. My whole weight just kind of formed around and over my arm so that I had to kind of pry myself up.

After I’d caught my breath… ie about 3 minutes of moaning and groaning in pain.

It probably took me 5 minutes to stand up and pick up the hose again. I’d been lying in the ditch of course so of course I was covered in mud.

Like a trooper, I kept watering. It had to be done, right?

Then I went into the house and sooked to Wayne while I changed and washed the gravel off my arm.

The elbow is bruised but doesn’t hurt. In fact, the right elbow (which was nowhere near the squash zone) still hurts more than the left, but the bruising is impressive.

Its my ribs that hurt. And the weight of my left breast. Youch. (Wayne kindly offered his support. Pun intended.)

I can breath but deep breaths hurt and moving hurts.

Wonderful.

I’ve had broken ribs before. Many times.

You don’t want to know.

There’s nothing to be done but rest and patience. So, whether its soft tissue damage or a broken rib, I just have to wait it out.

Wonderful.

I still have a week off work and I had so much to do.

NOT happy Jan.

z

PS. I watch too much TV and have a head full of quotes and movie trivia.

boring pine chest to pretty pine chest

Here’s something I learned today:

Sanding dust can give your hair great texture. Forget expensive sculpting gels, mud or whatever. Just go sand something.

…It does nothing for your hands however.

Anyway, thought I’d share a successful makeover (unlike so many not so successful ones).

When Wayne and I moved in together, he had two tallboys and a wardrobe. They were plain pine and rather boring. One of the tallboys was a mess, the drawers kept dropping when you pulled them out, the base was falling out of them… its in the casita right now holding odds and ends till I decide whether I can fix it.

The other one and the wardrobe went into our bedroom… I use them for my own clothes cause I made Wayne his own walk in wardrobe

Yes. The man has more clothes than I do! And shoes. What can I say?

I make do with a measely pine wardrobe and two chests of drawers: a smaller one I bought when I lived in Fentonbury and the one Wayne owns.

I always planned to do something with them but I had to wait till I had time and energy. Not so much for the painting, but for the carting and carrying. I’d already painted my chest of drawers white many years ago, so I wanted to make the three of them match better.

At least be less offensive.

I don’t have any before photos cause I didn’t take any. And the external drive I put all my old photos on has decided to not work… I found this photo online which will give you an idea of what it looked like. The one I’ve done up is a 6 drawer tallboy, it doesn’t have the two smaller drawers at the top. The one in the casita has the two smaller drawers, but you get the idea. Nothing fancy, just a plain pine chest of drawers. No cute feet, no fancy bits, just plain jane.

So, first thing I did was empty everything onto the bed (and then the floor cause we need to sleep in the bed!) and take it down to the casita where the tools are. I gave it a very light sand and then painted it with some antique white I mixed up with a bit of unsanded grout. I like the look and feel of chalk paint and have always just made my own.

In the vein of using what I have and not spending extra money, I looked through my collection of handles and knobs. I needed 12, not so easy to have 12 matching ones. So I decided to mix and match and I love the result.

For the top two drawers I used simple black metal handles I got on clearance last year. I wish I’d bought more.

For the lower drawers I used the black cup pulls I’d originally bought for the kitchen but decided they were too small. They’re fine for the drawers. I have delicate fingers…
After the entire thing was painted (and some of the drawers glued and clamped) I gave the whole thing a light sand, revealing a bit of timber here and there… not overly distressed. Just enough.
Lastly I gave it a wax using some lemon scented furniture wax I got on ebay last year. The wax gives it some protection from being marked or getting grimy fingerprints and makes it easier to dust.
If you ever feel like dusting, that is.

All the bedrooms in this house are small. Annoyingly so. Its not easy to decorate and have storage without the room feeling cluttered. Unmatched items make it worse.

Maybe I really need to try and fix the matching chest of drawers…

I wonder if I can change the tracks on the drawers to make them work better…?

z

Shared at:

the laziest christmas tree in the universe

Ok, since I mentioned my poor attempt at Christmas decorating, I thought I’d share my pathetic ‘tree’ for this year.

I was going to build a tree out of old timber or a pallet, which would have required sawing, nailing, measuring, assembling… but while searching my scrap pile I saw this piece of door I’d been using to spray paint items on. You can see some gold, white and black…

I checked it. It was rough, it took chalk… So much easier than building a tree!

There. Are you satisfied?

The poodles are ok with it, so I’m good with it.

And no mess to clean up. When I’m over looking at it, I just take it down to the casita and use it to spray paint on again.

z

artist case

In case you’re wondering what Wayne got for Christmas, well he got a couple of things. Two of them were Viking related: a feast knife and a Fenris cross (a norse wolf cross).

He likes Vikings… what’s not to like about them?
Anyway, the other thing I got him involved a bit of gathering separate (but related) items and a bit of DIY.
I’d seen a soluble graphite presentation box which I liked but when I went back to get it they were sold out. They only had a smaller version but it just wasn’t as good. The box I’d seen originally had a soluble graphite block, a soluble pit charcoal block and a brush. 
I decided I’d buy the bits and make my own presentation/carry case for Wayne. I bought a small tub of soluble pit charcoal, one each of graphite in regular colour and one sepia, an eraser, 2 soluble graphite pencils in different leads and three brushes of different sizes.
I located an old tin toolbox I had in the casita which was perfect. I had two of them, cause I collect things like that… I made one into a grooming room sign a few years ago (and sorry, I don’t have a photo, I put all my photos and a heap of other stuff on an external drive which decided to give up the ghost), and the other was the perfect size for Wayne’s gift.
So, first things first: I gave it a good clean and a bit of a scrub with some steel wool. Its got some rust and some staining, but hey, that’s part of the beauty of it, right? I then painted his nickname on it.
 
But the best thing is the inside!
I had to make compartments for each of the bits so they wouldn’t just jumble around. They needed to have their own little spots. 
I had an offcut of pine which was just the right size. I cut the bits I needed, sanded any rough spots off, then used liquid nails to glue it together.
Overkill? Perhaps. But I couldn’t find the PVA and the liquid nails was there, saying “go on, use me!”

I also used the glue to fix the pine frame to the tin.

I added a small bowl I had for water, put in the pencils, brushes and graphite blocks. Voila. Presentation case and carry case all in one!

I had planned to spray paint it, but I like the plain pine. I may have to give it a clear coat later to protect the timber from staining, but maybe not. It might add to the patina… what do you think?
I added a good quality drawing block and gave it to Wayne this morning. Now I await his masterpieces.
At least I hope he tries it out. He used to do pen and ink work years ago and I’d like to see him art again.
z

merry christmas and all that jazz

Its Christmas! I’ve always quite liked Christmas though I don’t do the decorating thing. Without a family or a big celebration, it just doesn’t seem worth going to all that trouble. The poodles don’t really care one way or another. As long as they get plenty of pats and food, they’re happy.

All I did this year was pick up half a door I’d been using in the casita as a spray painting base, draw a tree on it with chalk and sit it on the wood heater. That was my Christmas tree.

Oh, I also climbed on a ladder and put fairy lights on the trellis in the garden. They’re not working properly. Great.

Oh well. I tried.

We just had a couple of good friends come over for Christmas lunch. I baked melomakarona on Christmas eve and Wayne roasted a turkey roll, a leg of lamb and a bit of beef.

‘Cause, apparently, you can’t have too much meat.

Our friend Chris brought over a ham (’cause…. see above), and Patrice brought cheese and nibbles and a great sweet potato salad. We also had prawns and I made a greek salad and individual pavlovas. I topped them with raspberries picked from our garden this morning.

We started on nibbles and drinks around 11.30am and had ‘lunch’ around 5pm. All I had was a plate of salads and 2 small slices of ham and one of lamb. Then my pav.

‘Cause there’s always room for dessert.

Now I can’t move.

I’ve lost my ability to over-eat.

Presents-wise its been good. I got a new portable cd player cause my old one broke ages ago. I use it while grooming or doing DIY projects. Its essential.

I also got another power tool to add to my collection! Wayne got me an electric staple gun. Yeah!

I think I may try reupholstering an old armchair I have in my office… stay tuned for that badly done makeover in the new year…

z

the armchair makeover is complete

Remember the armchair I pressure cleaned a few weeks ago?
Well its finally finished and back in the house.
The washing went well and the drying took a long time cause the weather turned nasty. We had days of rain so I had to keep the armchair in the casita with the heater on it intermittently in order to dry it completely.
Then, once it was dry I got it wet again.
I had to. I wanted to dye it. The colour I wanted was brown but it was almost impossible to find the brown in any shade at all. I ended up with 2 packs of RIT powder dye, one was a reddish brown and the other was dark brown. I mixed them together and made up a bucket full of dye as per the instructions.
It took quite a few coats and I got bored of the process before the dye covered the pattern.
Here it is after the first coat. I applied the dye with a foam roller.

Around coat two the weather got better for a few minutes so I was able to put it outside to get some sun.

Coat three started to go a redder brown.

Coat four I figured I liked the flower patterns showing through. Kind of like an aged faded fabric instead of an incomplete dye job.

Of course before I could put it in the house I needed a new cushion. The dogs had chewed chunks out of the original one. It took me almost a month to buy the foam and fabric.

I only have one question about dyeing furniture though: what about the salt? After the chair dried I had to use a damp cloth to wipe off the salt which rose to the surface. Now I’m a bit concerned the dogs will notice the chair is rather tasty and start licking it.

I made the cushion cover today and was able to bring the armchair up to the living room. The fabric I chose for the cover is plain cause I couldn’t find anything else that would suit the chair. Obviously patterns wouldn’t work cause of the flowers showing through the dye, but that’s what I’d have in mind originally. I got some brown piping and put that around the cushion cover to tie it in a bit and give it some punch.

I’m quite happy with how it looks.

Even if the sewing leaves a lot to be desired.

Yep. No closeups. My sewing won’t stand up to such scrutiny. It works, that’s enough for me. My sewing is of the same school as Patrice’s DIY projects ‘where close enough is good enough’.
Seriously, I don’t think I did too bad considering I had no real plan, hadn’t even intended to tackle this job today, just put down the foam and cut out the shapes and sewed them together willy nilly.
You won’t notice in the photos but I rearranged some furniture. I’d share photos if the room was tidy, but there is washing to fold on the coffee table and Wayne’s new desk is buried under a pile of junk already. I cleaned ok? That was enough!
What I did basically was move the couch and put it against the (stupid, ugly) poles in the middle of our living room facing the back window, put the small bookcase behind it and swapped the old cabinet with the big bookcase cause I think it feels better.
There are more changes to come but I’m trying to sneak up on them so Wayne doesn’t become too upset.
z
Shared at:

step by step, we’re getting there

Our home may not be beautiful and neat, but one thing I can say for it… it has character. Like the side of the garage where some previous owner thought ‘what the hell, you can’t see this side from the gate’ and stopped painting it blue. And all the rusty bits of metal leaned up against the corner to stop the dogs from excavating all my plants in pursuit of some critter burrowed under the shed.

The foxgloves Ginny gave me are so tall I’ve had to stake them, and the lobelia and alyssum are looking great…

I hadn’t posted for a few days as I haven’t really had much to share. I’ve been busy with work and haven’t put any time into doing anything creative worth sharing. However, things are slowly moving along. I’ve had my trusty helper come out and do some of the heavy lifting for me so things are coming together in the yard.

For one thing, he’s put a brick border along the footpath to stop the blue metal (gravel) from falling onto the path and then into the ‘lawn’.

(I use the word loosely.)

I love the neat new look. Maybe it needs a brick border on the other side too?

You can see the tyre wall is coming along too.

Another view of the tyre wall from the garage to the front gate and our wonky wood shed. We figure about 3 more loads of tyres and we’re onto the next phase: soil and pinebark. I’ve already got some plants in the tyres down the front end, I need a whole lot more to fill the whole wall.

I’ve had my trusty helper put carpet down along the path between the house and driveway retaining wall. That area has always been a problem. Some of it has blue metal and the rest had weeds… almost impossible to mow with all the gravel mixed into the grass. This way no more weeds and I can buy more gravel to put on top of the carpet. You can’t really see it in the pic but there’s another brick border to hold in the gravel at the far end of the walkway.

We put carpet skirts around the trees we planted in the paddock as well. I told Wayne I was over weeds and planned to carpet the entire yard. He was not impressed.

We also put up a bit more wire for the potato vine and sweet peas to grow up. The garden is beginning to look really nice.

Well… except for the weeds where the lawn should be and the bare patches where I poisoned weeds…

I got a pleasant surprise the other day. This plant grew in one of the garden beds and I had no idea what it was. I wasn’t even sure if it was a weed or not. But since I didn’t recognise it as a weed I let it grow and voila! Its a delphinium!

I’d bought delphinium seeds a couple of years ago and not a single one grew. I think I tossed the soil from the empty pots in this area and look what grew!

I’m loving the way gardens can surprise you like that. This is a new thing for me. Mostly things I put in the garden surprise me by disappearing.

Meanwhile we had to do an emergency operation on the hardenbergia and azalea corner… another critter living behind them I guess, cause I came home to find dirty dogs and the plants almost ripped out. Its a pity cause both of them had just started to take off.

When I bought the azalea Patrice was all ‘oh, you’ll kill it’ and I was on track to prove her wrong. Hopefully no permanent damage was done.

A rickety cage made of a dog pen side, some old trellis, bits of wood and tied together with hay bale twine… add the tyre wall… a bit white trashy huh?

Oh well.

I’ll just call it the ‘Make Do’ culture. I’m recycling and using what I have on hand.

And I have a LOT of hay bale twine…

z

the conditions i’m forced to work in

This afternoon I went into the casita to have another look at the office desk I’m working on for Wayne. This is what I was greeted with:

Little Chipmunk peered out around the corner at me.

I was disturbing little chubby’s dinner.

Here’s a preview of the desk I’m working on from one angle…

…or from another…

Chipmunk looked at me suspiciously. He wanted to be sure I wasn’t going to turn on another sander like I did yesterday.

Gave him indigestion all night.

When he was assured there were no power tools lurking, he went back to burying his head in the bucket.

Whaaaa?

Can’t a little horse eat in peace around here?

Well, frankly, no. Its my workshop, not your dining room. Horses are supposed to eat in the yard. Or the stable. 
Or the yard.
Outside!
Its all Wayne’s fault. When he discovered that Chipmunk had discovered he could jump up the step and come in through the bottom half of the dutch door to the casita, he began letting him in while he prepared horse feeds, which lead to Chippy dining indoors.
It works great.
Most of the time.
There was that one time when the wind blew the bottom door shut and Chipmunk was stuck in there all night.
…There was poop everywhere.
Including on the legs of the desk I’m working on.
On the legs.
Seriously.
How did he even get it up there?
z