retaining walls and eliminating glassware

Things are progressing… Every day is a small step forward.
Wayne’s been working really hard on the new retaining wall. This is how it looked yesterday when he stopped for the day. 
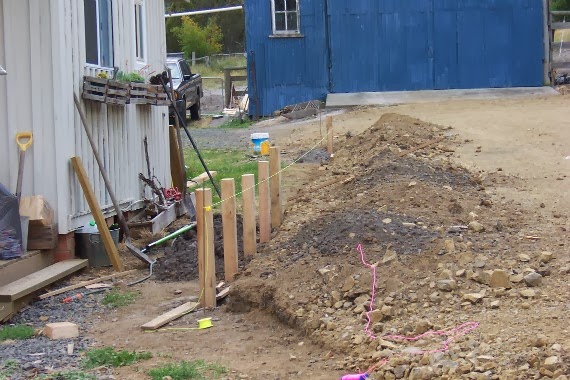
He worked in the heat all day to get this far. He’s definitely a better man than I am! Even the small bit of heat I got was enough to knock me out.
Today the weather is cold and windy. It rained most of the night too. It is Tasmania after all. 
But I’m not complaining. 
Anyway, this morning we went in to the hardware store where Wayne bought 24 bags of concrete mix. I bought 2 towel rails. 
Turns out I wasn’t quite done in the bathroom yet.
While Wayne continued on the retaining wall, getting all the posts in, I put up two towel rails. 
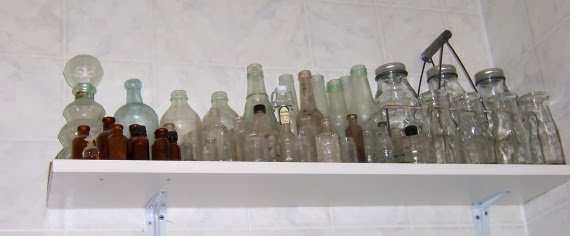
Till now I’ve had an over the door type of coat rack for Wayne to hang his towels and 2 hooks on the wall for mine. I was sick of knocking Wayne’s towels off the coat hooks every time I walked past them. Plus I much prefer rails to hang towels on, so today I made the leap. I know that one day I’ll be re-doing the bathroom, but till then I may as well make it more bearable. And I’m definitely liking it with the new shelves.
I’d like to say it was quick and easy. I’ve done this before. But once again it was a comedy of errors, putting the fittings on backwards, putting screws in, taking them out, re-doing things. You get the picture. At one stage I was sure I was going to hit an electric cable so I put on rubber gloves and rubber soled shoes, told everyone I loved them, closed my eyes and drilled.
Luckily I didn’t hit anything.
But Wayne did.
He hit another water pipe.
I told you, the guy should hire himself out as a water diviner. With a crowbar instead of a rod.
Luckily he hit it but didn’t puncture it. Thankfully. Herman Too is too young to hear the foul language that puncturing the pipe would have brought forth.
Did I mention Herman Too is back in the bathroom?
We released him the other day and he ran to the other ducklings in his slightly off-kilter way. They didn’t shun him for living in the big house. All was well. 
Or so we thought.
Yesterday afternoon, after the weather had turned cool, I was watering my flowers when I noticed two ducklings in a deep water bowl. One hopped out. The other was soaking wet and did not look good.
Have you ever seen a soaking wet duckling? I sure hadn’t and I was sure he was a goner.

I fished him out of the bowl, gave him to Wayne to dry and warm up while I went in search of the large plastic tub, the heating pad and blankets. The poor little thing couldn’t even walk, he just kind of crawled. I was sure he wouldn’t make it. But he did. He’s back to being chirpy and a bit brave.

Looks like Herman Too has moved back in. I suspect he’ll be here till he goes to college.

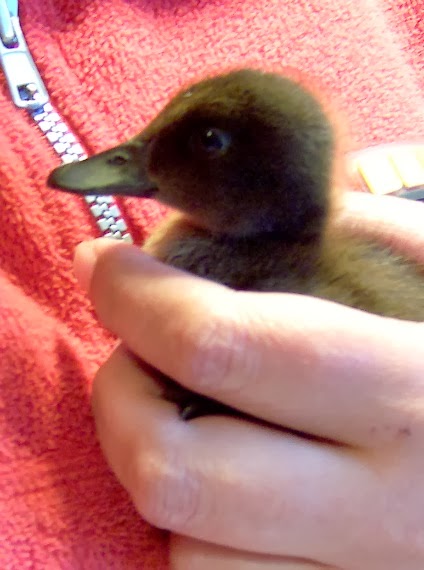
Maybe he can be our house duck.
(I’m still pretty sure Herman Too is a girl.)
Other than that, I spent most of the day today cleaning the kitchen. And by cleaning I don’t mean washing dishes and floors (though I did that too). I mean clearing out cupboards.
The work in the kitchen will be done. I need to start preparing. All the top cupboards are empty now since they’ll be the first to go. I packed up a ton of stuff we don’t need on hand and filled up boxes with things to go away.
Getting there slowly.
z

the bathroom – or how to make a 15 minute job last 5 hours

This morning I had a plan. I was going to clean the house. And by clean I mean a real spring clean type of clean. Clean up, clear out, organise.
I was optimistic. I’d start in the bathroom cause its the smallest room and would be the quickest to clean and tidy, then move on to the living room, the bedrooms, the office…
Uhuh.
I started in the bathroom around 11am.
I finished around 4.30pm.
How come it took me so long to clean and tidy such a small and ugly room?
Well, cause its small and ugly. I just got to the point where I was hating it more than ever… I decided to take out the tall narrow cabinet I had in there for towels and put up some shelves to make it look more… bearable.
It sounded easy, right?
First I removed the ugly gold and cream fittings from the wall which were never used to hang towels on.
I used my new contra saw to cut down old cupboard doors from the kitchen to make shelves. I had planned to put up 4 shelves but decided to leave it to 3, the top one would have been too high.
The top shelf holds my bottle collection. Minus one which broke in the move. All crammed in. I will thin them out and only keep the antiques there later. 

The second shelf will hold Wayne’s towels and, for now, holds my poodle mirror and a small duck basket.

The third shelf will hold my towels, a larger duck basket with soap bars and my small caddy with my toiletries.

I may be the only person in the world who’s like this, but if I don’t have my beauty products out where I can see them, I forget to use them. Ok, not the deodorant. I remember that! And my moisturizer but I do forget to use eye cream or cleansers etc.

Below the shelf, on top of the bathtub, I’ve put two baskets which I need to make labels for. The tall tennis ball basket will hold bath mats, the larger one will hold hand towels.

I quickly painted a timber door I had from a tip shop trip a while ago. It serves as a shelf over the end of the bathtub. We never use the bathtub so its a waste of space…

While I was at it, I cleaned out the vanity and threw out anything I didn’t use or need. How cathartic! I found I needed more space to put some other products (my perfume bottles, hair spray, etc) so I knocked up a quick caddy to hold them.
I had this odd little box which would be perfect, all it needed was a handle. I found a couple of bits of pine off a cut down bit of trellis. I nailed that to the ends of the box. Then I found an old hammer handle which I used as the caddy handle.

I will paint it one day, but for now its fine as is. It holds stuff and that’s all that matters.

I did discover that taking shortcuts often ends up in disaster.

See, the drill was in the bathroom. I was making the caddy in the workshop in the casita. It was too far to walk in the sun… (about 50 metres). I was too lazy to go get the drill so I just put a nail through the end of the hammer handle.

And split the wood.

So, a clever person like myself soon found a way to fix it… I got a clamp and put it around it, holding it together so it won’t split. HA!

I had to put a nut on the other side to hold the handle in place cause it had a hole way bigger than the nail head. Hey. Make do, right?

So there you go.

Five hours later and I have an orderly bathroom, complete with clean floor, walls, shower, sink, and organised storage. I celebrated by having a shower.

I’m exhausted. I have a headache. Don’t yell at me, I think I’m dehydrated too. I never drink enough and its been hot today.

Time for a rest.

z

Shared at:

wire, frames and photos

Thought I’d share these two wire frames I made and sold at the last market.

This first one is using… you guessed it!… birdwire!

‘Cause as you know, I have a ton of it. Though a ton less than I had before after lining the dog pen with it for the ducks…

Speaking of which, we now stand 2 ducklings down, 8 remaining. One egg down, 9 remaining. And holding our breath.

But I digress. Back to the frame. I have a couple of frames with this design on them so I decided I’d try one as a birdwire photo display.

The second frame I did with the wire lines for something different. (I like the birdwire better!)

Still, they’re both very handy. If I hadn’t sold them I’d be using them right now.

z

birdwire cloche becomes a birdcage

I decided to try my hand at a wire cloche. I’ve seen photos of them on Pinterest and I love them.
Let me tell you… its not something I’m going to be rushing out to do again any time soon! Its really not that easy to shape birdwire. There are tin bits of birdwire all over the place in the workshop!
However, it came up ok. I had a wooden base missing its top so I created a wire cloche which would fit in it, then added a broken drawer pull as a handle to the top.
This is what it looks like with a photo in it.

It was okay.

Not great.

Just okay.

I wasn’t entirely happy with it.

So I did some more work on it. For one thing, I found the perfect  base for it. A very old, discoloured filigree silver dish. It must have held a cystal bowl at some stage. Anyway, it was perfect.

Goodbye wooden base, hello gorgeous silver base.

Now it was a birdcage, not a cloche.

So, what does a birdcage need? A perch… and a bird!

I’d seen these gorgeous little fat birds made of fabric on Pinterest but I seriously didn’t want to sew. So I made up my own birdie pattern and made it out of felt – I cut up a piece of wet felted ‘fabric’ I’d made, then felted colours over it to create a colourful little bird.

Here’s the finished product…

Don’t you just love the typewriter? A friend of mine found it on the side of the road on a hard rubbish collection day and had to fight off 2 guys to get it for me! What a friend!

Its all rusty, the bits are kind of welded together and no parts move, but isn’t it great? I think it’ll look great with the right plant growing around it on the porch. If I can find the right plant for the porch… Only succulents can survive summer on our porch!

z

Shared at:

flyscreen pinboard

This weathered old flyscreen has been hanging around my shed for a while. I can’t remember where I found it, and I had no idea what I’d do with it, but I loved the look of it, especially the metal flyscreen with a few rusty spots and a few small holes.

ie character.

Anyway, while considering what to make of it, my eye fell upon a piece of bulletin board I had… could I make it into a pinboard?
Yep.
The bulletin board was just the right thickness. I cut it to the right size and popped it into the frame from the ‘front’. I put a piece of plywood on the back to finish it off. 
Now the ‘back’ is the front. You can pin photos or notes onto it, putting the pins through the flyscreen into the bulletn board behind.
I added a bit of wire through the holes already in the frame where the hinges used to be, and it was ready to hang.

I pinned some photos of mom and dad on it for the photos. I’m really enjoying having all these old photos!

I sold this pinboard at the last market to a friend who owns a cafe. Maybe I’ll see it there next time I visit…

z

Shared at:

http://www.funkyjunkinteriors.net/2013/12/salvaged-junk-christmas-candles.html?utm_source=feedburner&utm_medium=email&utm_campaign=Feed:%20blogspot/KCcu%20%28Funky%20Junk%20Interiors%29

an old bathroom cabinet gets an update

I’ve had this little cabinet for a long time now. Back when you could find solid timber bathroom cabinets at the tip shops. For the last few years these guys have become scarce. I’ve only seen plastic (yuck) or metal ones, usually that really awful rental flat stuff.
When I found this cabinet it had the same mirror (which shows its age) but it was painted in layers of thick paint – not in a chippy yummy way at all. Just yuck. The inside was stained and even yuckier…

What I did was sand all the paint off using a grinder with a sanding disc cause it was a serious job which called for the big guns. 
The back of the cabinet and inside of the door was rotten, so I kept the mirror but put in a new sheet of ply to cover the back. I replaced the back with some old tin stuff I’d found. I’m told its siding from an above ground swimming pool. I don’t know. I just liked the look of it.
The metal contrasts nicely with the old distressed timber inside…
And the back has some bits of rust and discolouration cause, you know… its OLD.
Finally, I coated it all with some satin varnish to finish it off.

Originally I’d made my own knob for the door but it broke – and the magnetic catch I put inside the door is really strong and my knob didn’t really give enough grip. So when I decided to revamp it last week I replaced the knob with a sash window pull. A nice old rusty one I had in my collection of drawer pulls and knobs.

When I was living in Fentonbury I had this little guy in my kitchen to hold coffee, tea, etc. Its never been used in a bathroom. But maybe, one day, if we ever get around to redoing our bathroom, it’ll find a place in there.
Unless I sell it first.
z
Shared at:
http://www.funkyjunkinteriors.net/2013/12/salvaged-junk-christmas-candles.html?utm_source=feedburner&utm_medium=email&utm_campaign=Feed:%20blogspot/KCcu%20%28Funky%20Junk%20Interiors%29
 

what to do with an old rubbish bin lid

One day, not too long ago, I found this galvanised iron lid at the tip shop.

I just had to have it. I loved the colour. Or should I say ‘discolouration’? It was marked with old paint and rust and who-knows-what-you’d-rather-not-know-about.

It was wonderful.

I took it home, gave it a good wash, a bit of a scrape with steel wool and it was clean but still colourfully trashy.

Since it was magnetic (see magnet on right hand side of above photo), I thought it’d be ideal as a magnet board for photos or notes or whatever…

But there was a handle in the middle. What to do with that?

Make it into a ‘whatever’ holder!!!

(I did mention I had a whole LOT of birdwire, didn’t I?)

I drilled a couple of holes on the top and bent some wire to make a hanging hook, and done.

The photos are my dad and a friend in cowboy costumes, and my mom and her brother at a dance.

I found a couple more lids at another tip shop a couple of weeks ago and grabbed them. Both of these ones sold at the last market. They were simpler versions of the one above – ie magnetic boards with a hanging hook. They came with 3 magnets made from buttons.

These two were reversible… you could pick which side you wanted to hang as the front – I love both colours. The old galvanised metal as well as the old fashioned green paint.
z
Shared at: 
http://www.funkyjunkinteriors.net/2013/12/salvaged-junk-christmas-candles.html?utm_source=feedburner&utm_medium=email&utm_campaign=Feed:%20blogspot/KCcu%20%28Funky%20Junk%20Interiors%29
 

the broken rose frame

Have you ever had one of those days weeks months when your life just seems to be so busy it overwhelms you?

I’m having one of those months. I look at each week ahead of me and I groan at how many things I have booked in. Work, dogs to groom, meetings, appointments, other work, supplies or groceries to buy, things to fix, make, wash, etc.

Wayne is always lecturing me on how bad I am at prioritizing. That I have a busy week ahead of me and I go on and cram more stuff into it. That he virtually has to drag me out of the house to spend a bit of quality time just relaxing.

I always say that I can’t not do something. I even like to work on something while I watch TV. I love audio books cause I can listen to a book while I drive, groom dogs or work in the shed.

I do remember being able to just relax, once, a long long time ago… and I remember having days in my life when I had nothing planned and could spend the day doing as much or as little as I wanted.

What happened to my life?

Does anyone else have this problem?

Up till about a month ago I was working 5 days a week. Now I’m working 3.5 days and I’m busier than ever. Please, someone, explain to me how I manage this.

Failing that, can someone please point me in the direction of a cloning facility?

Ok. Enough of this self indulgent crap. Time to share something creative.

I had found this old frame in an op shop a long time ago. I loved the rose pattern on it but whole chunks of the roses were broken off. A friend (yes, you Diane) told me I could create new roses but that sounded like too much hard work to me.

Besides, I’m a trashy kinda girl. I like things in their natural state of disrepair, patina, rust, grime, etc.

All I did was paint the frame white, then give it a bit of age using some burnt sienna acrylic paint and a damp sponge. It made the roses really pop and the blank spots actually don’t look that bad.

I had been considering putting a chalkboard into the frame, cause, you know, chalkboards are so popular… but I wanted to go a bit different this time. So I put in bird wire.

Yes… I’m going through a bird wire phase…

I did mention the failed attempt at keeping birds from nesting in our roof. On Saturday I had to cut two holes in the wire I slaved to put up in order to remove a dead adult bird and to let out 3 youngsters who were trapped…

I have tons of bird wire I won’t be using on our roof….

Anyway… I got out my trusty staple gun, put in the birdwire and voila!

The photos, for display purposes only, are my parents. Mom as a beach babe, my dad, and the two of them in a loving pose on a beach.

I took the frame with me to the Lazy May Market on the weekend and donated it to the raffle. I did consider buying tickets to the raffle… it would have been quite cool to win it back and keep it! But I didn’t. It didn’t seem fair.

Maybe if I’m lucky I’ll make myself another one!

z

Shared at:

another day, another market


Its been another long day, another fun day at a market. After this market I’m taking a break.

Till the next one.

Actually, I don’t plan to do another till sometime in the beginning of next year. I need a break. I need to do some housework (though I’ve successfully avoided it for so long I’m not sure I remember how…), I need to groom my own stinky dogs, I need to make more stuff to take to the next market.

I need to finish painting the house…

Here are a few photos. Some of these items I will post about when I get a chance, others are sold and I won’t be able to get more photos of.

Like these two bird prints. They turned out great but I wasn’t able to get photos of them before the market.

A flyscreen bulletin board…


Some bin lid magnet note boards…

Some felt animals… little ornaments… sold and not photographed.

A fun altered art frame…

Some bird wire framed birds…

Wayne came with me this time which was great, he’s always handy to have around to carry things, but he’s also chatty and funny.

My brain is fried right now, we had the work Christmas party last night and got home at 11pm, then got up at 5am.

Hopefully, once things get back to normal I’ll be able to post a bit more. You know, normal. Like only 133 things to do a day without the added pressure of a market to get ready for.

I need some sleep.

z

raggedy lampshade

Its been a quiet day here at Wind Dancer Farm. I’ve pretty much succeeded to avoid doing much of anything today.
Wayne’s been out behind the garage sorting out old timber. When we bought the farm there were piles of all sorts of things in the paddocks. Over the last couple of years we’ve gone through and sorted things out, burning the timber which was beyond saving, re-using some of it to build the stable, trying to save as much of it as we could.
In fact, every time Wayne made a pile of rubbish to burn off, I’d sneak out and rescue any bits of wood I thought I could use. He hated it!
The reason we have to do this right now (and by ‘we’ I mean ‘he’) is because we’re planning to have our driveway and the dam fixed and the old timber is lying right in the path of the excavator. Of course, the other reason is to clean up the place. I know farms aren’t usually neat and tidy as there’s always that extra space to ‘just toss that there till later’… I just don’t like big messes. We’ve cleaned up a ton since we moved in here, but there’s still plenty left to do.
Last weekend Wayne sorted out weatherboards for the eventual revamp of our small timber shed. Today he sorted out floorboards. One day I’ll have a little studio shed.
I can dream…
For now I’d settle for a new stove. A new kitchen. A new bathroom. A dam that doesn’t leak. A driveway that doesn’t turn into Niagara Falls when it rains.
I don’t ask for much.
At least I have my projects which allow me to feel a sense of accomplishment amongst all the things on the To Do list.
Like this lamp.

This is an old lamp that I’ve had for quite a few years now. I never had the original shade for it so I’ve never really used it. Its been hanging around in the aforementioned timber shed since we moved here.

Last week, while sorting out things to make, do and finish for the market, I found the lamp base and decided it was time to actually do something with it. I mean, the colour is gorgeous!

I pictured beachy, fresh, white. I pictured texture, rags and frayed edges.

I had kept a couple of skirts I was given , even though I’d never wear them, cause I had planned to do just this with a wire basket I have. I guess the basket will have to wait for other fabric now.

I wove and wrapped the ripped fabric around the wire shade frame, tying new strips as needed, creating a random pattern of weave and knots. I added a few lines of pale taupe as well for a bit of interest.

The result is a gorgeous textured lamp shade. The freshness of the white combined with the turquoise of the base is exactly what I’d been hoping for.

I’m quite happy with how it turned out!

z