artist case

In case you’re wondering what Wayne got for Christmas, well he got a couple of things. Two of them were Viking related: a feast knife and a Fenris cross (a norse wolf cross).

He likes Vikings… what’s not to like about them?
Anyway, the other thing I got him involved a bit of gathering separate (but related) items and a bit of DIY.
I’d seen a soluble graphite presentation box which I liked but when I went back to get it they were sold out. They only had a smaller version but it just wasn’t as good. The box I’d seen originally had a soluble graphite block, a soluble pit charcoal block and a brush. 
I decided I’d buy the bits and make my own presentation/carry case for Wayne. I bought a small tub of soluble pit charcoal, one each of graphite in regular colour and one sepia, an eraser, 2 soluble graphite pencils in different leads and three brushes of different sizes.
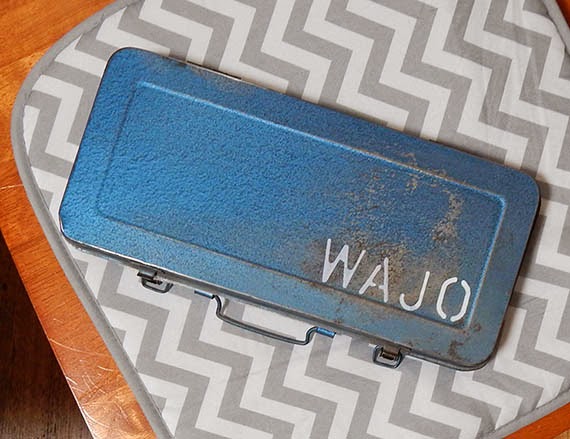
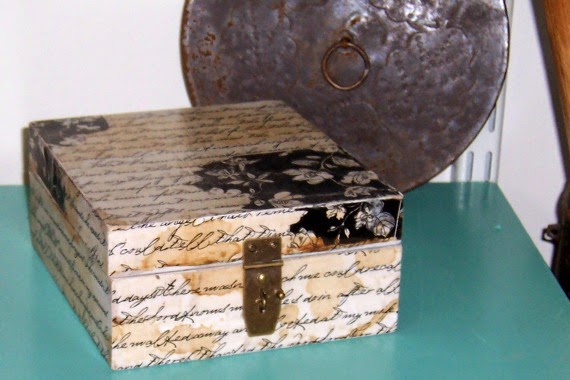
I located an old tin toolbox I had in the casita which was perfect. I had two of them, cause I collect things like that… I made one into a grooming room sign a few years ago (and sorry, I don’t have a photo, I put all my photos and a heap of other stuff on an external drive which decided to give up the ghost), and the other was the perfect size for Wayne’s gift.
So, first things first: I gave it a good clean and a bit of a scrub with some steel wool. Its got some rust and some staining, but hey, that’s part of the beauty of it, right? I then painted his nickname on it.
 
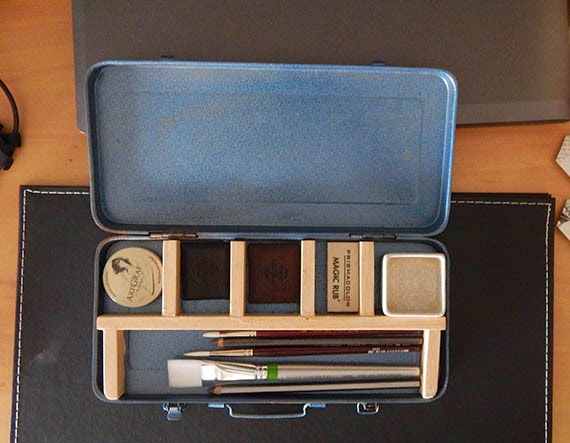
But the best thing is the inside!
I had to make compartments for each of the bits so they wouldn’t just jumble around. They needed to have their own little spots. 
I had an offcut of pine which was just the right size. I cut the bits I needed, sanded any rough spots off, then used liquid nails to glue it together.
Overkill? Perhaps. But I couldn’t find the PVA and the liquid nails was there, saying “go on, use me!”

I also used the glue to fix the pine frame to the tin.

I added a small bowl I had for water, put in the pencils, brushes and graphite blocks. Voila. Presentation case and carry case all in one!

I had planned to spray paint it, but I like the plain pine. I may have to give it a clear coat later to protect the timber from staining, but maybe not. It might add to the patina… what do you think?
I added a good quality drawing block and gave it to Wayne this morning. Now I await his masterpieces.
At least I hope he tries it out. He used to do pen and ink work years ago and I’d like to see him art again.
z

farm fresh

This is a little project I did a couple of weeks ago in another burst of inspiration I didn’t ignore. I mean, if you just sit down and wait, it passes and you can continue to just be lazy.

But while organising the pantry, I decided it was high time I put the baskets I bought off ebay to use. See, I bought these little beauties cheap on ebay (and paid way too much for postage) so I could keep onions and potatos in style.

Problem is, I had nowhere to put them!

You’d think the perfect spot would be in the dark and gloomy entry, near the pantry. But there’s absolutely nowhere to put them in there. Not enough room on the wall near the door, behind the door won’t work, alongside the wall where the fridge is just interferes with the door opening… Its already so squishy in there you can’t have one person at the fridge while another is trying to get in or out of the house.

So what do do?

Well, I decided that the only spot I could conceivably put them as on the side of the kitchen cupboard. But no way was I going to put hooks onto that!

I measured the side of the cupboard and went out to the casita for a scrounge. Sure enough, I had the perfect thing. This was a narrow door off something I picked up from somewhere sometime long ago.

I put one of those galvanised shed hooks (for brooms and gardening tools) on the back and just hooked it over the side of the cupboard. Perfect.

Excuse my blurry photos. Taking photos inside is always dodgey without proper lighting. I have proper lighting… I’m just too lazy to get it!

I did have to do some cleaning, some sanding, remove the rotted support slats on the back and replace them with new ones… and paint a sign.

It might have been easier to just make the thing from scratch with pallet wood… but it wouldn’t have that “I just got saved from the rubbish pile” look to it.

Its kinda funny too, cause today I saw this project by Denise On A Whim… we seem to have had similar inspiration on our signs. Of course her writing is much neater than mine.

Unfortunately I couldn’t leave the baskets ‘au naturel’ because the bird wire has spikey rough edges. I can just see reaching in for an onion (smaller, top basket) or potato (bigger, lower basket) and ripping your hand to shreds.

Or more like Wayne reaching in and ripping his hand to shreds.

So I lined the baskets with a table napkin (top) and a flour sack (bottom). I guess that’s better anyway cause it keeps the contents in the dark. Dark is good for potatos and onions…

z

sag drag and fall

(as opposed to flip flop and fly)

I have no idea what’s wrong with me.

I can’t seem to find the energy to do anything. Or the desire to try to find the energy.

Yesterday I did get one paint of topcoat on the woodwork in the tiny hallway (4 door frames) and the window in the bathroom. But I was seriously dragging my feet as I did it and then I forgot to wash the brushes cause I got sidetracked feeding dogs and feeding and rugging horses…

I did 4 loads of washing, groomed two dogs, cleaning the living room and tried an alternate furniture arrangement (it sucked) and sprayed all the weeds I could using one full load of the backpack sprayer. Then it rained and all my good work went down the drain.

I didn’t even bother trying to get the clothes in off the line.

Ok, when I list the things I did yesterday it doesn’t sound like I was lazy, but trust me… I was. This is not normal behaviour for me. I get up in the morning and I start doing stuff, starting with feeding animals, then moving on to whatever I have in my mind for the day… usually changing them as I go cause I get distracted and sidelined. Like weeding. I see a huge weed and grab the weeder, then, before I know it, half an hour has gone by.

Normally, I’d be painting in the hallway, cleaning or organising things in the house, then I’d find a project I want to do and get onto that. Somewhere along the line I still manage to finish the cleaning and organising jobs I start and do a second coat of paint.

Right now I’m finding I really have to push myself to get off my butt.

Then, instead of getting online and posting on the blog or catching up with all the emails in my inbox, I watch tv like a couch potato.

Wayne says its cause I need to rest.

I say its cause I’m feeling a bit down when things don’t work out. Like the living room re-arrangement. Or the waste of weed spraying.

This morning I gave myself permission to be lazy. I got up, fed animals, pooperscooped the yard, did some weeding (see? all it takes is a walk across what passes as a lawn and I can’t help myself), put up some wire trellis for the sweet peas which didn’t hear that they were supposed to die in winter and are trying to crawl up the porch rails. I also put a trellis up for the jasmine which I want to encourage to grow up the side of the casita.

Its blowing a gale out there and I am trying to convince myself to do another coat on the woodwork (do I really need to? Its just a tiny hallway. Will anyone notice?) or something else productive. Like sew a liner into the large laundry basket I got. Or clean up the wire shelf thingy I got for the office. Oh and tidy the office. Again. And clean the kitchen. And bathroom. And bedroom.

Or maybe just pick one of those and do that.

Right now I just don’t really care to do anything.

However, just so this isn’t an entirely boring whining post, here’s a little something I did to the kitchen wall last week during one of those short bursts of inspiration and energy. I put my two antique food covers and a grain sieve I bought in Greece (you’ll recognise this one Zef) on the wall above the cupboard in the kitchen.
I’ve had these for a few years now but never had anywhere to put them. Now they have a spot and when I need them I can just use the new stepladder to get them down.
Yes, a new stepladder. I realised that the 60s stool/stepladder I have is probably not as strong as it should be for me to climb up to reach high places… I bought a folding stepladder which is slim enough to fit in the gap between the pantry and the wall in our tiny entry way. Its already come in really handy. I’ve used it to organise the pantry last weekend and while painting in the hallway.
Here are some photos of the hallway with the newly painted walls (which should really have had a third coat but I ran out of paint and its only a tiny hallway anyway, who will notice?
I decided to hang some of my fruit labels above the doorways to cheer the place up a bit. This is above the office door.

Above the bathroom and kitchen doors where I need to put a nice light fitting. Love my Tasmanian fruit label with a poodle on it! Ironically I bought it on ebay from the USA many years ago.

Last, the living room door and the spare room door (on the right).

I know have a blank wall on the left where I’m considering putting some hooks for our bags so they don’t sit on the floor or any available surface in the kitchen.

Here’s a look at the ugly, but now organised, pantry in our squishy entry.

When I was doing this last week I made a small shelf out of some leftover bamboo flooring to double the space for the small containers.

I think I know what my problem is… power tool withdrawal. I need to make something. I felt energised when I made the stupid little shelf last week. But I can’t make anything till I clean out the casita so I can actually get to the power tools. And find anything else I need.

Maybe I’ll have more energy tomorrow.

z

an outdoor firebox

This last weekend I did a little work in the garden.

Actually, I’ve been doing a little work in the garden for a couple of weeks now. The emphasis is on little… I’ve had a friend helping me and he’s been doing the heavy lifting. I’ve had him help me move some plants, put in new plants and prepare the vegetable patch for planting.

We have a cement slab in our yard which used to hold a water tank many years before we bought the place. Its just a useless concrete slab in between the house and the Hill Hoist (Australian icon, aka clothes line) which tends to collect ‘stuff’. You know the stuff I mean, the kind of stuff you think “I can’t be bothered taking that back to the right shed now, I’ll just leave it here…”

When we first moved here I asked Wayne to build a trellis there to block the view of the clothes line and water tanks. I had visions that the clematis and banksia roses I planted in front of it covering the trellis and providing a gorgeous screen.

Here are a couple of photos of the trellis from two years ago. First a view of from the clothes line towards the house.

Looking towards the corner of the casita – you can see the clothes line and one of the water tanks.

And looking back towards the house from the other side. The plants are more than double in size since then, but still nowhere near the gorgeous screen I envisaged.

Here are some pics taken on the weekend of the same area. In this one you can see the clothesline behind the trellis. You’ll also see the copper artwork I distressed to get the green patina. Its now garden art.

This spot is great for sitting and relaxing in the afternoons, once the sun heads down behind the trellis. You look over the middle paddock towards the hill, the dam and stable, back up the valley behind the house, and all the front yard. So, when Wayne decided to get rid of the big wood stove he had in the garage and asked if I wanted it as a garden ornament, I jumped at it.  Its perfect for my little outdoor relaxing area.

What would an outdoor post from me be without horses and a gratuitous poodle in the shot?

The wood stove is heavy and very rusty. Just gorgeous. Wayne removed the door and side panels so you can see the rusty metal sides in all their glory. I put some potting mix in the box itself and put in some succulents. They’ll get full morning sun there but shade in the afternoon. I added some of my favourite pots: a once red bucket, a once red biscuit tin and an old jam pan. They’re filled with succulents as well. Only succulents will survive that position in pots in summer as it gets full sun almost all day long.

While I was at potting up succulents, I did a few more. Here’s another favourite of mine. The old mop bucket!

Oh boy, I used to hate those things when I was growing up.

I love spring. I love looking at the garden and seeing the flowers bloom and what new flowers pop up that I don’t remember putting in.

z

Shared at:

office makeover – part 2

The office is almost finished. Sure, things around here are never actually really finished, but its now as finished as it will be for a while.

Warning: these photos were taken ‘in progess’ so they’re not all neat and tidy!

The one thing thats glaringly obviously not finished is the blind on the window. Still the old salmon coloured one. Its a colour that haunts me. Since the window isn’t a standard size I can’t just go buy a cheap blind to replace it so I’m considering my options. Till then, I can live with it.

As you can see above, there will always be boxes of stuff for the various projects I have on the go at any given time lined up in the office. But if I keep my promise to myself and work on one (or two, okay, maybe three) projects at a time, I can keep the mess down. Especially if I put away things I’m finished with.

I bought these two colourful rag rugs online. I had planned to sew them together to make one large rug for the office but they’re very obviously different lengths. Well, the guy did say they’re handmade so they do differ! Doesn’t really matter. I’ll be putting my non-slip rug underneath them and they’ll do the job of keeping the office a bit warmer in winter. Plus, they’re easier to wash when they’re smaller.

I spray painted our filing cabinets gloss black so they’d match. Mine was a purpley colour and Wayne’s was a more original beige. Now they’re both black and they don’t stand out like sore thumbs.

The light fitting is a waste paper basket I hurriedly put up and that needs finishing too. I have the crystals. I just need to get it down and fix it up.
I’ve painted the shelves a deep shade of aqua to match the cute little coat hanger near the map which holds some of my scarves.
The wooden box under the desk holds my power board and once I hinge the top on it it’ll act as a footstool when I’m working at the desk.

My sewing machine will live on its little school desk on castors so its always handy when I need it. My paper storage stool had to find a temporary spot too.

I have plans to make that wall above the sewing machine a wall of memories with photos and shadow boxes.

The map is a feature on the wall near the door. Right now its still a blank wall where I pile boxes of materials. I hope to one day, maybe, possibly, put a nice armchair in that corner near the small cupboard with drawers. I have a reading lamp I’m working on for that corner too.

Maybe.

Its not a big room.

This is my new paperweight. An antique iron. Love it.

My tin rusty tin crown sits on top of the dvd player cause I have no idea where else to put it and it always makes me smile when I see it.

A shabby letter holder now holds my paint brushes and the pottery measure Merrill gave me still holds my necklaces.

I’m still using my old suitcases, metal boxes and baskets for storage as much as possible cause I love the look of them. I have less storage space in the office now I moved the dresser into the kitchen so I really do need them.

The shelves are still a bit of a mess of things I like and want to keep around me, plus things I need in order to work. I figure they’ll sort themselves out eventually.

A small timber box I decoupaged holds my usb sticks and other small but necessary gadgets. The shelf wall and desk are now home to a desktop computer with its own monitor, a TV monitor I connect my laptop to when I’m doing film editing and a dvd/video player so I can watch movies in the office if and when I get an armchair in there.

Eventually I’ll be getting rid of the desktop computer so I’ll have a bit less clutter on the desk, but knowing me, unless I’m very careful I’ll soon lose the desk under tons of paperwork to be filed or acted upon. The theory is that when I love a room I make an effort.

The kitchen is still clean and tidy so there may be hope for me yet.

z

repurposed playpen pot holder

You never expected that the kitchen makeover would be done, finito, finished, so easily – right?

No!

Last weekend I put up my new pot holder. Its not really a pot rack since it sits against the wall.

In fact its not even a pot rack… more like a frying pan and wok rack…

Basically, the layout and size of the kitchen doesn’t really allow for a pot rack hanging from the ceiling. It would feel like a cave in there, Wayne would always bang his head against the pots… a total disaster.

So I considered the playpen side I picked up from a tip shop once and I’ve kept it in my shed (that magical place of mystery and treasures), gathering dust like everything else, forever.

I’ve left it original. That means I didn’t do anything to it. All I did was give it a clean and a light sand (mostly to get off some unidentifiable muck). Its got hinges on either end which I used to attach it to the wall, and a hinge in the middle so it could fold in half back in its playpen sides. Its pretty cool.

I think it works pretty well as a frying pan and wok rack actually. Though not big enough… How many frying pans can one home have? Six apparently. That’s how many we have. Or, technically, five frying pans and one wok.

z

Featured at:

Beyond The Picket Fence

Shared at:

a pallet wood box

You know what its like – you come into the house with an armload of stuff: some shopping, a bag over your shoulder, your keys, phone and sunglasses, maybe an armload of firewood… you just dump it all as soon as you can, on the most convenient surface usually.

Well, I’m over using the end of our kitchen bench as a hold all for everything we bring into the house or dig out of our pockets.

And I’m even more over Wayne running around the house at the last minute every time we’re on our way out going “Where’s my phone? Have you seen my keys? What was I wearing yesterday? I can’t find my wallet!”

I’m hopeful this little addition to our kitchen will help.

When I made the cabinet/bench I had some pallet wood left over. I used it to make this box. It was much easier than the bread box I’m making (more on that later…)

I had this fancy scrolley thingy I bought off ebay to tizzy up the wardrobe in the bedroom (one day). Given it was still lying around in a drawer when I moved the kitchen dresser from the office to the kitchen (yup) I figured I may as well use it before it got all bent from being stuck in a box and put somewhere safe where I’d never find it again.
In other words, I had this thing so I put it on the box to make it look fancy.
Why couldn’t I have just said that first time? 

I painted it in the same blue/green I used on the doors and frame, and, of course, covered it in my favourite ‘grime’ – burnt umber. That way it matches the chalkboard straight away and I don’t have to wait for someone’s grimey fingers to make it look old.
I put it on the wall between the doors so that its one of the first things you bump into as you come into the house. The wall in that spot is just plasterboard and as such wouldn’t be strong enough, so I put a bit of timber on the wall in order to attach the box securely to the wall. I used some old rusted up hooks and eyes for hanging the box.
I just want to dab a bit of white on the screws to hide them a bit and it’ll be finished.
So far its working fine. Its already being used. I’d call that a success.
z

Shared at:

Beyond The Picket Fence

storage bench with pallet top


A long time ago, in a land far far away on one of my visits to the tip shop, I found this little cabinet. Like the one I posted about previously, this little guy was made as a base to a wardrobe. A small wardrobe. This is the only ‘before’ pic I can find (not one of my best, I confess).

It didn’t have a top at all, had a couple of big cracks on the sides and the drawer was broken. In fact it was a real mess. But I liked the shape and handles, and was already thinking bench and shoe storage.

My vision was that one day I’d put a new top on it, give it some new paint and make the drawer into a door.

It sat in the casita for about a year. Maybe more. It held all kinds of junk for a while. It stood on its side a fair bit trying to look inconspicuous… It hung around gathering dust and possum poop (thanks to the resident possum, Mr Ponsonby who has since been relocated, and turned out to be a Mrs anyway).

Eventually I noticed it again and decided it was about time to do something with it and regain some space in my workshop. Especially given I’d pulled apart and repurposed the old shoe cabinet/bench.

I started off by giving it a coat of paint. At the time I was experimenting with greens so I painted the body green, but the handles were painted in a creamy yellow so I stuck with that for the door. I put a shelf inside the cabinet and painted the inside a slightly brighter yellow.


I pulled apart the broken drawer keeping the front. I had to fill the dovetail joints with bits of timber and gap filler to make it into a door rather than the front of a drawer. (Sorry, no pics of that.) I attached a clip closer and hinges so it now opens downward.

I’d always been itching to make something out of pallet wood (I’ve used pallets for many things but never made anything out of the wood) so I went and collected a couple of pallets from the ‘free’ pile outside a hardware store.

To be honest, I’m not sure they’re totally free, I was told they were by a friend and I chose to believe her, but whenever I’ve taken any I’ve always felt rather sneaky about it. Whatever… most of the ‘free’ pallets are broken or made of really cheap wood. Obviously. They’d never throw out good pallets.

Anyway, I got my pallets home and started pulling apart the only one long enough to make a top out of. I split most of the bits of wood I got off. In the end I got enough better pieces to create the top.

It wasn’t easy. I see so many pallet wood projects and I wonder how people do what they do… either they’re getting much better quality pallets than I got, or they’re just plain better than me!

I finally pieced together a top with as few gaps as possible, matching warped boards together like a jigsaw puzzle. I joined the wood together using 2 slats of wood underneath to hold them together and to give them added strength. (Did I mention this was crappy timber?)

Once that was done I sanded it back really well. It looked great.


Only problem was I wanted a weathered timber look, not a brand new look.

So I looked around for some steel wool to put in vinegar and resigned myself to waiting for the requisite rust to age the timber with.

I couldn’t find steel wool. I think I used all I had patching up holes around pipes in the wall in the kitchen! (Apparently mice won’t chew through steel wool. At least I hope they don’t!)

Well, that was the end of that idea. What else could I do?

I got out my artist acrylics and mixed up a watery solution of burnt umber (a colour you hear about a lot on my blog), grey and black. Grey cause weathered wood is always grey and black cause nails holes always go black.

I slopped the watery solution over the wood and let it soak in a bit, then wiped the excess off with a clean rag.

Not quite right yet.

I got out undiluted colours and painted them on and wiped them off, leaving darker areas. I dabbed black over areas of the wood, especially around holes.


I love the way it turned out.

When it was dry I put 3 coats of satin polyurethane on it to finish it.

Finally, I distressed the cabinet a bit in areas where it would normally get wear and rubbed in some burnt umber to give it an old appearance. Not that it wasn’t old, but the paint was new and burnt umber is like the accumulation of years of dirt.

Funny how I refresh something, make it nice and clean, then make it look grimy before putting it in my house… I wonder what that says about my personality…?

I’m still not entirely sure about the colours. I didn’t want just another white or cream cabinet and I had this colour mixed up and thought it would go well with the creamy yellow. An antique colour mix I thought. Do you think I achieved it?

z


Featured at:

Shared at:

Beyond The Picket Fence

kitchen decisions

I’ve been thinking about new kitchen chairs.

And dishes.

And light fittings.

But the chairs pushed themselves to the top of the list when Wayne broke the leg on one of my old kitchen chairs last week.

I always suspected the day would come when I’d need to rethink the rickety, pretty but badly restored chairs I have in the kitchen. I love my mismatched timber tip shop chairs, but truth is there’s only so much strengthening I can do with my limited expertise.

(ie no expertise…)

So, I started looking for new chairs for the new kitchen and found this website:

http://retrojan.com.au/

I love it! I love everything they have. Not that its all right for this house… I would have loved all their furniture in my house in Melbourne which was a 1950’s house both in architecture and my decor.

Anyway, this is the style of chair I thought I’d love in the kitchen. They’ve been all over the  various TV renovation shows and magazines lately. I love the mix of industrial and vintage in a country style kitchen. Plus I think they’d be strong…

I was able to test these ones out at Freedom locally and they’re really nice. Though Wayne is right… they may be too cold!

I like the school-like simplicity of these chairs from Retro Jan. Not as trendy but really cute.

However I’ve decided that Wayne is right. Timber chairs would be better, not to mention warmer!
Finding timber chairs sold separately, that didn’t cost squillions of $$$ is another matter. I managed to find these which should be available locally. I’ll go look at them soon and see.
I think I like the first one best, the last is too chunky. 

Not sure I want them ‘natural’ either but I won’t make any decisions till the kitchen is finished.

I think I need to see it finished and live in it a while before I make final decisions or purchase anything new. Right now I don’t even know how my table will fit in the kitchen with the new layout.

So, where are we on this whole kitchen thing?

Well… this last week has seen the pine panelling on the walls finished. Except for the corner trims… the gaps filled, and the painting.

I’ve undercoated the kitchen door, the window moulding and the trims for the bench and corners.

Handyman has put up the rangehood but not put in the vent cause… of course… we’ve hit a snag. A roof support snag.

Right in the way of the vent.

Naturally.

So we need a bit of flexi pipe or a rigid 90 degree bend to finish it.

Wayne is now asking when, realistically, we can expect the kitchen to be finished.

I want to know too.

Well, Handyman says he will probably be able to put the benchtop in next weekend.

Probably.

I won’t hold my breath. At this stage having no kitchen feels almost normal.

Its been so long!

z

a quick shot of power tools

I mentioned that the other day I got distracted from pulling nails out of the kitchen floor by the fact that I could finally reach my power tools.

Hello circular saw! Hey there jigsaw! Nice to see you again grinder! I sure have missed you guys!

So, while I was there admiring them, patting them, etc, I remembered that I’d promised Wayne I’d put a lid on the box he stores chaff in for the horses. Its a raised garden bed box made of pallet wood that we got (in pieces) from the Men’s Shed in New Norfolk. That’s a community based place where men can go and bond over power tools, as well as learn new skills.

Anyway, Wayne had put this together, lining it better so it would hold the chaff, but he’d never put a lid on it. Up till recently we’d been using pieces of leftover flooring as a lid and moving them out of the way to reach in.

I’d been hit on the head by a falling ‘lid’ a few times…

It was time for a proper lid.

I’d gotten some pieces of laminate flooring from a friend and one piece was almost the right size. Using that and a piece of old timber I’d found, I created a proper lid. I attached the bit of timber to the end to give the lid something to hinge off, then trimmed the lid to the right size.

Since the flooring is that click together stuff, I had to reinforce it with bits of pine that came out of the kitchen. I glued and screwed those into the back to give the lid strength.

Then I used some gorgeous big old hinges I’d picked up from a tip shop. (I tell you, my tip shop finds always come in handy!).

The flooring and the timber slat were different thicknesses, so to make the hinges fit properly I had to pack it up a bit. For this I used some of the masonite we’ve been pulling off the kitchen floor.

Waste not, want not!

Lastly, I found an old handle among my collection of junk, and voila! A working lid. Not perfectly finished, but hay (pun intended!), the horses don’t mind.

No more head bashing cause now when you open it, the piece of timber on the end allows the lid to sit back against the wall with the right lean so it won’t slam back down.

z