i’m a big fan

Thought I’d quickly share these photos of the birthday present I got Wayne this year.

I was looking through the old tool section of a local antique store when I saw this little beauty and just had to grab it. Its a heavy duty fan of some kind of machinery.

(We like getting eachother useless rusty things as gifts. Love it!)

I love the chippy paint and the rust. The photos suck, but hopefully I’ll get better photos of it when I put it up somewhere.

Don’t you think it’d make a terrific light fitting for the new kitchen?

Then again, its Wayne’s present, not mine. Maybe it’d look better on the garage wall!

z

a nice dripping tap

A few weeks ago I bought a replacement tap for our yard.

I got the wrong one. I didn’t know they came in more than one standard ‘yard tap’ size.

But it didn’t go to waste. I had this weathered bit of timber from an old gate or shed door, complete with a rusty hinge. I have no idea what it came off, all I know is that when I saw it in the scrap pile near the stable I grabbed it.

Like everything I collect, I knew it would come in handy one day.

I had drop shaped crystals. I had fishing line. I had crimping beads.

Most importantly, I had the tap and the board, complete with rusty hinge.

I put them all together and now I have a perpetually dripping tap… in the best possible way.

I haven’t found the right spot for it  yet, but I love the look of it near the plants in the new flower beds.

z

Shared at

Beyond The Picket Fence

january = rain and wind

Things have been crazy around here lately.

Holidays are meant to be time to rest, aren’t they? Wonder what I’m doing wrong…

The weather has taken a turn for the worse. Summer in Tasmania… It got windy, really windy. So windy the poodles were pinned up against the fence yesterday. Then it started raining. Its been windy, rainy, windy and rainy, sunny, windy, sunny and windy, sunny and rainy, any and all variations of that for 3 days now.

The ditch on the side of the driveway seems to be doing its job… we haven’t had a waterfall on the garden path. So far so good.

Herman Too has joined the other ducklings and I’m pleased to say we can’t tell which one he is. That’s great news as it means his limp is so much better we can’t see it any more.

I kinda miss having him in the bathtub and saying good morning to him every morning.

I don’t miss the stinky duck poop.

Things are moving along with the plans for the new kitchen (more on that in a separate post), and the retaining wall is mostly finished. Photos of that to come once the dirt settles and the rain stops.

Could be a while…

z

rusty wreath reborn

I love rust. Its no secret. When I see a piece of rusty wire, no matter how bad its condition, my heart skips a beat.

I found this old piece of messed up rusty wire out the back of our property somewhere and picked it up. It was pretty mangled. No way to unravel it, so I did the next best thing. I weaved it into a circle, added a few bits of rusty barbed wire and called it a wreath.

You can see how it looked in its first incarnation here.

I lived with it like that for a while but it just wasn’t … finished.

You know what I mean.


It needed something… more. It needed a strand of wire with glittery green beads on it.

And a couple of aged keys.

The wire with beads was given to my by a friend who said ‘I thought you’d be able to use this’… how right she was!

I love the shine of the gold wire and the sparkle of the beads against the flatness and colour of the rusty wire.

I love the tangles of the wire.

I’d say its finished now… it just works!

z

PS On an aside, the ‘search this blog’ link isn’t working… I have no idea why. It used to work!

Shared at:

the bathroom – or how to make a 15 minute job last 5 hours

This morning I had a plan. I was going to clean the house. And by clean I mean a real spring clean type of clean. Clean up, clear out, organise.
I was optimistic. I’d start in the bathroom cause its the smallest room and would be the quickest to clean and tidy, then move on to the living room, the bedrooms, the office…
Uhuh.
I started in the bathroom around 11am.
I finished around 4.30pm.
How come it took me so long to clean and tidy such a small and ugly room?
Well, cause its small and ugly. I just got to the point where I was hating it more than ever… I decided to take out the tall narrow cabinet I had in there for towels and put up some shelves to make it look more… bearable.
It sounded easy, right?
First I removed the ugly gold and cream fittings from the wall which were never used to hang towels on.
I used my new contra saw to cut down old cupboard doors from the kitchen to make shelves. I had planned to put up 4 shelves but decided to leave it to 3, the top one would have been too high.
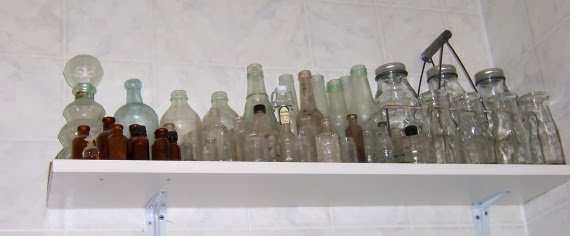
The top shelf holds my bottle collection. Minus one which broke in the move. All crammed in. I will thin them out and only keep the antiques there later. 

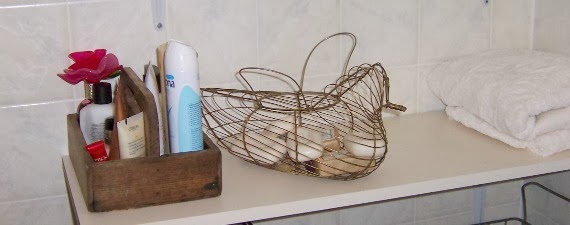
The second shelf will hold Wayne’s towels and, for now, holds my poodle mirror and a small duck basket.

The third shelf will hold my towels, a larger duck basket with soap bars and my small caddy with my toiletries.

I may be the only person in the world who’s like this, but if I don’t have my beauty products out where I can see them, I forget to use them. Ok, not the deodorant. I remember that! And my moisturizer but I do forget to use eye cream or cleansers etc.

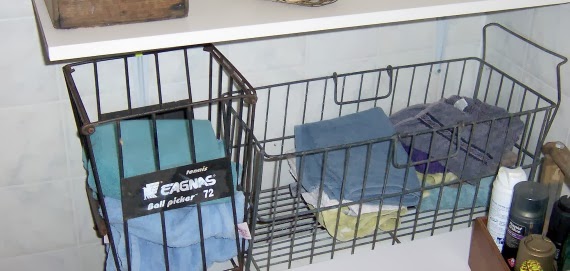
Below the shelf, on top of the bathtub, I’ve put two baskets which I need to make labels for. The tall tennis ball basket will hold bath mats, the larger one will hold hand towels.

I quickly painted a timber door I had from a tip shop trip a while ago. It serves as a shelf over the end of the bathtub. We never use the bathtub so its a waste of space…

While I was at it, I cleaned out the vanity and threw out anything I didn’t use or need. How cathartic! I found I needed more space to put some other products (my perfume bottles, hair spray, etc) so I knocked up a quick caddy to hold them.
I had this odd little box which would be perfect, all it needed was a handle. I found a couple of bits of pine off a cut down bit of trellis. I nailed that to the ends of the box. Then I found an old hammer handle which I used as the caddy handle.

I will paint it one day, but for now its fine as is. It holds stuff and that’s all that matters.

I did discover that taking shortcuts often ends up in disaster.

See, the drill was in the bathroom. I was making the caddy in the workshop in the casita. It was too far to walk in the sun… (about 50 metres). I was too lazy to go get the drill so I just put a nail through the end of the hammer handle.

And split the wood.

So, a clever person like myself soon found a way to fix it… I got a clamp and put it around it, holding it together so it won’t split. HA!

I had to put a nut on the other side to hold the handle in place cause it had a hole way bigger than the nail head. Hey. Make do, right?

So there you go.

Five hours later and I have an orderly bathroom, complete with clean floor, walls, shower, sink, and organised storage. I celebrated by having a shower.

I’m exhausted. I have a headache. Don’t yell at me, I think I’m dehydrated too. I never drink enough and its been hot today.

Time for a rest.

z

Shared at:

vintage book christmas tree

… or how to do a token Christmas tree when you’re not really doing the decoration thing.

Firstly, you panic cause its, like, Christmas, and you have nothing Christmassy to blog about.

You grab a pile of old books you have lying around the house.

You stack them up, making sure they’re in the right order so they form a ‘tree’ shape. Or a pyramid shape.

You look around for something to top the ‘tree’ with. Locate a wooden star you’ve used before.

Balance it on top of the book stack.

You look around for something to trim the tree… I mean, it might just be a stack of books, but the trimming is what makes it a Christmas tree, right?

You find a broken string of pearls you once found on the ground near a bin in the city, and picked up, cause, like, why not. See? You knew it would come in handy one day.

You artfully drape the pearls over the tree.

You step back and admire it, thinking “there, did my Christmas bit”.

Then you go get a camera, take a photo and blog about it.

z

PS I hope you all have a Merry Christmas!!!

wire, frames and photos

Thought I’d share these two wire frames I made and sold at the last market.

This first one is using… you guessed it!… birdwire!

‘Cause as you know, I have a ton of it. Though a ton less than I had before after lining the dog pen with it for the ducks…

Speaking of which, we now stand 2 ducklings down, 8 remaining. One egg down, 9 remaining. And holding our breath.

But I digress. Back to the frame. I have a couple of frames with this design on them so I decided I’d try one as a birdwire photo display.

The second frame I did with the wire lines for something different. (I like the birdwire better!)

Still, they’re both very handy. If I hadn’t sold them I’d be using them right now.

z

flyscreen pinboard

This weathered old flyscreen has been hanging around my shed for a while. I can’t remember where I found it, and I had no idea what I’d do with it, but I loved the look of it, especially the metal flyscreen with a few rusty spots and a few small holes.

ie character.

Anyway, while considering what to make of it, my eye fell upon a piece of bulletin board I had… could I make it into a pinboard?
Yep.
The bulletin board was just the right thickness. I cut it to the right size and popped it into the frame from the ‘front’. I put a piece of plywood on the back to finish it off. 
Now the ‘back’ is the front. You can pin photos or notes onto it, putting the pins through the flyscreen into the bulletn board behind.
I added a bit of wire through the holes already in the frame where the hinges used to be, and it was ready to hang.

I pinned some photos of mom and dad on it for the photos. I’m really enjoying having all these old photos!

I sold this pinboard at the last market to a friend who owns a cafe. Maybe I’ll see it there next time I visit…

z

Shared at:

http://www.funkyjunkinteriors.net/2013/12/salvaged-junk-christmas-candles.html?utm_source=feedburner&utm_medium=email&utm_campaign=Feed:%20blogspot/KCcu%20%28Funky%20Junk%20Interiors%29

an old bathroom cabinet gets an update

I’ve had this little cabinet for a long time now. Back when you could find solid timber bathroom cabinets at the tip shops. For the last few years these guys have become scarce. I’ve only seen plastic (yuck) or metal ones, usually that really awful rental flat stuff.
When I found this cabinet it had the same mirror (which shows its age) but it was painted in layers of thick paint – not in a chippy yummy way at all. Just yuck. The inside was stained and even yuckier…

What I did was sand all the paint off using a grinder with a sanding disc cause it was a serious job which called for the big guns. 
The back of the cabinet and inside of the door was rotten, so I kept the mirror but put in a new sheet of ply to cover the back. I replaced the back with some old tin stuff I’d found. I’m told its siding from an above ground swimming pool. I don’t know. I just liked the look of it.
The metal contrasts nicely with the old distressed timber inside…
And the back has some bits of rust and discolouration cause, you know… its OLD.
Finally, I coated it all with some satin varnish to finish it off.

Originally I’d made my own knob for the door but it broke – and the magnetic catch I put inside the door is really strong and my knob didn’t really give enough grip. So when I decided to revamp it last week I replaced the knob with a sash window pull. A nice old rusty one I had in my collection of drawer pulls and knobs.

When I was living in Fentonbury I had this little guy in my kitchen to hold coffee, tea, etc. Its never been used in a bathroom. But maybe, one day, if we ever get around to redoing our bathroom, it’ll find a place in there.
Unless I sell it first.
z
Shared at:
http://www.funkyjunkinteriors.net/2013/12/salvaged-junk-christmas-candles.html?utm_source=feedburner&utm_medium=email&utm_campaign=Feed:%20blogspot/KCcu%20%28Funky%20Junk%20Interiors%29
 

what to do with an old rubbish bin lid

One day, not too long ago, I found this galvanised iron lid at the tip shop.

I just had to have it. I loved the colour. Or should I say ‘discolouration’? It was marked with old paint and rust and who-knows-what-you’d-rather-not-know-about.

It was wonderful.

I took it home, gave it a good wash, a bit of a scrape with steel wool and it was clean but still colourfully trashy.

Since it was magnetic (see magnet on right hand side of above photo), I thought it’d be ideal as a magnet board for photos or notes or whatever…

But there was a handle in the middle. What to do with that?

Make it into a ‘whatever’ holder!!!

(I did mention I had a whole LOT of birdwire, didn’t I?)

I drilled a couple of holes on the top and bent some wire to make a hanging hook, and done.

The photos are my dad and a friend in cowboy costumes, and my mom and her brother at a dance.

I found a couple more lids at another tip shop a couple of weeks ago and grabbed them. Both of these ones sold at the last market. They were simpler versions of the one above – ie magnetic boards with a hanging hook. They came with 3 magnets made from buttons.

These two were reversible… you could pick which side you wanted to hang as the front – I love both colours. The old galvanised metal as well as the old fashioned green paint.
z
Shared at: 
http://www.funkyjunkinteriors.net/2013/12/salvaged-junk-christmas-candles.html?utm_source=feedburner&utm_medium=email&utm_campaign=Feed:%20blogspot/KCcu%20%28Funky%20Junk%20Interiors%29