costumes not so easy – part 2

More badly cheaply made costumes for our film. 
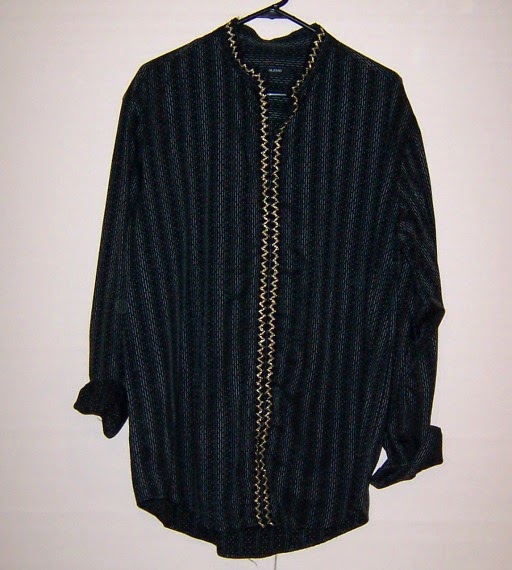
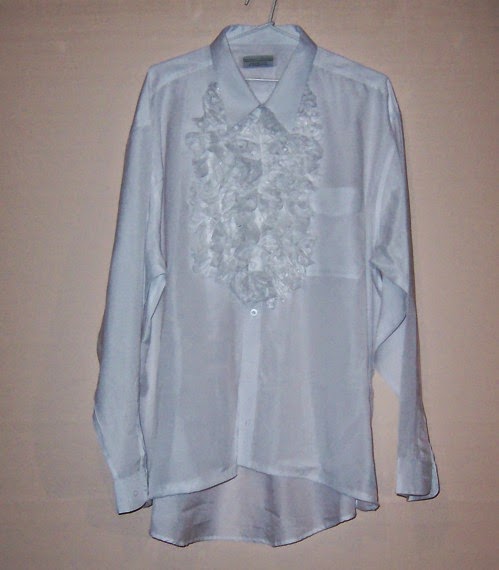
When dressing in a fairy tale/medieval style you need tunics. Loads and loads of tunics. And shirts just don’t make good tunics. At least not for the ‘common folk’ costumes, which can’t have fancy braid to cover the button down the front look of shirts.
So, using some plain grey cotton fabric from my stash, I made the simplest tunics I could. Basically I laid the fabric out in half and cut out a T, along the lines of this pattern:
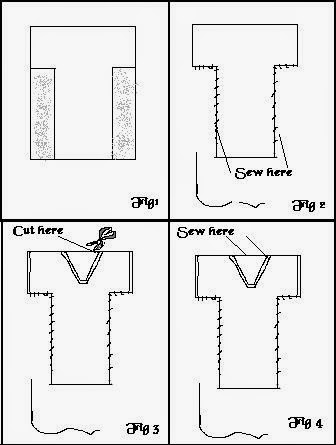
I added elastic to the sleeves to give them a puffy look.

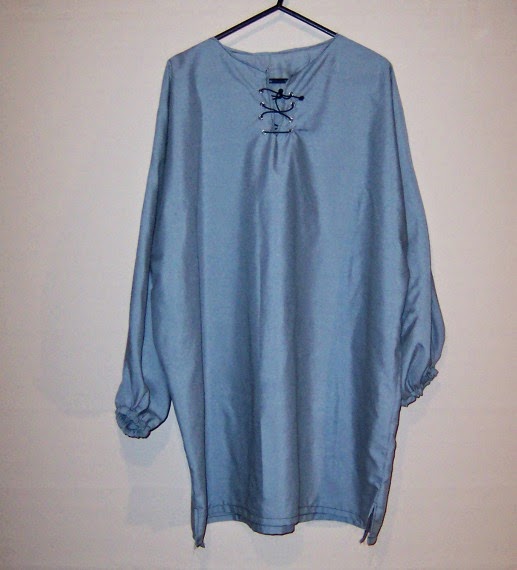
This is where my bad sewing and laziness becomes obvious. I used black thread cause it was on the bobbin and I didn’t have grey, and what the hey, its for a film. You can get away with a lot of fake in movies. 
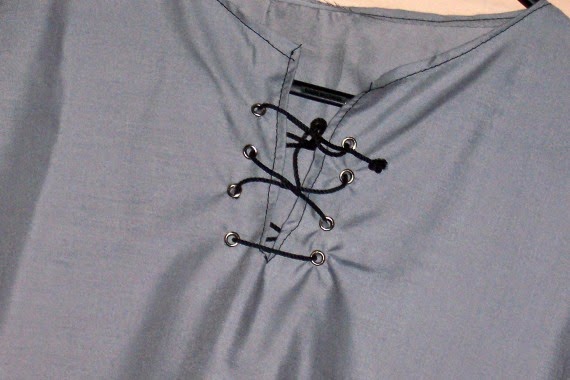
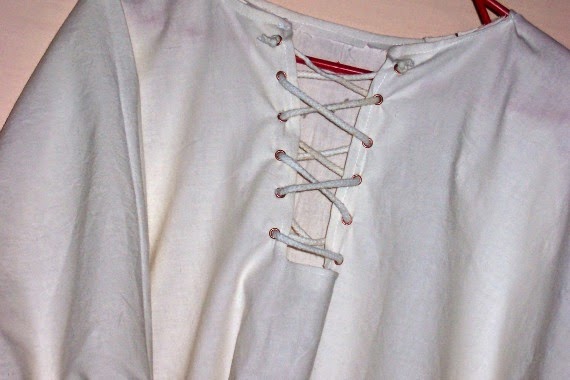
I bought myself one of those eyelet tools and a pack of eyelets in different colours for the lace up front which is a requisite for tunics. Took a few monumental fails putting on the eyelets but eventually I managed to figure out how to use the tool which came without instructions (not even those translated from Chinese to Russian to Swedish and then to English). Not the neatest eyelet/lace up setup I’ve ever seen, but hey… I blame the thin cotton fabric, the fact that I have no patience and no hand strength.
I finished it off with some thin black string I found in my odds and ends.

But hey… its for a film. And you can hide a lot of fake in movies.
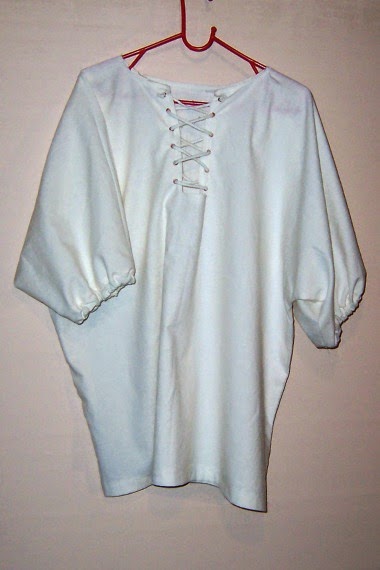
The second plain tunic was better. This one is for the cook and is made of cream fabric with white string. I put more eyelets on this one so it worked better. The sleeves are short cause I didn’t have enough fabric to make the T sides long enough. But its the cooks costume and I figure the cook can have her sleeves pushed up.

The costume is finished off with a cap and an apron. The cap has no pattern. I simply cut a circle cut out of fabric, put elastic around the edge and lace trim. The apron is pretty plain, just a simple apron out of plain white cotton.
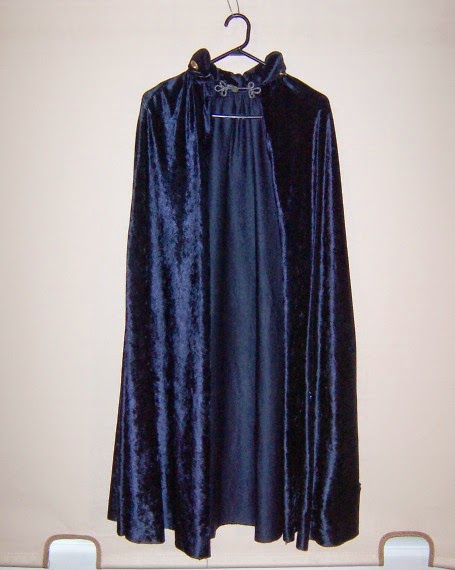
Another costume, for one of the kings, is a cape and puffy pants in a heavy silver fabric. I got lucky with this fabric which I found at an op shop. I think its unlined curtain fabric, but its rich and very royal looking.
This cape will be worn with a pair of gray leggings (on loan from my wardrobe) and some fake boots (more on those in a later post). I also have a cap for this costume cause when this character is young he won’t need to wear his crown (also in a later post).
I made the cape using the simplest template, basically the same one I used to make full circle skirts in my rock’n’roll dance days:

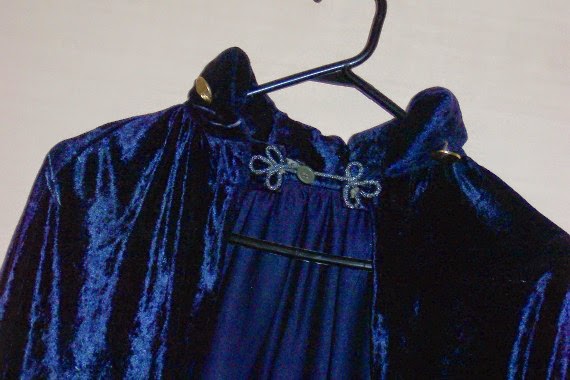
Once the cape was hemmed I got a fluffy knitted scarf and sewed it on to give the impression of fur. Cause kings wore fur of course.
To finish it off I used beads, wire and a bit of chain to create a fancy way to hold the cape closed.

Lastly, the cap was made the same way the cook’s cap was, only this time I had to made it in 4 sections to allow for the stripes in the fabric. I trimmed the edge of the cap with a finer line of scarf/fur, made a scarf/fur pom pom for the top and added a couple of feathers.

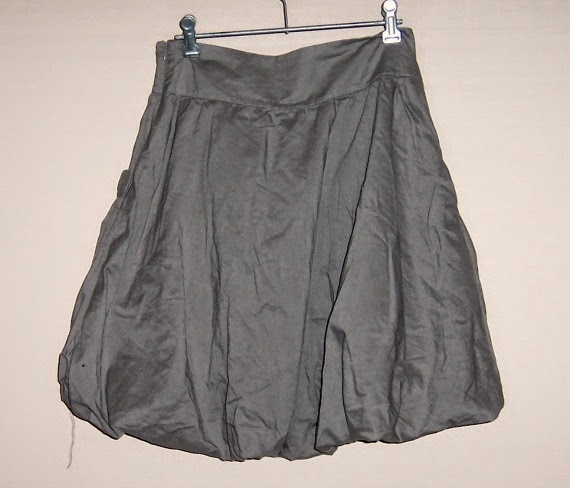
One thing that guys used to wear back then were tights and puffy pants. The skirt I found which I shared in Costumes Part 1 gave me the inspiration to base my ‘puffy pants’ on a more skirtlike design. Instead of trying to make actual baggy shorts, I just made a skirt with elastic around the thighs which will bunch it up, creating a puffy look.
I don’t have a photo of the king’s pants, but here are another character’s pants, they’re basically the same… 
Ok, I could have made shorts. I actually did make shorts. Huge fail. 
I’ve made trousers before, I know how to make a pattern for them… but for some strange reason the shorts I cut out in the silver fabric just did not work. I did what any imaginative fake seamstress would do… I converted them to a skirt which would look like shorts.
Hey. It works.
And you can hide a lot of fake in movies!
z

costume making the easy way – part 1

In case you’ve wondered where I got to over the last few days… weeks…

I’ve been buried in the chaos that is my life. I’ve had no time to post and nothing much to post about. I’m overworked and over-committed. The house hasn’t yet been tidied up since I started making over the office about a month ago. I still have things stacked in the corner of the living room from the kitchen remodel. Instead of finishing things and putting things in their place (or getting rid of them), I’ve just kept adding to the mess.

We haven’t been able to see the living room floor, much less the coffee table surface, for over three weeks now. It looks like my brain exploded in here.

Why you may ask? Well… its because I offered to make the costumes for a movie we’re making in one of my programs at work.

Obviously!

See, I take pride in what I do… and since I have nothing to do in my 1 minute of free time a week, I thought I’d offer to take on yet another TO DO for my list cause I want our movie to look as good as possible.

As good as possible means costumes that look right for the story and aren’t just a mishmash of cobbled together bits and pieces we could scrounge from wherever. That means making costumes that look right from bits and pieces I could scrounge from wherever… tip shops, op shops, my fabric collection, my wardrobe, my friend’s wardrobes, wherever.

And all those boxes and bags have been placed in the living room in an orderly fashion.

haha.

Ok, firstly, what’s the movie about? Its a fairy tale of good vs evil, kings and queens, a prince, a mermaid, love, friendship and a magic rabbit. The story was written by the group I work with so it pretty much had to cover everything.

Its set in a land far far away, a long long time ago, therefore the costumes are more or less renaissance in style.

So I started the easy way.

First I looked through the wardrobe shared by the drama programs. This blue cape is one piece we’ll use but I’m not sure which character will wear it yet. 
I also found this purple cape which had a silver collar that made it look very ‘magician’-like. I put some fake black fur on the collar to make it a bit more regal.
I found this funny skirt in an op shop. Its perfect as puffy pants. You know those puffy pants guys used to wear over their tights? 
Ok. I’ll get photos of the full costumes so you’ll be able to picture it then.
Next I moved on to adjusting clothing. These shirts were donated or found at op shops and were in my program’s wardrobe. I cut off the buttons and collar, stitched the front closed, added fancy braiding and voila: tunic.
A black one for the bad guy.

A regal looking burgundy one.
Embellished with gold buttons, gold stitching (bad stitching) and a vintage earring.
A regal purple one with gold braid trim and an oversized gold button embellishment.
I adapted a white shirt for the magic rabbit costume. All I did for this one was add ruffles of wide lace ribbon.
Since the jacket worn over this shirt won’t close (its not big enough) I made the lace bib nice and big to make it a feature. 
The rabbit costume is based on Tim Burton’s Alice in Wonderland white rabbit but I couldn’t find a blue blazer. I opted to use my old dog show red jacket. I shortened the sleeves temporarily by hand stitching them, then added lace to the cuffs. The lace was cut off a ripped table cloth.
The bow tie was an op shop silk scarf which I tied into a bow and added elastic to go around the collar. Of course this costume comes with a set of pink and white bunny ears and a pair of white trousers.
No rabbit costume is complete without a tail. For this I used a leftover white pom pom from the pom pom chair suite
The rabbit costume has optional spats made from a red tartan napkin. I thought they might add a bit more ‘spiff’ to the rabbit but it’ll depend on how the costume looks when its all together. I have a small gold clockface and some gold chain which I hope to make into a fob watch too.
Stay tuned for more costumes.
z
Shared at:
Beyond The Picket Fence

office makeover – part 2

The office is almost finished. Sure, things around here are never actually really finished, but its now as finished as it will be for a while.

Warning: these photos were taken ‘in progess’ so they’re not all neat and tidy!

The one thing thats glaringly obviously not finished is the blind on the window. Still the old salmon coloured one. Its a colour that haunts me. Since the window isn’t a standard size I can’t just go buy a cheap blind to replace it so I’m considering my options. Till then, I can live with it.

As you can see above, there will always be boxes of stuff for the various projects I have on the go at any given time lined up in the office. But if I keep my promise to myself and work on one (or two, okay, maybe three) projects at a time, I can keep the mess down. Especially if I put away things I’m finished with.

I bought these two colourful rag rugs online. I had planned to sew them together to make one large rug for the office but they’re very obviously different lengths. Well, the guy did say they’re handmade so they do differ! Doesn’t really matter. I’ll be putting my non-slip rug underneath them and they’ll do the job of keeping the office a bit warmer in winter. Plus, they’re easier to wash when they’re smaller.

I spray painted our filing cabinets gloss black so they’d match. Mine was a purpley colour and Wayne’s was a more original beige. Now they’re both black and they don’t stand out like sore thumbs.

The light fitting is a waste paper basket I hurriedly put up and that needs finishing too. I have the crystals. I just need to get it down and fix it up.
I’ve painted the shelves a deep shade of aqua to match the cute little coat hanger near the map which holds some of my scarves.
The wooden box under the desk holds my power board and once I hinge the top on it it’ll act as a footstool when I’m working at the desk.

My sewing machine will live on its little school desk on castors so its always handy when I need it. My paper storage stool had to find a temporary spot too.

I have plans to make that wall above the sewing machine a wall of memories with photos and shadow boxes.

The map is a feature on the wall near the door. Right now its still a blank wall where I pile boxes of materials. I hope to one day, maybe, possibly, put a nice armchair in that corner near the small cupboard with drawers. I have a reading lamp I’m working on for that corner too.

Maybe.

Its not a big room.

This is my new paperweight. An antique iron. Love it.

My tin rusty tin crown sits on top of the dvd player cause I have no idea where else to put it and it always makes me smile when I see it.

A shabby letter holder now holds my paint brushes and the pottery measure Merrill gave me still holds my necklaces.

I’m still using my old suitcases, metal boxes and baskets for storage as much as possible cause I love the look of them. I have less storage space in the office now I moved the dresser into the kitchen so I really do need them.

The shelves are still a bit of a mess of things I like and want to keep around me, plus things I need in order to work. I figure they’ll sort themselves out eventually.

A small timber box I decoupaged holds my usb sticks and other small but necessary gadgets. The shelf wall and desk are now home to a desktop computer with its own monitor, a TV monitor I connect my laptop to when I’m doing film editing and a dvd/video player so I can watch movies in the office if and when I get an armchair in there.

Eventually I’ll be getting rid of the desktop computer so I’ll have a bit less clutter on the desk, but knowing me, unless I’m very careful I’ll soon lose the desk under tons of paperwork to be filed or acted upon. The theory is that when I love a room I make an effort.

The kitchen is still clean and tidy so there may be hope for me yet.

z

a place for our keys

Once upon a time Wayne had this box in his garage. I think he once told me it was meant to hold a dartboard…

I remember now (hard not to with all the yelling…),

…but I’d forgotten it before I pulled it apart…

Anyway, from the moment I spied it just sitting idly against a wall, I had plans for it. I found it was made of 2 boxes joined together so that their doors opened outwards like a wardrobe.

One day I got inspired and pulled it apart. That’s when he reminded me what it was for.

oops.

Anyway. What was done was done by then. I may as well do something with it to make the destruction worth it, right?
What I saw when I looked at it was a key storage box… a place to keep our keys organised and labelled. (Sorry, no before photos.)

Making into what it is now wasn’t an easy job. When i pulled it apart it had chipboard glued to the inside. REALLY well glued. I ended up taking chunks of timber out when I tried to pry it out using a chisel and scraper. Then I put the sides back so it was a single box with a door even though the inside was awful with all the gauges.

That meant I had to find a backing for it. That’s when inspiration struck.

Ages ago when we visited the guy who we bought timber from for the mud room, I saw all these strips of hardwood he was throwing out. They were the edges of timber he’d trimmed to size. They were the same width but the thicknesses varied. I collected some and they’d been sitting in the carport since I brought them home. I got some out, sanded them, cut them to size, gave them a wash of different colours, then used them to line the box. It gave the box a beachy kind of feel.

Ok… I don’t do beachy… so I had to figure out how to finish the outside of the box so it suited my style but didn’t look out of place with the inside!
The door to the box has a fancy design on it with a name in the middle. Sort of like a wine crate would have… I wanted to keep that somehow, but had no idea as to what I wanted to do with it. I considered painting keys on it, stenciling words… 

I wanted to use keys for the obvious reason. And I remembered the antique keys I brought home from Greece. I wanted to use them on something I’d keep, so why not this?

I experimented with some expendable keys and different glues to see which would work best and then glued the keys on the door. The 3 bigger keys are from Greece, the rest are from my ‘antiqued’ key collection.

I had started painting the box creamy yellow, then brown in a way to make the fancy border stand out, but I just didn’t like it.

I went ahead and painted it in layers of different coloured paints in the sloppiest way I could, till in the end I topped it off in the minty green I’ve been using everywhere else.

Then I distressed it.

Naturally.

The colours in the photos vary a lot, sorry about that. Its cause I took them in different places inside and not outside on an overcast day.

They key box is now hanging in the corner of the office between the window and the wall with the antique map.

It doesn’t have many keys in it yet. I have to sort them out and label them properly so we know what’s what.

One day I plan to be organised.

In this lifetime even.

z

Shared at:

Beyond The Picket Fence

more or less back to normal

More or less. The kitchen is working great, but could use some shelves.

I’m getting to them.

The office is coming along. The floor is looking great, I put the shelves back up and have put in a ton of my necessary stuff. I also packed away things I don’t need on hand all the time.

I can’t wait to get rid of the old computer, but till I get all the programs I need on the laptop I have to live with 2 computers on my desk.

I’ve been going through a phase, trying to minimise things in the house and in my life. I’ve moved most of my craft stuff to the shed in plastic storage boxes. When I work on a project I just go and get the specific box I need. If I keep putting boxes back when I’m finished with them I can stop the office from becoming a dumping ground.

I need to clean and organise the pantry. Another huge job. Not to mention that I need to do the floor in there as well.

Later.

The filing cabinets are outside on the footpath.

I moved them there today so I could spray paint them both. Wayne’s is cream and mine is purple. I wanted them to match since they always go in my office.

So now I’m waiting for them to come back inside so I can finish putting things away. Not that they’ll come in on their own… no such luck. But I think I’ll rope Wayne into bringing them in for me. Getting them out was hard enough.

The living room is back to an almost normal configuration – some office and kitchen stuff still lingers, waiting for its forever home and racks dry clothes in front of the heater. All I seem to do is move things from one room to another in a vicious circle as I move my attention from one part of the house to another.

Will we ever live in a house where everything is in its place or am I doomed to repeat this pattern forever?

Don’t answer that.

z

repurposed playpen pot holder

You never expected that the kitchen makeover would be done, finito, finished, so easily – right?

No!

Last weekend I put up my new pot holder. Its not really a pot rack since it sits against the wall.

In fact its not even a pot rack… more like a frying pan and wok rack…

Basically, the layout and size of the kitchen doesn’t really allow for a pot rack hanging from the ceiling. It would feel like a cave in there, Wayne would always bang his head against the pots… a total disaster.

So I considered the playpen side I picked up from a tip shop once and I’ve kept it in my shed (that magical place of mystery and treasures), gathering dust like everything else, forever.

I’ve left it original. That means I didn’t do anything to it. All I did was give it a clean and a light sand (mostly to get off some unidentifiable muck). Its got hinges on either end which I used to attach it to the wall, and a hinge in the middle so it could fold in half back in its playpen sides. Its pretty cool.

I think it works pretty well as a frying pan and wok rack actually. Though not big enough… How many frying pans can one home have? Six apparently. That’s how many we have. Or, technically, five frying pans and one wok.

z

Featured at:

Beyond The Picket Fence

Shared at:

a pallet wood box

You know what its like – you come into the house with an armload of stuff: some shopping, a bag over your shoulder, your keys, phone and sunglasses, maybe an armload of firewood… you just dump it all as soon as you can, on the most convenient surface usually.

Well, I’m over using the end of our kitchen bench as a hold all for everything we bring into the house or dig out of our pockets.

And I’m even more over Wayne running around the house at the last minute every time we’re on our way out going “Where’s my phone? Have you seen my keys? What was I wearing yesterday? I can’t find my wallet!”

I’m hopeful this little addition to our kitchen will help.

When I made the cabinet/bench I had some pallet wood left over. I used it to make this box. It was much easier than the bread box I’m making (more on that later…)

I had this fancy scrolley thingy I bought off ebay to tizzy up the wardrobe in the bedroom (one day). Given it was still lying around in a drawer when I moved the kitchen dresser from the office to the kitchen (yup) I figured I may as well use it before it got all bent from being stuck in a box and put somewhere safe where I’d never find it again.
In other words, I had this thing so I put it on the box to make it look fancy.
Why couldn’t I have just said that first time? 

I painted it in the same blue/green I used on the doors and frame, and, of course, covered it in my favourite ‘grime’ – burnt umber. That way it matches the chalkboard straight away and I don’t have to wait for someone’s grimey fingers to make it look old.
I put it on the wall between the doors so that its one of the first things you bump into as you come into the house. The wall in that spot is just plasterboard and as such wouldn’t be strong enough, so I put a bit of timber on the wall in order to attach the box securely to the wall. I used some old rusted up hooks and eyes for hanging the box.
I just want to dab a bit of white on the screws to hide them a bit and it’ll be finished.
So far its working fine. Its already being used. I’d call that a success.
z

Shared at:

Beyond The Picket Fence

office makeover

In case you’re wondering where I’ve disappeared to for the last week or so, few posts… I’ve been on my knees working on the office makeover.

I’ve often mentioned how much I hate the salmon carpet throughout our house. And how much I specifically hated the office carpet cause the dogs (NOT my dogs! Mine are toilet trained.) used it as an indoor toilet.

A bit of background for those of you who don’t know our story: when Wayne and I got together he brought 2 dogs into the relationship: Mischa, a purebred staffie, and Barney, her illegitimate spoodle cross son. Neither of them had ever been indoor dogs. They were escape artists and were penned when Wayne was at work and at night, and rarely allowed into the house. When we moved in here we kept them in the dog run when we were at work and they slept in the garage at night. I soon moved them into the entry way and allowed them in the rest of the house when we were here. When Mischa died I felt sorry for Barney so he’s been a couch dog since. While in the house and out of our sight, they would often use the office carpet as their private restroom.

As a result the carpet in there was disgusting. I’d started removing it before we started the kitchen makeover and when there was another ‘accident’ in there (cause I forgot to close the door) I’d just cut out and throw away the piece of carpet. Why bother trying to clean it up?

So, over the week I had off and Wayne was away, I started the office makeover. First step was to remove the old carpet and underlay (which I re-use as a weed barrier).

Then I sanded the floor the same way I did the kitchen. First I went over it with the belt sander, then with the orbital sander and finer grit.

The floorboards now run from the kitchen, through the small hallway to the office.

After sanding both the office and hallway, I gave the office floor 3 coats of polyurethane. The hallway will have to wait. I ran out of time.

Next I I removed the shelving from the wall. I should really had done that sooner (like before sanding!) but the living room was already squeeze through room only. Once the floor was polished I took eveyrthing off the shelves, piled it into the middle of the room on a dropsheet. I now have to clean it all!
I painted the office walls the same colour as the kitchen, 3/4 strength Dulux China White. It looks so much brighter in there now. I had grown to dislike the blue which I thought was grey when I picked it. I also did the skirting boards, window and door frames in Dulux Antique White USA.

I still have to work out the window covering situation… I was considering painting the old blind but it doesn’t fit on the inside of the window frame, and its a bit worse for wear. I’ll work out what I want there eventually.
I have put a few things in the office, but can’t finish things till I work out the shelves. I’ve painted them and have to decide how to configure them. Now that I’m making films I’m thinking of putting my small flat screen in there as a second monitor. That means working out how to best place the shelves and screw them into the brackets before I can start replacing things to clear the floor.
I’ve put Wayne’s antique map on a different wall and placed my desk under the shelves. The plan is to minimise the crap stuff I put in the office. And try to work on ONE project at a time (says the woman who can’t see the coffee table or living room floor cause of office stuff and fabric to make costumes for a film!). 
The plan is to put an armchair in this corner and only have the sewing machine on a small table with wheels, the computer on the desk, and only the things I use most often in the office. And a rug.
And not jam pack the office with a million things to ‘get to when I can’.
Yeah, yeah, famous last words. However, I must point out that the kitchen is still neat and tidy and hasn’t begun to accumulate junk on surfaces. I love it so much I even wipe and put away anything I have to wash by hand immediately!

Here is a preview of another project I’ll post about when I get a chance… they key box!

And, as a bonus, you get to see part of the pile in the middle of the floor.
I hope to be able to get more done on the office this weekend but back to work means doing things in dribs and drabs. I’ll keep you updated.
z

storage bench with pallet top


A long time ago, in a land far far away on one of my visits to the tip shop, I found this little cabinet. Like the one I posted about previously, this little guy was made as a base to a wardrobe. A small wardrobe. This is the only ‘before’ pic I can find (not one of my best, I confess).

It didn’t have a top at all, had a couple of big cracks on the sides and the drawer was broken. In fact it was a real mess. But I liked the shape and handles, and was already thinking bench and shoe storage.

My vision was that one day I’d put a new top on it, give it some new paint and make the drawer into a door.

It sat in the casita for about a year. Maybe more. It held all kinds of junk for a while. It stood on its side a fair bit trying to look inconspicuous… It hung around gathering dust and possum poop (thanks to the resident possum, Mr Ponsonby who has since been relocated, and turned out to be a Mrs anyway).

Eventually I noticed it again and decided it was about time to do something with it and regain some space in my workshop. Especially given I’d pulled apart and repurposed the old shoe cabinet/bench.

I started off by giving it a coat of paint. At the time I was experimenting with greens so I painted the body green, but the handles were painted in a creamy yellow so I stuck with that for the door. I put a shelf inside the cabinet and painted the inside a slightly brighter yellow.


I pulled apart the broken drawer keeping the front. I had to fill the dovetail joints with bits of timber and gap filler to make it into a door rather than the front of a drawer. (Sorry, no pics of that.) I attached a clip closer and hinges so it now opens downward.

I’d always been itching to make something out of pallet wood (I’ve used pallets for many things but never made anything out of the wood) so I went and collected a couple of pallets from the ‘free’ pile outside a hardware store.

To be honest, I’m not sure they’re totally free, I was told they were by a friend and I chose to believe her, but whenever I’ve taken any I’ve always felt rather sneaky about it. Whatever… most of the ‘free’ pallets are broken or made of really cheap wood. Obviously. They’d never throw out good pallets.

Anyway, I got my pallets home and started pulling apart the only one long enough to make a top out of. I split most of the bits of wood I got off. In the end I got enough better pieces to create the top.

It wasn’t easy. I see so many pallet wood projects and I wonder how people do what they do… either they’re getting much better quality pallets than I got, or they’re just plain better than me!

I finally pieced together a top with as few gaps as possible, matching warped boards together like a jigsaw puzzle. I joined the wood together using 2 slats of wood underneath to hold them together and to give them added strength. (Did I mention this was crappy timber?)

Once that was done I sanded it back really well. It looked great.


Only problem was I wanted a weathered timber look, not a brand new look.

So I looked around for some steel wool to put in vinegar and resigned myself to waiting for the requisite rust to age the timber with.

I couldn’t find steel wool. I think I used all I had patching up holes around pipes in the wall in the kitchen! (Apparently mice won’t chew through steel wool. At least I hope they don’t!)

Well, that was the end of that idea. What else could I do?

I got out my artist acrylics and mixed up a watery solution of burnt umber (a colour you hear about a lot on my blog), grey and black. Grey cause weathered wood is always grey and black cause nails holes always go black.

I slopped the watery solution over the wood and let it soak in a bit, then wiped the excess off with a clean rag.

Not quite right yet.

I got out undiluted colours and painted them on and wiped them off, leaving darker areas. I dabbed black over areas of the wood, especially around holes.


I love the way it turned out.

When it was dry I put 3 coats of satin polyurethane on it to finish it.

Finally, I distressed the cabinet a bit in areas where it would normally get wear and rubbed in some burnt umber to give it an old appearance. Not that it wasn’t old, but the paint was new and burnt umber is like the accumulation of years of dirt.

Funny how I refresh something, make it nice and clean, then make it look grimy before putting it in my house… I wonder what that says about my personality…?

I’m still not entirely sure about the colours. I didn’t want just another white or cream cabinet and I had this colour mixed up and thought it would go well with the creamy yellow. An antique colour mix I thought. Do you think I achieved it?

z


Featured at:

Shared at:

Beyond The Picket Fence

cabinet door chalkboards

Once upon a time I had an old footlocker/wardrobe base which went with the wardrobe Wayne brought with him when we moved in together. Our ceilings in the bedrooms are too low for us to use this as intended (as a base for the wardrobe) so it sat on the front porch for a couple of years as a kind of ‘hold all’ for anything we weren’t sure what to do with.

Since it didn’t have a proper top, I did a mosaic on it so it would look pretty on the porch while it held Wayne’s boots. I had five old, crazed, oblong tiles and a ton of plain white ones. I used the green tiles (funny, guess I was always attracted to that colour!) in a staggered pattern with the white around them. I colour matched the green tiles and did one coat in that, then topped it with white which I distressed to show the green through.


Wayne made spoon handles and a wire closer for the doors (not pictured, sorry).

When I had to move back to my old house in Fentonbury for a while, it made an appearance there…

but it spent the majority of its life on our porch outside the mud room. Here it is in its prime, before the accumulation of crap useful items seeking a permanent home began to accumulate.

Then Wayne started using the cabinet as a bench and sat on the corner while pulling on boots, breaking the chipboard top… pieces of tile everywhere… It wasn’t worth salvaging so I did what any reasonable person would do, I kept the doors and chucked the rest out.

In fact, its still in the junk pile waiting to be taken to the tip…

The doors became my first experiment with milk paint.

I bent the spoons a little more to make them into chalk holders.

I do like the textured effect of the milk paint, but I can’t say I’m a convert…

All in all, I’d say the latest incarnation of the (leftover bits of) cabinet have turned out ok.

z


Shared at: