Unknown's avatar

About zefiart

Blogger, DIY-er, poodle lover, graphic designer, dog groomer, recycler, artist, wonder woman in my spare time.

the grooming room

 
I know, its been a while since I’ve posted and I do apologise from the depths of my heart.

I’ve been busy. In fact, I’ve been so busy I almost forgot to sleep this last weekend.

I kinda got into the ‘zone’ with tidying up the workshop and grooming room, and then my head was buzzing with ideas and plans and projects… sometimes I wish I had a ‘sleep’ button.

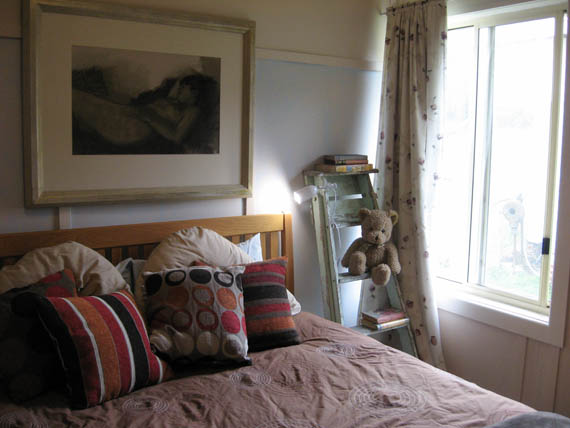
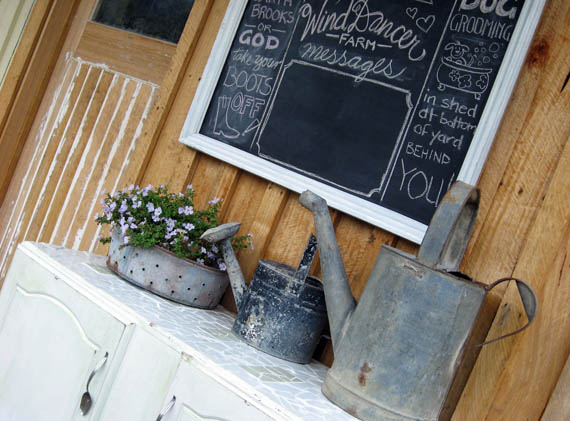
So, here’s just some of the stuff I did this past weekend. I decided to rearrange the grooming room to incorporate this big ugly pink thing I got from an op shop a couple of months ago.

(I sort of had to do something with it. It was in DJ’s garage and he’d threatened to do nasty things to me if I didn’t move it soon.)

 
Very pink huh? I had planned to paint it and use it in the office. Or something… I mean, it was cheap. Very cheap. It’d come in handy for somewhere!

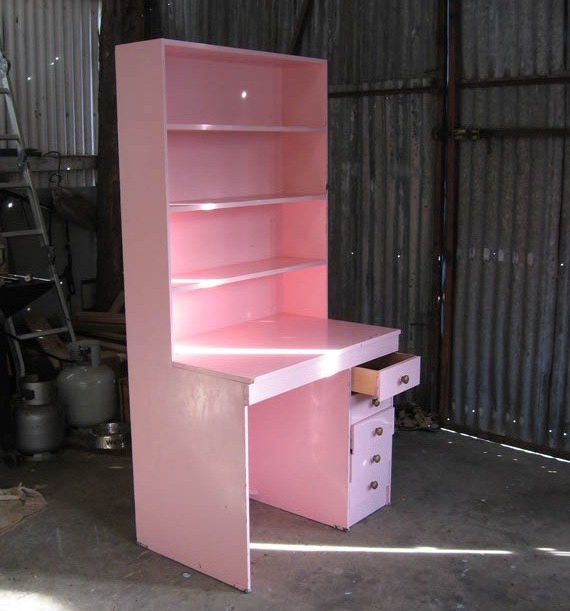
It even came complete with all these stickers! ugh. Which wouldn’t come off.

 
Since I wasn’t painting it I didn’t want to spend time scraping or sanding them off. And I was in a hurry to just move it into the grooming room and get it done.

This is what that corner of the grooming room looks like now. Big Pink in the corner holds all the grooming tools and beautifying products. It now has hooks on the side to hold some of my dogs’ fancy collars and hooks off the middle shelf so I can hang the clippers and dremel. And there’s a hook on the wall to hold the dryer hose out of the way.

The other corner holds the bigger grooming table, part of my poodle collection (you can just see them all, clamouring to get out!) and the newest tip shop chair waiting to be make over.

The floor, plain concrete, is covered with rubber tiles under the grooming area – easy to sweep up and nice and comfy underfoot. There’s an old rug on the other side of the room to further insulate the floor.


The other side of the room, on the window side, holds 2 dog beds. Along the wall to the right of the above photo are dog crates, another display cabinet with just as many poodle figurines and dog blankets piled up higher than my head.

When I put Big Pink in the grooming room I moved out a bench, which is now living in the laundry. It works perfectly there – underneath it holds 2 laundry baskets plus 2 grooming/show tool boxes. The top of the bench is a great place to put washing baskets and sort washing. I’m planning to put a couple of shelves in there soon and make that room over a bit.

The other things that were moved were 2 smaller cabinets which are now in the hydrobath room holding towels.

Before you ask to see the rest of the casita, let me remind you that the casita is an old, OLD house… the original farm cottage on our property. It has no foundations as such, and someone somewhere along the line, thought that taking up whatever flooring was in most of the casita and replacing it with concrete was a good idea… It may very well have been a good idea.

If the concrete wasn’t just sitting on the wettest ground this side of the great flood.

So… the rooms with concrete floors are damp. Badly damp. One room is totally unusable. Unless you plan to grow mushrooms. The grooming room isn’t so bad, but its not great either. The hydrobath room and the laundry are … well… lets just say there are patches of concrete which never seem to be totally dry, even when I haven’t washed a dog in a week.

In the front part of the casita, where floors are timber, its great.

However, there are parts of the ceiling which are sagging or totally missing. In the damp areas there are walls with mould. Eeech. Given the floors get so damp in winter, how on earth do you even THINK about fixing the damp walls?

When we first saw this place we dreamed of fixing up the old cottage. It has character. It has baltic pine ceilings (where it has ceilings). But its a real mess, and we don’t have the money to fix its problems.

So, it remains a shed. A grooming room. A dog washing room. A laundry. A workshop. A horse feed room. And a dark gloomy mushroom growing room.

One day, when I’ve patched up holes in walls, replaced missing wall panels, whatever, I might be able to show you areas of rooms, like the laundry. Till then, trust me. It ain’t so pretty!

z

teeny tiny birdcage

Just a little something I whipped up while watching TV.

My hands were bored.

The inspriation? Pinterest of course! On my Wired board.

I used a bottle top, then two different gauge wires. I love my tiny birdcage.

I haven’t yet found anywhere to put it, or use it. But then again, my house (and shed) are full of things I love but haven’t yet found a place or use for. I’ll get to it eventually. I always do.

At least for a while.

I’ll find a place for something, then one day I’ll be doing up another room or another corner and I’ll scavenge my house for the perfect item to finish it off. I’ve been known to plunder a vignette/room/shed/outdoor area for that perfect item to finish another vignette/room/shed/outdoor area.

Everything can be re-used.

Well. Almost everything.

Some things are best sent to the tip.

I know that.

We’re planning a couple of tip trips over the next weeks. I’ve been collecting piles of stuff in a corner near the casita and DJ has been busy burning piles of scrap wood (sob) and rubbish in the paddocks and piling stuff that needs to go too.

Although I’m losing my stockpile of weathered wood, we’re finally cleaning up the rubbish piles we inherited when we bought this place.

There is still a huge stack of timber near the garage. We plan to use that over our September break in my crazy woodshed makeover. It was once great wood. A mix of hardwood lining (like the stuff used in the mudroom), floorboards and weather boards. I’d love to keep it for something special, but the fact is its rotting in the weather. When we bought the house it was lying on the side of the garage, semi wrapped in plastic. We moved it to higher ground and wrapped it better.

In come the horses. Over the last few months they’ve unwrapped it and scattered timber all over the place. Breaking bits of it as they walk over it… you get the picture. Its a matter of use it or lose it.

Since we first moved here we’ve had this ugly woodshed. The shed itself is cute and stable – with round corner posts and a timber floor. The undercover area outside needs a serious bit of work as it was done the wrong way and the beams are all sagging and the roof is hanging low. That will be fixed (if I have anything to do with it) but the woodshed itself – I have plans!

Its currently covered in thick shadecloth. Ok… it works I guess, but its ugly. It looks like a badly wrapped package. I plan to rip that all off (and recycle it!) and then clad the shed in old timber.

DJ doesn’t quite get it. He says things like ‘There isn’t enough wood in the pile to do it’ thinking I want uniformity. I don’t. I want a crazy, characerful, rustic farm shed, made with mismatching bits of timber and with a yellow climbing rose growing up the side.

As I said… I have plans. I just hope we have enough time to tackle it over our break.

Fingers crossed nothing else comes up.

z

teapot chime


I had a silver teapot I found at an op shop.
I had a quite a few salt and pepper shaker lids leftover from my garden stake project.
And I had Pinterest for inspiration!

I saw this somewhere along my wanderings. Gorgeous.

Only I made a few changes. I wanted mine to look more like water spouting out than drops pouring out. So instead of having one lid from which others hung, I made each lid come out of the spout itself in a graceful curve.

At the end of each curve of wire I hung a lid and some aqua crackle glass beads. I also added some tiny bells to the lids for extra jingle.

I wanted to hang it on the porch where the wind will catch it and make it tinkle but taking photos of it there proved to be impossible… so I tried a few more interesting settings.
I love the contrast of the shining silver pot and lids with the rusty red bucket and old biscuit tin. And the weeds.
Much as I love the vignette of silver and rust, I didn’t want to leave it out in the middle of the yard exposed to rain. I’ve put it on the porch, on a ledge next to a rusty pot holding succulents. 
Works fine there too.

I think it might need a few more lids. I found a few more yesterday so I can add them any time. Make it richer/fuller.  Still, I’m rather pleased with it as it is.

z

PS. This project has been added to the Knick Of Time Tuesday link party! Go visit and check out what other bloggers are doing.

DIY pendant light


What do a deep fry basket, an old xray and some crystals have in common?

They’re hanging in my guest room!

When I found a deep fry basket at the tip shop I just had to have it. It was clean and shiny and, being part magpie, I collected it for my nest. I knew it’d be perfect for something.

 
I don’t have a ‘before’ photo. And no step by step photos either. Sorry.

I removed the handle and thought about it. I’d been to an art from junk show last year and someone had used xrays to make a lightbox.

I have xrays. Tons of them at the bottom of a suitcase… I have no idea why I hold onto them. Maybe future generations will be interested in my fractures.

I cut the xrays into strips narrow enough to thread through the wire and put weaved them through the basket.
I had to order chandelier cyrstals online (thanks ebay) and waited for them to arrive.
I also orderd the three-cord twisted black cloth wrapped electrical cord. Ok. I know that sentence doesn’t sound right, but live with it.

I searched for black fittings, a black plug, a black switch and a black light globe holder thingy. (You don’t have to know what its called to use it!). I found the plug and the switch but the light thingy was hard to find.

Hello black spray paint.

I then climbed on a ladder, put a hook in the ceiling of the guest room, and hung it. No hanging off this chandelier as the ceiling will cave in.

I brought the ladder from the spare room in Fentonbury to use in here as a bedside on one side, the suitcases on the other.

The room still needs painting and the bedding needs to be sorted. However, I like how its coming along so I feel progress is being made, even in baby steps.

z

PS. This project was linked to Beyond the Picket Fence’s Under $100. Visit the link below for ideas you can recreate which will cost under $100.

Beyond The Picket Fence

four legged love

Anyone who knows me, knows I love my poodles.

Even DJ has a strong suspicion that in case of fire, I’d get the dogs out of the house before I him.

There’s something just so beautiful about them. I’ve always been a poodle lover. From the first time I ever saw a photo of a toy poodle. Then, after reading Jacqueline Suzanne’s Every Night Josephine, I was hooked forever.

Unless you’ve had a poodle you probably have no idea what I’m talking about, but let me just say – every man I’ve had in my life who ‘poo-poohed’ at the thought of poodles, fell in love with them. At the end of any relationship I’ve had since having poodles in my life, it was the poodles the guy was sorry to leave behind. (sniff).

For myself, I love their beauty. Their elegance and grace, their humour and energy and the way they make me laugh. Feeling their curls under my hands is enough to calm me if I’m stressed and lift my spirits if I’m down.

The fact that they have no doggy smell and they don’t shed is a definite bonus! More grooming, but less vacuuming. Gotta love that.

I’m never lonely with poodles in my life.

The day I held a toy poodle named Scooter in my hands when I lived in Melbourne, far far from any family, I knew I was no longer alone. With him I had my own family.

Since then I’ve never been without a poodle in my life. More than one usually. I currently have only Montana and Romeo, both of whom were born in my bedroom.

All dogs are beautiful I just love dogs. I see the heart in all of them, not just poodles. But my babies are my family and I love them a LOT… so please forgive my ‘doting mother’ ramble.


On Monday we went for a walk around the paddocks to check things out. We took the dogs with us. Montana and Romeo were thrilled. They ran down the driveway first, checking out the new smells (like the horse poop…)

Then in the bottom paddock, leaping over the snowdrops. This paddock fills up with snowdrops and daffodils every year.

So pretty!

Barney can mostly keep up with the poodles.

Mischa stuck near us. She’s too slow to run with the dogs with longer legs.

A day ‘on the land’ with the dogs and horses… my idea of heaven!


I’ll leave you with a fun little pipecleaner poodle I made a while ago.


It looks like its wearing a turban. 🙂

z

pretty garden (well, not quite)

 
I absolutely fell in love with the garden decorations I’ve seen on Pinterest.

I wanted them.

I wanted a pretty garden like that…

See, our garden is NOT pretty. It’ll never be pretty while we allow horses in it. At the moment we have to feed Dancer in the yard cause the boys eat her food. She also enjoys a nibble of the grass. And stomping on my pathetic excuse for a flower garden.

I guess I have to decide what’s more important… spending quality time with the equines, or a pretty garden.

I’m working on it.
 
Anyway, I admired the baubles on Pinterest.

I looked at them.

I decided I could make something similar.

I had a few odds and ends around the house. I found more at op shops. I got to work.

The first ones I made were made using two of my cheap poodle ornaments and some candlesticks.
I liked them. I put them in my pathetic little flower garden (before the frost took its toll on my plants) and they looked great for about 2 weeks. Then something (or someone) knocked one down and broke the poodle.


I glued the poodle together, but I discovered the glue I was using (supposedly will glue anything to anything. hmph) was useless. So I tried superglue.

Lesson: do not buy $2 dollar store superglue. You may as well use flour and water.

But I know that now. Not when I was making these things. Here is what my coffee table looked like for a week.

I don’t do things by halves.

After they dried, I put them on a bookcase to wait till the weather improved enough to put them outside.

Naturally DJ knocked them over. Broke 2 of them and proved that the glues I used were not up to the challenge.

I fixed what I could, then took the survivors and put them in the garden. Or whats left of it.

Its really not easy photographing them all at the same time and not getting the muddy cement and the water tanks in the shot.

Maybe, come spring, the bushes will come back to life and flower. And the pretty decorative jewels will add to the beauty of my garden.

Till then, they ARE the beauty in my garden.


If they last till spring I’ll take more photos.

z

SQUIRREL!!

It was brought to my attention today, by a good friend, that I may lack focus.
Those weren’t the exact words she used… scattered was one of them. Easily distracted was another. Take on too much put in an appearance. Not superwoman got a mention. Crazy was in there somewhere too…
In fact, I was compared to the dogs in UP (watch video if you haven’t seen the movie). Love the dogs in that movie but I think I see what she means… I’ll be doing one job, then I’ll see a rusty object and … SQUIRREL!
ANYway… I don’t think I’m scattered. I think I just have too many ideas, too many lists, too little time and too little space in my head.
In fact, that’s my usual excuse when I forget things. I only have so much space in my brain. If I let more things in, some things have to go to make room for more.
At least I’ve had a productive weekend. I did tons of stuff which was on my list. Plus things which weren’t. I love weekends like that!
(Means I can put new things on the To Do List!)
So, here’s what I’ll do. Rather than go on and on in a long scattered blog, I’ll confine myself to one project per blog. How’s that for focus? Huh?
One thing I did was work on the corner of the deck. This is where we step up off the driveway onto the deck. Last weekend I put a large chalkboard on the wall. This weekend I moved the cabinet I’d mosaic-ed to the porch and added legs to it.
Not real legs. Temporary legs. I just cut chunks of a leftover post from when we made the deck. They’re the right size more or less so I may just paint them and call it good.
Last night I did my own version of chalkboard art. Badly. My handwriting really sucks. Which proves this is authentic.
If I was photoshopping it, you’d bet the typography would be spot on.
I put my old watering cans on the cabinet, added the only pot plant I have which is flowering (the only plant flowering in my yard, full stop!) in a galvanised planter, and voila! Very pretty.
Please ignore the horrible handwriting. It helps if you look at it and squint.
 I think I’ll stick to computer typography from now on.
z

very pinteresting

This weekend, and last, I had a go at trying out some of the things I’ve pinned on Pinterest.

I mean, they SOUND good, right? Some of them probably work too!

Like this one: using undiluted white vinegar to kill weeds. Sounds great right? No chemicals. No locking up dogs and only killing weeds where horses won’t eat them, ensuring that fence lines become small jungles.

So I thought I’d have a go. I have white vinegar. Tons of it. Some of it is even in the kitchen! DJ uses it when he makes poached eggs.

Yep.

I didn’t know that either. Apparently a dash of vinegar in the water makes the best poached eggs, and DJ does make the best poachies.

Other than as an egg poaching aid, I use vinegar in the grooming room, diluted in the rinse when I wash dogs, and when I hose down the countless ‘ooops’ and the ‘I meant to pee there’ incidents when dogs visit.

I went to the casita, grabbed my industrial sized bottle of vinegar, poured it into a gardening spray bottle and headed out to fight the battle of the weeds.

Well… all I can say is this: either my weeds are much stronger that the ones on the link above, or I did it wrong.

My weeds poked their tongues out at me. They didn’t die. They just got angry!

Some looked a bit sickly, but they were sickly and angry.

Next time I think I’ll add some dishwashing liquid to the mix… after all, its what you do to make weed killer work better – make it stick to the plants… I’ll keep you posted.

I’ve used white vinegar to clean the house as well. Like this pin:

I mean, what a great idea! Vinegar to clean without the pickle jar smell.

I got orange peels, steeped them in the vinegar, then put it in a spray bottle to use as a cleaner.

Again. Either my grime is tougher than other grime, or I’m not doing it right.

It cleans… more or less. If I scrub hard enough.

And it sure does smell nice.

When we went shopping last night I grabbed one of these thingies below cause I saw a pin which recommended using one in the shower. Fill it with … you guessed it! white vinegar and dishwashing liquid, then use it to scrub the shower while you’re in there.

As a bonus, it’ll kill any weeds growing in there too.

I’ve already always cleaned the shower while I was in there.

Unfortunately, it meant standing in chemicals while I did it. This way I don’t have to worry about my bits touching the walls as I clean. Its just dishwashing liquid and vinegar.

Last, for today, I tried this out. Sort of. I read this article, then went and looked at the rangehood filter.

Not a good idea. I don’t advise you do it. What you don’t know won’t hurt you, right?

All good and well I thought, IF you have a pot large enough to fit in half the filter.

I didn’t.

So I took a friend’s advice.

I bought some cloudy ammonia from the supermarket. Found a container big enough to hold the filter and liquid (the plastic tray at the bottom of a dog crate – see? they come in handy!), filled it with HOT water, added the ammonia and put in the filter.

Then ran out of the shed cause the fumes were disgusting.

Next morning the fumes had dissipated enough for me to brave the shed.

It was awful.

There was thick fat/scum everywhere.

Yeech.

I had to pick most of the solids out cause we all know putting that stuff down your pipes is courting disaster. Then I rinsed off the filter in hot water.

And rinsed.

And rinsed.

Then blotted with an old towel. And put it back. And its clean and shiny!

For about 2 days.

A woman’s work is never done!

z

the downside of blogging

Starting the day with a wine whine.

First thing this morning, more or less, I check my email and look at blog posts from blogs I follow. This is what’s prompted this list entry.

A few of the blogs I follow have videos embedded in them.

I have nothing against videos, in fact I’ve been known to watch a video or two on occasion.

However, they’re set to play when the page opens. No ‘click here’ required.

Why do you do this to us? It might be ok for those who live in technologically non-3rd world countries, but for someone on satellite broadband, on the computer Noah used as a child, do not need to be slowed down any more than we already are!

Videos that play automatically when a page opens are annoying at worst and make me want to throw my mouse out the window at best. Or vice versa. Whatever.

My computer grinds to a pace which a snail would have no trouble beating on a dry day, as it tries to load the bloody video, all my other windows hang and outlook express goes out in sympathy. So I have to sit here for what feels like hours, waiting till the computer wakes up so I can find the offending video and turn it OFF.

I’m not even interested in the videos! I want to read the blogs and look at the heavenly photos and get on with my life. I don’t want to be sitting here while my computer goes into deep meditation as it churns out megabytes of video.

And that’s another thing. Satellite internet is not only slower than ADSL broadband, its also more expensive. Much. More. Expensive. And if I go over my limit… Lets just say I had to upgrade to a higher plan cause my last bill was TWICE the monthly cost. And I wasn’t even over that much.

Yeah, yeah. No. I don’t have other choices here. We live in the black hole of communications. If its not hard wired, it doesn’t work well. TV, mobile phones, internet… I think smoke signals would be more efficient here.

So people, PLEASE consider that some of your readers do not have superwhiz connections… a small percentage maybe, but we are here. Think about us!

On that positive note I’m off to do some real work. I have tons of progress and some projects to share. Stay tuned.

z

Monday, 20 August 2012

OMG! I can’t believe it! I am just reading an article from A2D which is exactly what I was saying (only in more words detail and much more tact).

… now to follow some of her other tips… I wonder if people have to verify text before posting a comment on my blog? And I have no idea how to add categories…

shades of colour (or my obsession with aqua)

I’ve been going through my Pinterest boards today, tidying up… You know. The tidying up you do when you don’t want to actually get up out of your chair.
And I realised that not only have I had a white fetish lately, but I’ve also become infected with an aqua/turquoise/sea foam obsession. 
The white obsession started with my kitchen in Fentonbury where I painted all the walls and cabinets white.
 
I managed to add in a touch of vintage green with the meat safe and grey with the polka dot vase.
I’d love an all white with timber benchtops and touches of grey and vintage blues kitchen on the farm. I’d love white on white, cream and soft natural colours all throughout the house in fact.
My love affair with a certain type of blue started with my bathroom in Fentonbury. I painted the walls a pale blue called Snow Glow by Wattyl. Love that colour.
Only now, I’m leaning towards a bit more of a sea foam/minty green blue… Maybe not quite as green as these paint samples… but not far off either.
Maybe its got something to do with missing Greece and the crystal clear waters I love swimming in.
Maybe its got to do with the vintagey-ness of those pale blue greens.
Whatever it is, I see photos like these and my heart goes ‘Ahhhhhhhhhhhh’.
Love this grey/greeny blue in the bathroom, coupled with white. Its so good I want to eat it (almost).
And I want timber panelling on my bathroom again (as opposed to stupid laminate tile sheets)! I mean, how fresh and clean is this? You’d feel clean even just walking into a bathroom like this!
Oh yeah. Forget the white towels…
Love the combination of beige, taupe, brown and the turquoise blues. With creamy whites of course!

And look at this… swoon….

I have the bottles. I have (different) old wire containers. I just need that cabinet.
Ok. I can’t have that one, but I have an old bookcase I found at an op shop, painted white and put flywire on the doors where glass used to be. I could repaint it, remove the flywire (which a dog destroyed), replace it with birdwire, find legs for it… and it will go in my new/improved bathroom (if I ever get that far!)

Look at these colours. The mustard colour is similar to the colour I painted my hallway and office in Fentonbury. I would love to use this combination in my kitchen.

Love these kitchens. Same colours…
How is this for decadent and beautiful. I want one! I have a small brass chandelier. Surely I can do something like this with it!
Note to self: search for turquoise crystals on ebay.
Only problem is I’d have to get an electrician in to get rid of the stupid fluoro lights in the living room.
Who puts fluoros in the living room? The people who we bought from, that’s who!
Anyway, I think my chandelier will go in our bedroom. Imagine it in a room painted in these colours:
Oh man I want timber panelled walls… sigh…

If I painted our bedroom thjis colour maybe I wouldn’t have to paint our dark timber bed…

Or what about this? White chandelier and white furniture…. oooooh….
 See? Those colours are everywhere on my boards!
I mean, I knew I had a problem, but didn’t know I had it so bad. When you go through your pins and see the same colours appear time and time again in all different images, different spaces, different items, you know its time to do something.
What?
Why get a paintbrush and start painting!
Wait.
I have to pick the actual colours first. And decide what colour will go where.
I have some plans ideas.  I want to paint the guest room white. A soft white. The mudroom white with aqua bits. Our bedroom a softer bluey green. The living room either a creamy white or a pale grey to compliment the dark grey wall at the far end – very similar to the last colour in this palette.
When we first moved here I picked a pale grey for the main walls in the living room and that dark grey for a feature wall. Problem is now I look at the pale grey and all I see is a blue I don’t like.

Maybe I need to go lighter/whiter/greyer…. a warm instead of cool grey.

These colours for the living spaces – greys, whites and bits of blue…. Yum.

 
I am so itching to get my paintbrush out, listen to loud music and get to work!
Well, I better go wipe the drool off my keyboard.