Author Archives: zefiart
room dividers and general craziness
Well, not much in terms of excitement. Sometimes I feel like that hamster on its wheel… running flat out and still in the same place.
I’ve been going through the house and casita and purging to make space for projects and things I want to keep, instead of having everything stacked on top of everything else in every available shed and no space to work.
I’m being ruthless. I look at things now and think “is it worth keeping?”, if not, out it goes. I’ve dedicated the tiny yard beside the casita (formerly known as Stalag 13 and housing roosters) as the To The Tip Site. I have boxes of stuff I’ll donate to the tip shop, and piles of boxes of stuff to sell at a garage sale sometime early next year.
I’m making progress.
As I evaluate stuff I look at quality, usefulness and whether I’m likely to ever really do anything with it. If it doesn’t tick at least one of the criteria it goes to the tip, but not before I’ve removed hinges or handles or whatever I want to keep.
I’ve also done some work on the garden with the help of a friend. The weeds have been whacked, I have some fledgling tomato plants, beans, bells peppers and cucumbers in the vegie garden, some lettuce in a washing machine drum near the kitchen and some more colour in the garden. More tyres have been filled with soil and plants and pine bark mulch has been applied. Its a long way from being a great garden, but I’m getting there.
Inside, there’s still much to do. Mainly cause I got it into my head that I wanted to build a divider/tv unit in the middle of the living room and I wanted to do it now.
A friend said left brain people are never idle as they always have ideas they want to do, and they want to do them now.
I can relate.
So, since my divider/tv unit isn’t ready yet, I thought I’d share some pics which inspired me.
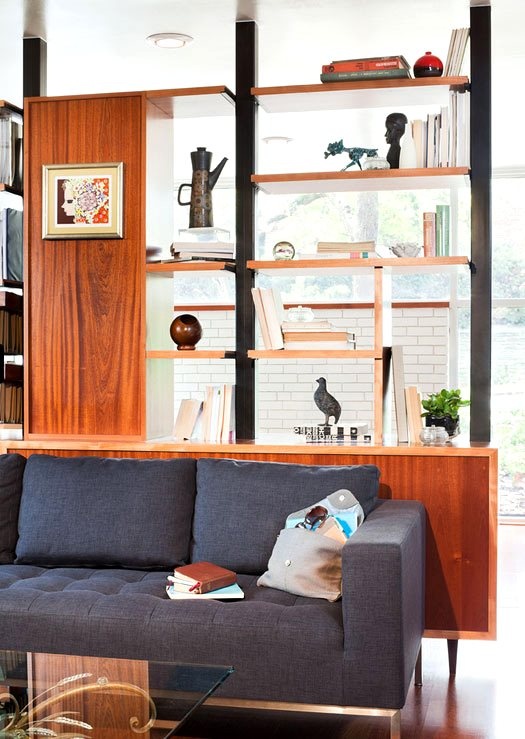
Firstly, I love those 1960s type bookcase dividers which were so common in living rooms of that time. Often they were between the front door and the living area. I also love cube storage units. But the thing is I wanted the divider to hold the TV… so I was looking more at something which was a cross between a credenza:
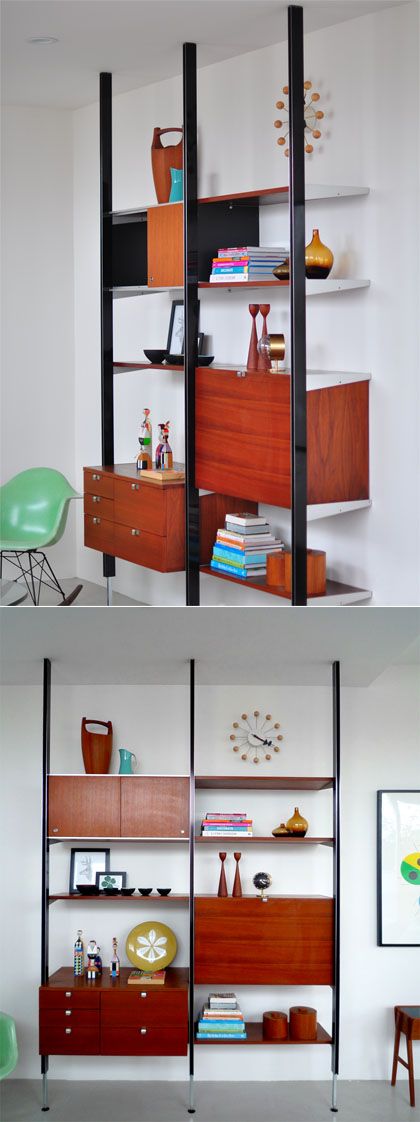
And a 60s style bookcase:
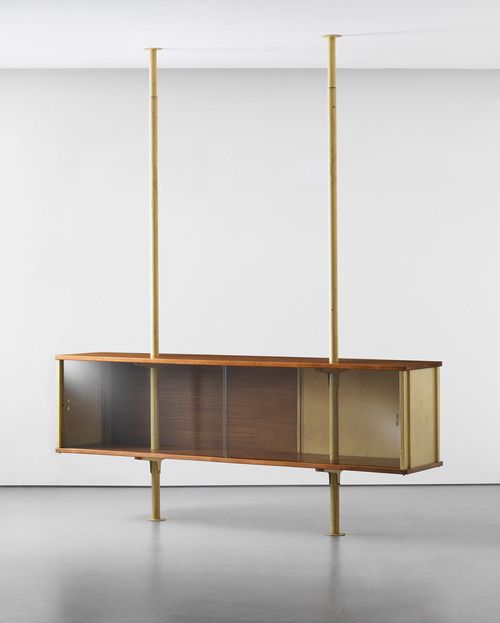
Or something like this – which is totally gorgeous:
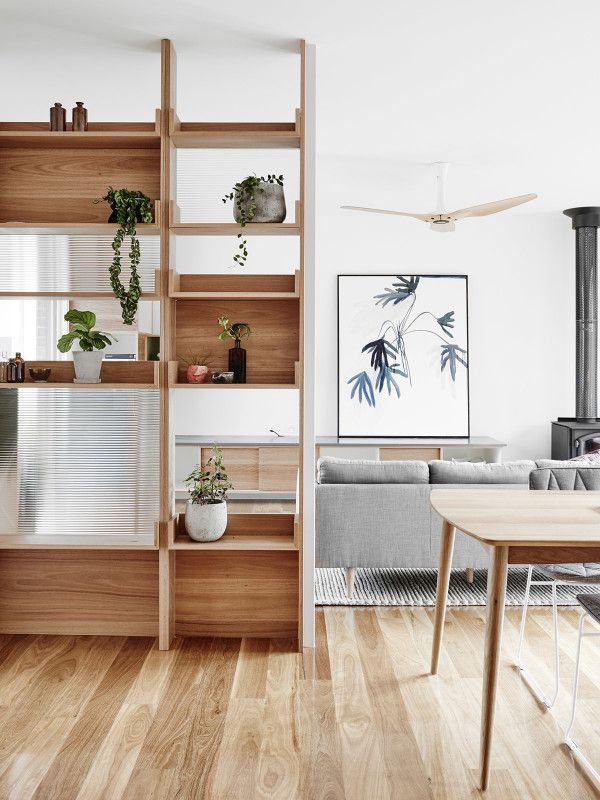
Or this (if it wasn’t fixed to a wall):
I’ve been thinking about this since we moved in here. I hate the poles. They really cut the room in half both visually and literally, and make it hard to decorate. I considered cladding them in timber and then putting shelves between them first, but wasn’t sure that’s what I wanted.
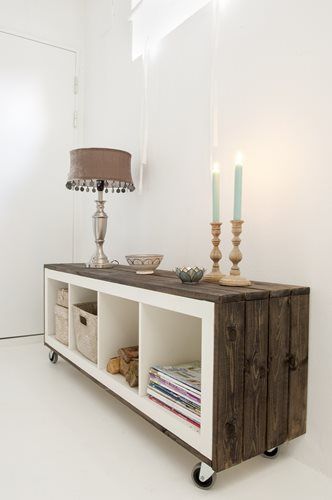
Then I saw this and I liked it:
Here’s another. Its just a cube storage unit clad in rustic timber and made into a credenza. How great is that!
I was thinking I have one tall cube unit with a back… Its mdf, but if I clad it in old timber I’d have both rustic and industrial with the poles…
Then I saw this and all bets were off.
this year’s christmas tree
I had planned a 3D tree, made using old timber on a central rod. Then I found the old crib sides I used to use as dog barriers when I lived in Fentonbury and thought “hey, I’ll use the slats!”…
So I cut them up for branches. I drilled holes in the middle. I cut blocks to go between the branches. I drilled holes in those. I created a base for the rod. I put it all together and went “yeech”.
Then I found myself with all these cut up slats – luckily not all had holes in them – so I went for plan B.
And this is what I ended up with:
Pretty huh?
Yes, I know its a bit wonky… but you know me. Nothing is ever quite perfect. I’m of the ‘close enough is good enough’ school of DIY.
I used the base I cut the slats off as the bottom, I like the way it grounds it. I had to stick the trunk slat back onto the base so I used an old hinge.
I then decorated it with the timber stars I bought a few years ago and some brown, natural looking, florist wire I’d had for years (I knew I’d find the right project for it one day!)
Its hanging in the middle of the living room, right over the air conditioner. Basically, its on the only bare wall I have. I’d been wondering what I’d put there, well, problem solved for the next few weeks. Gives me time to think about future displays.
my new toy
3 ways to make a display mannequin
propeller (fan) light fitting
Every day I think about posting on here but something comes up. I think “I’ll do it later, tonight”. Then tonight comes and I’m wiped out and it takes all my energy to change TV channels.
So, given its been two weeks or so since I last posted, I thought I’d better share this project. I finished this weeks ago and just never got around to posting about it.
Not only has it taken me a long time to share this project, its also been a few years in the making. I bought this propeller for Wayne for Christmas ages ago, with the aim of making it into a light. Its been gathering dust in the casita up until a couple of months ago.
I’ve put it in the enclosed part of the porch where I used to have the fry basket light fitting before. I like this one better and it was time for a change anyway.
When I first got the propeller I had a friend weld a chain to it for hanging. I already had the bits to make the light part so it was just a matter of joining things together and adding a globe. I chose an LED edison bulb for bigger shine. There’s already a light fixture nearby so I put a bayonet end on the cord to plug into the socket.
Funny how the house looks yellow in the photo… I hate pale yellow houses and picked this grey/brown tone to change the look of the house.
I’m loving the new light. It makes me smile every time I walk through the door.
z
Featured at:
Shared at:
birdwire light fitting
The new light fitting is made from some leftover bird wire I found in the shed. It was a bit crushed but that made it perfect. Imperfection is what I’m all about. Sometimes its even on purpose!
I had this shallow shade frame so all I did was attach the bird wire cylinder to it. Originally I had a long Edison bulb in it but they really don’t give off much light. Now it has a big white ball glove in it.
I think Wayne’s happy with it. Its a light. It comes on when he hits the switch. He’s happy.
z
Shared at:
meet mr fox – in felt
He’s such a happy little fellow. Mainly cause I gave him a little grin when I needle felted him.
My what big ears you have Mr Fox!
Perhaps they were right… there were ARE foxes in Tasmania!
z
garage sale trailing
I just had to have it. It was too wierd to pass up.
And this:
Since our travels took us up to Bushy Park we decided to take a detour through the hops farms to look at the old hop kilns.
I love this part of the Derwent Valley. I worked picking hops during the harvest for 5 years when I first came to Tasmania, so this area is special to me.
a pink step-ladder bedside table
When I got it the middle step was broken off and it was natural timber but badly stained on 2 of the steps. And the top step was warped. Still is, in fact. I think the poor thing had been exposed to the elements and mistreated.
First order of business was to re-attach the middle step. I tried glue and clamps. Nope. It broke off when I thought it was all dry.
So I nailed the sucker down.
I have a hammer and I ain’t afraid to use it!
I tried sanding off the stains with the intention of varnishing it, but that was too much hard work and didn’t look like it was working. Paint was the answer. Paint is the answer to everything.
Even two coats of Zinsser Stain Blocker didn’t cover those stains! So, I did two coats of that, then two coats of DIY chalk paint in grey.
While I was at it, I made a shelf for the bottom step, making it more useful as a bedside table. I cut and edged a piece of MDF, used a strip of timber to hold it in place, and viola. Easy (removable) shelf.
Then I painted it light pink. I still had some DIY pink chalk paint from a previous project.
Lastly I wet sanded it and rubbed it down in places to expose the grey, the white undercoat and even the timber in places. I’d never tried wet sanding before and I think I like it.
Here it is in the guest room.
I haven’t yet styled the shelves or made the bed properly (no rush till I have visitors, then I’ll run around like a headless chook trying to do it all in an hour), but I’m liking the new bedside stepladder!
The photos aren’t the best. I’m having some trouble with my camera. I was playing with the settings one day and now I can’t seem to get good photos…
I’ll figure it out eventually. Hopefully before I’m too old to care.
z


