tea bag village – a recycled work project

How do you decorate your home for Christmas? I like to do things a little differently. Not the usual kind of stuff in other words. Well… except for candy canes. I love them cause I eat them when they’ve done their decorative dash. This year I used them to bulk up my pitiful collection of Christmas cards. I love email but I mourn the loss of cards at this time of the year. (I never send them myself either!)

You’ve already seen my Christmas tree this year…

So it’ll come as no surprise that I used a recycled tea bag and papier mache project as part of my Christmas decor.

This is a project I worked on at work with one of our participants. I made up little houses out of milk cartons and other small cardboard boxes and he papier mached them in plain white paper.

Once the white paper had dried we covered them with tea bags! I’ve been collecting tea bags for a long time and for this project I soaked them, split them and thew out the tea leaves, then dried them flat. The colours are just amazing.

I did try writing on them but didn’t like it. They’re all plain tea bags now.

Below you can see I used them on each side of the new TV unit and on top of the wood heater.

On the wood heater I wound some fairy lights around them and light them up in the evenings. They look beautiful.

They’ll be going back to work after Christmas to be exhibited next time we have an art show. I just needed to get some nice photos of them and hey, while they were here… I might as well put them to use!

z

kmart plant stand side table

Did you noticed the little side table in the guest room?
Its something really quick and easy to make.
First, you get one of these metal plant stands from Kmart. They had them in copper and aqua in our local store.

Then you get a round timber cheese board or whatever you have on hand. Give it a sand and then stain and/or varnish it. I did both.

Using liquid nails (liquid nails is your friend!) you glue the stand to the timber top.

I had it sitting upside down for a day with weight on top to make sure the glue was nice and dry.

Easy, and very cute.

The roses are from Patrice’s garden. Yellow roses are my favourite.

z

this year’s christmas tree

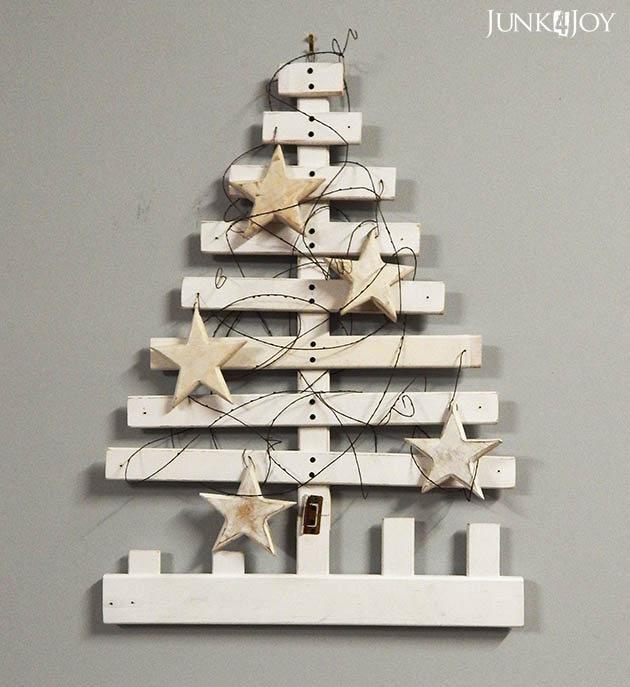
Its not exactly what I’d planned, but I love it.

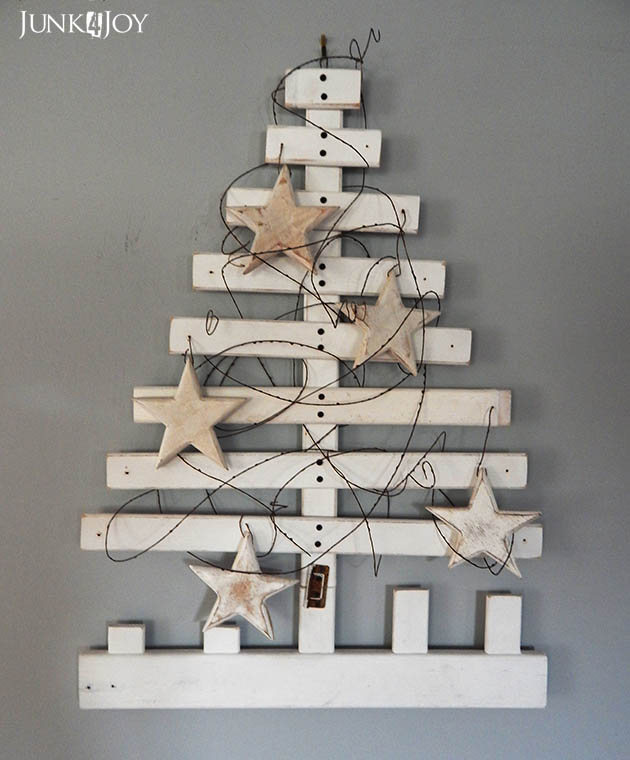
I had planned a 3D tree, made using old timber on a central rod. Then I found the old crib sides I used to use as dog barriers when I lived in Fentonbury and thought “hey, I’ll use the slats!”…

So I cut them up for branches. I drilled holes in the middle. I cut blocks to go between the branches. I drilled holes in those. I created a base for the rod. I put it all together and went “yeech”.

Then I found myself with all these cut up slats – luckily not all had holes in them – so I went for plan B.

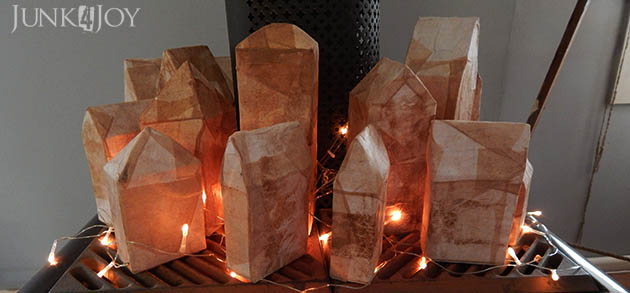
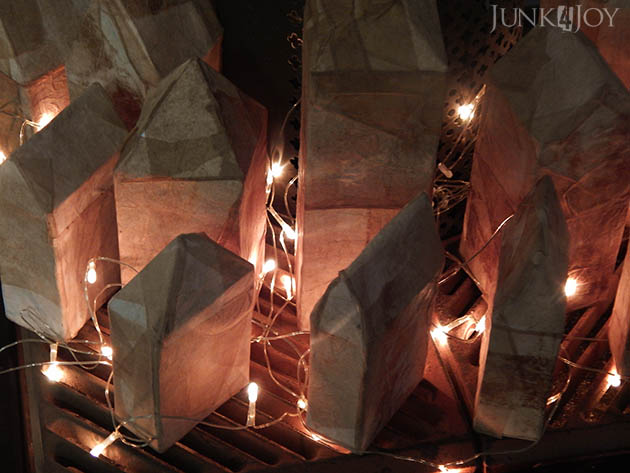
And this is what I ended up with:

Pretty huh?

Yes, I know its a bit wonky… but you know me. Nothing is ever quite perfect. I’m of the ‘close enough is good enough’ school of DIY.

I used the base I cut the slats off as the bottom, I like the way it grounds it. I had to stick the trunk slat back onto the base so I used an old hinge.

I then decorated it with the timber stars I bought a few years ago and some brown, natural looking, florist wire I’d had for years (I knew I’d find the right project for it one day!)

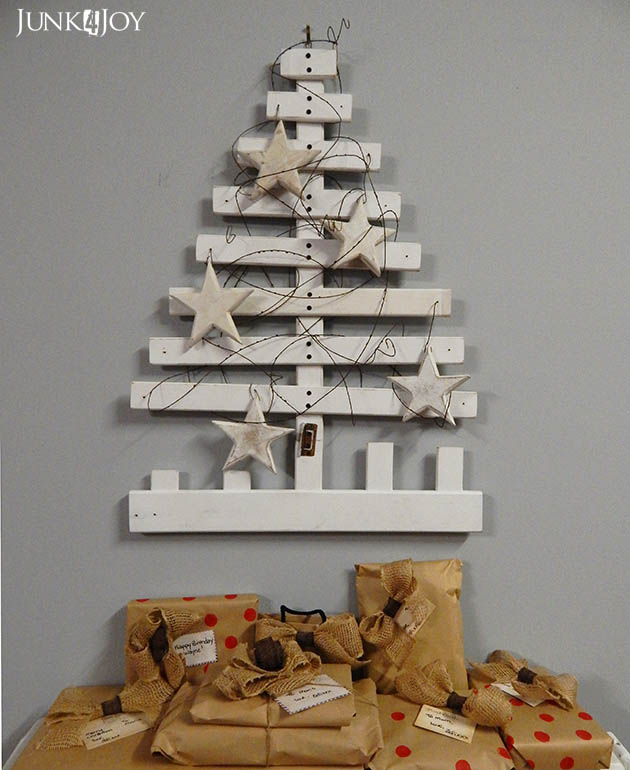
Its hanging in the middle of the living room, right over the air conditioner. Basically, its on the only bare wall I have. I’d been wondering what I’d put there, well, problem solved for the next few weeks. Gives me time to think about future displays.

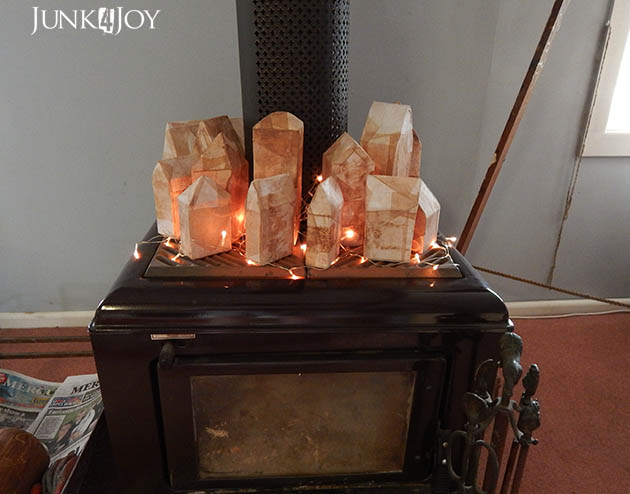
Did you notice I put the presents under the tree (on top of the air conditioner?) They won’t stay there. When I clean the old grate we use to hold firewood for the wood heater I’ll put the presents in that.
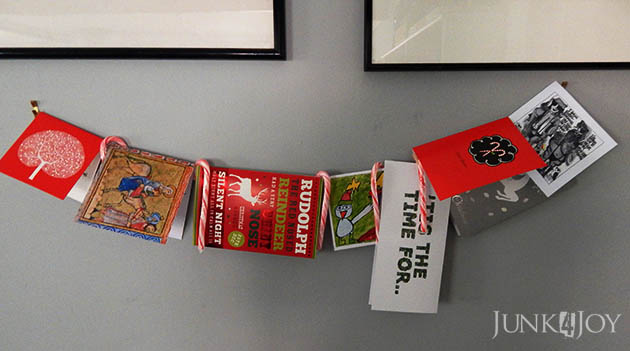
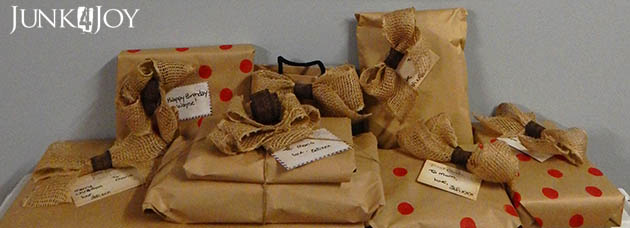
Don’t know about you, but I love wrapping presents. I’ve had a thing for plain brown paper for years now, adding different embellishments each year to pretty them up. This year I made large bows from burlap ribbon and a brown linen type ribbon.
The spotted paper was something I saw at a shop while browsing… I thought “I’m not paying that for wrapping paper!” so I made my own. I love the way it looks having plain and spotted paper wrapped gifts together.
I’m all excited now. I can’t wait to get stuck into getting the house ready for Christmas and mom’s visit.
I’ve already started in the garden. There’s been weeding and some new planting (to fill in gaps) and heaps of general cleaning in the yard. Still much to do on that front!
I’ve also started building my tv unit/room divider. 
Its a big job and I can’t believe I’m doing it, but after months, years even, of thinking about it and hesitating and doubting myself, I suddenly got hit with inspiration. Before I had time to rethink it I’d measured up and gone out and bought plywood.
Its half done now. I’m thinking it’ll be a work in progress. The base part is done except for putting the legs on. Then I can move it into the house. It’ll need polyurethane to protect it and I’ll need to do the back, but it can be used and I can rearrange the living room the way I’ve been planning to for ages!
Later I can build the rest of it. The idea is to make it so it can be pulled apart in case I want to move it one day, thus making it in 2 stages works for me.
But more on that later. When I have decent photos to share.
Other than that I’m doing great. Well, other than the wisdom tooth I had pulled out last Friday cause it was loose (and turns out it had an abscess). And the fact that its now more sore than it was on Saturday. Thank goodness for strong pain killers! 
I’m falling apart.
z

Shared at:

propeller (fan) light fitting

Time just flies, doesn’t it?

Every day I think about posting on here but something comes up. I think “I’ll do it later, tonight”. Then tonight comes and I’m wiped out and it takes all my energy to change TV channels.

So, given its been two weeks or so since I last posted, I thought I’d better share this project. I finished this weeks ago and just never got around to posting about it.

Not only has it taken me a long time to share this project, its also been a few years in the making. I bought this propeller for Wayne for Christmas ages ago, with the aim of making it into a light. Its been gathering dust in the casita up until a couple of months ago.

I’ve put it in the enclosed part of the porch where I used to have the fry basket light fitting before. I like this one better and it was time for a change anyway.

Please ignore all the electrical cords. We don’t have enough power points and I’ve got extension cords everywhere for the time being.
I’d originally thought I’d put this light over Wayne’s desk, making his office area more industrial… but the living room ceiling isn’t high enough for a large pendant light. I could just see him knocking himself senseless every time he stood up at his desk.
Not to mention this is one heavy sucker. I doubt I could find a beam in the right spot to hang it from in the living room. On the porch I can see the beams! 

When I first got the propeller I had a friend weld a chain to it for hanging. I already had the bits to make the light part so it was just a matter of joining things together and adding a globe. I chose an LED edison bulb for bigger shine. There’s already a light fixture nearby so I put a bayonet end on the cord to plug into the socket.

Funny how the house looks yellow in the photo… I hate pale yellow houses and picked this grey/brown tone to change the look of the house.

I’m loving the new light. It makes me smile every time I walk through the door.

z

Featured at:

Shared at:

birdwire light fitting

I went through a phase a couple of weeks ago where I was updating, making, changing light fittings. If you know me, you know I’ll do nothing for ages cause I’m worn out, then do all kinds of things which aren’t on my to-do list, then begin working on things which are on my list, then get side tracked with spur of the moment things.
The light fittings were like that. I began by doing the office/guest room swap and thought it’d be a good idea to change light fittings in those rooms while the furniture was out of the way.
Somehow I managed to stuff up the light connection (no idea what its called, but its the bit that’s in the ceiling and holds the globe) so the guest room has no light currently.
The office has a light (a working one I might add) but it hasn’t got a light fitting. I want a pendant in here as the ceiling is high enough.
So, having given up on the guest room light and having put off the office light, I went ahead and changed the light fitting in the wardrobe room. For those that don’t know, that’s a tiny room in our house which I converted into a wardrobe for Wayne.
Yes. You heard me right. In our house the man has the walk in wardrobe cause he has more clothes.
Anyway, back to what I was saying… The original light fitting in there was a real quickie I whipped up using wire and an old lamp shade. 
I never liked it much.

The new light fitting is made from some leftover bird wire I found in the shed. It was a bit crushed but that made it perfect. Imperfection is what I’m all about. Sometimes its even on purpose!

I had this shallow shade frame so all I did was attach the bird wire cylinder to it. Originally I had a long Edison bulb in it but they really don’t give off much light. Now it has a big white ball glove in it.

I think Wayne’s happy with it. Its a light. It comes on when he hits the switch. He’s happy.

z

Shared at:

a pink step-ladder bedside table

Before I show you this project I’d like to apologise for the fact that I can’t find my ‘before’ photos. I know I posted about this step ladder when I got it, but when you give your posts wierd non-topical names, its impossible to find specific posts!

When I got it the middle step was broken off and it was natural timber but badly stained on 2 of the steps. And the top step was warped. Still is, in fact. I think the poor thing had been exposed to the elements and mistreated.

First order of business was to re-attach the middle step. I tried glue and clamps. Nope. It broke off when I thought it was all dry.

So I nailed the sucker down.

I have a hammer and I ain’t afraid to use it!

I tried sanding off the stains with the intention of varnishing it, but that was too much hard work and didn’t look like it was working. Paint was the answer. Paint is the answer to everything.

Even two coats of Zinsser Stain Blocker didn’t cover those stains! So, I did two coats of that, then two coats of DIY chalk paint in grey.

While I was at it, I made a shelf for the bottom step, making it more useful as a bedside table. I cut and edged a piece of MDF, used a strip of timber to hold it in place, and viola. Easy (removable) shelf.

Then I painted it light pink. I still had some DIY pink chalk paint from a previous project.

Lastly I wet sanded it and rubbed it down in places to expose the grey, the white undercoat and even the timber in places. I’d never tried wet sanding before and I think I like it.

Here it is in the guest room.

I haven’t yet styled the shelves or made the bed properly (no rush till I have visitors, then I’ll run around like a headless chook trying to do it all in an hour), but I’m liking the new bedside stepladder!

The photos aren’t the best. I’m having some trouble with my camera. I was playing with the settings one day and now I can’t seem to get good photos…

I’ll figure it out eventually. Hopefully before I’m too old to care.

z

a cute paper towel roll holder

Do you ever get sick of all the things that seem to gather and multiply on your kitchen bench? I do.

And one of those things is the $2 wire paper towel roll holder I’ve had for years. It gets shuffled over this way and that but its always there, another bit of clutter.

So while I’ve been running around moving furniture and painting rooms (more on that later) I got sidetracked and made a new roll holder.

I’m like a magpie with ADD when I’m busy, but I got inspired when I was looking for something in my workshop and knocked down a pile of wooden junk useful items I’ve collected. Among them were these spindles which I looked at and thought, “hm… that’d make a great paper towel roll holder…”

I had the perfect cast iron bracket (only one) so I cut a bit of timber for the top. Naturally I painted it the minty green I’ve used in my kitchen as a highlight colour.

It was all going great till I realised I’d cut the spindle too short.

I do this all the time! Nothing I make is ever quite perfect. Its always a bit off or a bit too long or a bit crooked… I did measure. I just cut off the wrong end of the spindle to the right height…,

In full solution mode, I looked around for something to add length. I have a broken shovel handle which was perfect. I cut a slice off that and joined it all together.

… I won’t bore you with details, lets just say it wasn’t pretty. The result is this odd looking chunk of wood at the bottom but guess what? It works! The thicker bottom bit holds the roll in place so it doesn’t rattle around too much.

I capped it off with one of the knobs from my kitchen cupboards (again, a little crooked cause I can’t drill a straight hole…)

My methods aren’t exactly professional, but in the end it worked out great.

When I asked Wayne if he liked it, he said “Its cute.”

I’m pleased with how it turned out. Now I just have to put in the shelves above the coffee tray and the kitchen will be finished.

After 2 years.

Meanwhile, I know I’ve been really silent on the blog. I’ve got great excuses. Firstly I was sick with a bad flu for about 2 weeks. I felt lousy and really didn’t feel like doing anything at all, must less finding interesting things to post about.

Then I went to Victoria for a week, where I stayed with a friend and groomed her toy poodles for 3 big shows. The shows went great, I got a good fix of toy poodle love and then I got back to work just in time for a week off!

Way to plan! 🙂

My week off has been flat out. Grooming dogs I had to put off while I was away or sick. Swapping out the office and guest room. Painting walls. Moving furniture. Mowing grass that seems to grow a foot overnight. Replacing plants which didn’t make it through winter.

I’ll leave you with some photos of the poodles I groomed – I love the smell of hair spray on poodles!

Armani
Kismet
Zena

I miss having a toy poodle… I almost stole a baby puppy Iris had at home. Maybe one day again…

z

Shared at:

simple jug suncatchers

There is nothing new to share, but since I have a bit of time (nothing but time) I figured it was time to catch up on some projects I’ve had to share for ages.

Below are a couple of simple stainless steel jug suncatchers. I made these as part of a commission for a birthday gift. Basically I had an order for one so I figured I may as well make two while I was at it.

They’re really, really simple.

1. Find stainless steel coffee pots, milk or water jugs at an op shop.

2. Bend wire into spout.

3. Attach chandelier crystals (or beads, or whatever you want) to the wire.

4. Admire.

The second one had a broken knob on top so I glued on a broken earring for added bling.

Easy and pretty. Normally I’d use old teapots but my collection was low on those so I used what I had.

Another variation, for when you have a jug without a lid, would be to put a succulent in the pot – suncatcher with plant! What more could a girl want?

z

not quite what i envisioned

The title was meant to refer to the project below, but its now also referring to my weekend… my week…

Its definitely not what I envisioned. I had plans to groom and work in the casita, tidy the house (which needs it, believe me) and generally be active. Instead, I’ve been in and out of bed since Thursday.

Seems I have one of those illusive flu bugs going around. It started with a kind of premonition type pain in my head and throat on Monday night. Tuesday I had headaches and a dry cough. Wednesday I was getting chills, coughing and sneezing and feeling irritable.

Then Thursday I woke up with a chesty cough and feeling like I’d been hit by a bus. I stayed at home most of the day but had to go to the chemist in town.

I thought that taking a day off would nip it in the bud and I’d be back at work on Friday…. Uhuh. I woke up worse on Friday. So I went to the doctor. She gave me some antibiotics just in case there’s a bacterial component, said drink lots of fluids, don’t skip eating and rest, rest, rest.

I’ve had to cancel all the grooming appointments I had this weekend and the worst of it is I don’t even have the energy to work on my own craft projects in the comfort of my armchair!

What makes it worse is that I’m having elective surgery on Tuesday so I need to be well by then… and then I’ll be recovering from that!

Talk about it all hitting at once.

But enough of my woes. Thought I’d share something with you that didn’t turn out as planned and, though its not a total failure, it sure ain’t what I envisioned.

I had this little tray. I wanted to make it into a key rack. So far so good, right? Easy.

It was painted in a cream oil paint with some acrylic over it, not very good, so I sanded it, cut out a key shape in contact paper, then sprayed it using a black and then ivory. I sprayed the hooks ivory as well.

I then sanded it back to distress it.

I hated it. It was bland.

So I decided to use oil based blackboard paint to liven it up.

This is what happened:

The paint just chipped off!

Ok. I love chippy paint, but I didn’t want to lose it all!

So I rubbed off the loosest paint, then sprayed it all with clear varnish.

The chips are now stable. And the whole thing is gloss.
Oh well, can’t have everything!
I put the hooks in (drilling into the side like that was a challenge and the hooks are all crooked as you can see…) and put a wire hanger behind it.
It is what it is.
Someone might love it.
I hope!
z

a hardworking little box

Guess what?

This post isn’t about something made with wire!

This is a little project I’ve had on the go for quite a while… Took me ages to finish it, then ages to get around to photographing it. But here it is…

I started with a plain box on castors I picked up at a tip shop. I couldn’t find any before photos and, natually, I didn’t take any before I began work on it. It was all the same colour you can see inside in the pic below – an orangey stained timber.

Yeech.

First thing I did was sand back the outside and give it a coat of paint.
Or four.
I started with white, then pink, then turquoise and lastly a pale grey. Mainly cause I couldn’t make up my mind, but also cause I wanted it to look patchy.
That was the easy bit. Then I had to make a box for the drawer. In theory, how hard is it to make a box?
hmph,
I made the front using a collection of timber bits from the hardware store bin. Then I used some 12mm MDF to put the box together. I cut the pieces, put glue on them, then delicately balanced it all together and used masking tape to hold it together till it dried.
Yes. Masking tape.
What do you use?

Here’s the front view of the box – its made up of three offcuts glued and nailed together, then stained to match the interior orangey colour. I also dry brushed the front with some of the grey.

I chose a rusty antique handle from my collection. It had some green patina on it but I added to it to give it more character.

Here it is finished.

Not bad for a project that took me something like 3 months to finish…

So, what would you use it for? A handy side table with storage. A bedside table for a futon bed. Put a cushion on it and its a footstool.
I’m sure it’ll come in useful for something!

z