the organised office

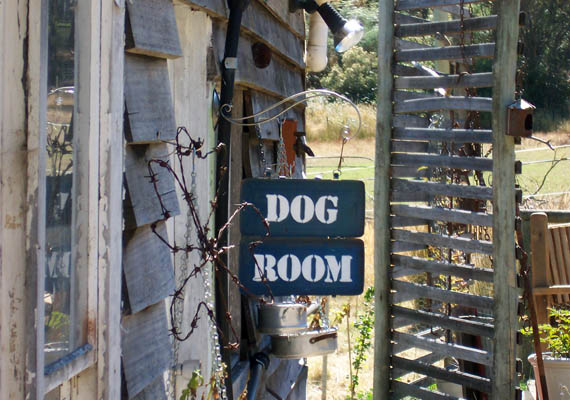
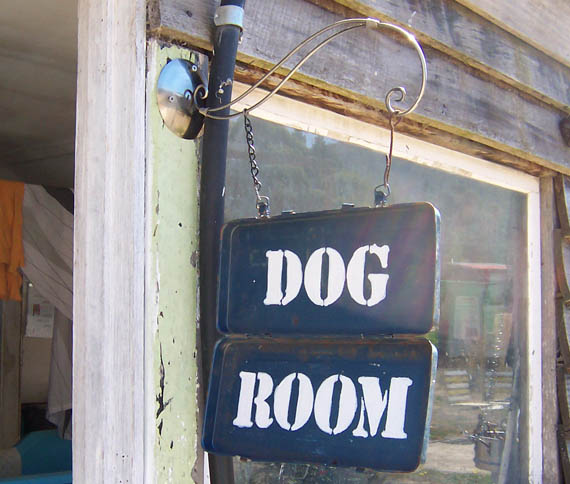
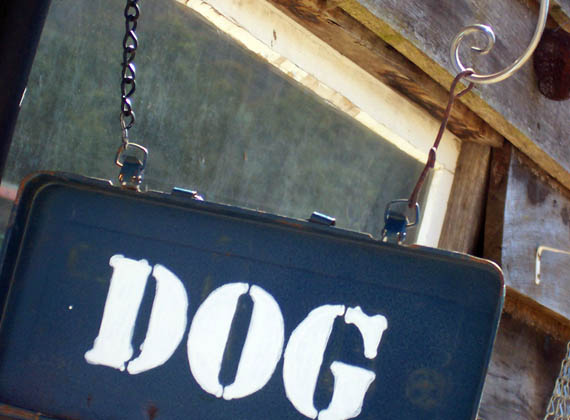
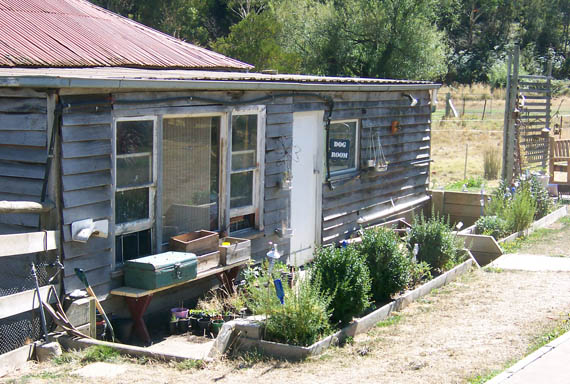
I thought I’d start this post with a pretty photo…
On the weekend that just past I found myself with a spare couple of hours so I thought I’d clean up my office.
It was so bad I couldn’t bring myself to document it photographically. Lets just say that even the dogs avoided it. I think they were afraid that they’d get lost among the piles of stuff and would never be fed again.
Since I’m not a ‘do half-a-job’ kinda gal, I had to do it right.
That means, as we all know, make a bigger mess so as to reduce the mess.
In order to clean and tidy up, I had to move some things outside the office. Into the kitchen, the hallway, the bathroom and the guest room. Lucky Wayne wasn’t home.
In fact, that’s partly why I tackled this project at all, cause he was out! As it happened, he got home before I finished and tripped over the office chair in the entry, knocked some folders off the kitchen bench, and skinned his knee against the sewing machine in the hallway. Lucky he didn’t need to go into the bathroom or guest room cause that would have necessitated grapple hooks and pick axe.
No wonder the guy hates leaving me alone in the house!
See, my office is a small room. Not tiny, but small. Big enough to almost hold most of the bits and pieces I need for my hobbies.
Its also got a ton of furniture in it, including two filing cabinets – one is Wayne’s of course since we first set up the office to share…. I have since moved his office into a corner of the living room. 
I need all the space I can get!
So, two filing cabinets, stacked on top of eachother in a corner. An antique cabinet, a wall of shelves, a new cabinet with lots of small drawers, 2 desks (one is a real table, the other is a closet door), 2 old junior school desks, boxes, crates and suitcases.
You see the problem.
Though I didn’t want to show you how the office looked before I started, I’ll show you how it looked about halfway through:
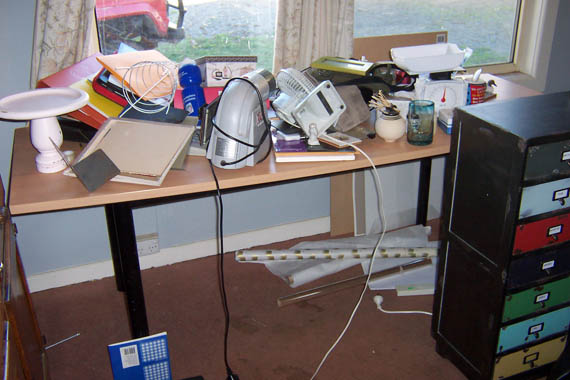
I decided I no longer wanted the corner desk layout which took up two full walls. I moved the table under the window and took down the filing cabinet tower on my own (do not try this at home kids!) then pushed, heaved and persuaded the filing cabinets onto the right side of the room to hold up the door/desk.
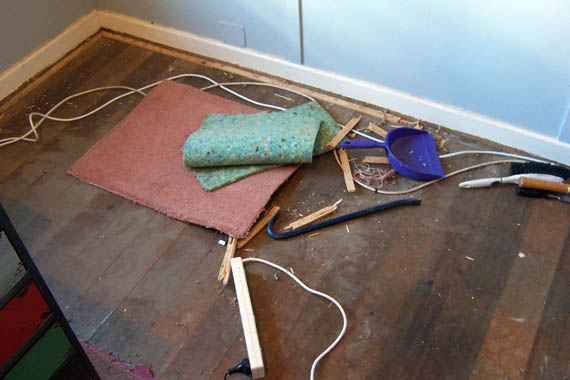
Now… once I had some empty floor space I couldn’t help but look at the carpet. The filthy disgusting dog peed carpet.*
*Long story. I am not one of those dog hoarders who lives amongst dog pee and poop. I am a dog lover who has house trained dogs, but all dogs sometimes have accidents of the vomit variety. And my partner owned two un-house trained dogs which I brought into the house as part of the family. Thinking I could train them. I gave up after I found one pee stain too many in the office where they’d been sleeping. They were out but the carpet remained.
So, I did what any obsessed DIY-er would do. I started ripping up carpet.
Somewhere in the middle of this I thought to myself “I’ve done this three times before. Why am I doing it again?”.
The answer is simple. I hated the salmon, pee stained carpet. I want it gone. From every room in the house. But Wayne will kill me if I start ripping up the carpet in the living room when he goes out for an afternoon so I’ll do a room which doesn’t affect him…
Its not finished. Wayne came home so I had to start putting things back into the office or face a slow painful death. Plus I’d have had to move furniture again to expose more carpet to rip up and I was tired. I did manage to remove about 1/3 of the carpet.
The timber floors are old and rough, they will need sanding and polishing. I like the old look, but they will need a good clean and a coat of estapol or something to keep them clean. But it does look like a studio floor now!

Meanwhile I sorted out the shelves and made them prettier to look at by hiding away the ugly binders in  filing cabinets and putting documents and other stuff in suitcases and rustic containers.

Wayne’s antique map of South Australia still hangs above my desk.

I love my little square crate. I’ve had that one since Melbourne. For years it held my oil paint tubes.

I bought this little aqua bird in a dollar store cause I loved the colour and found this broken little wire thingy at the tip shop. They look good together till I do something else with the wire thing.
I bought this cloche at Target a few months ago, added in some sticks, a bird I bought at the Shabby Market, a real nest and one of our tiny chicken eggs. My burlap flowers sit in an old wire hanging plant basket. Sorry about the blurry photo…
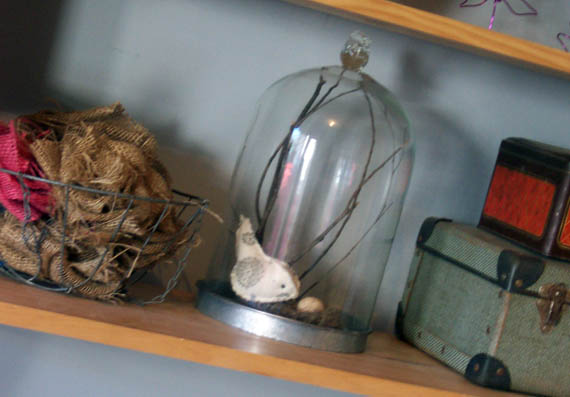
This pottery measure thingy (that really is the technical term) was given to me by Merrill before she left for the mainland. I knew I could do something with it. Its now a jewelry holder.

All in all, it was a productive weekend!

z

beater halter hangers

Am I the only one who remembers Tom Hanks in Bachelor Party chasing his girlfriend around with the egg beater?
I LOVE Tom Hanks.
But this post isn’t about who I find attractive (though if you really want to know, James Stewart, Jensen Ackles from Supernatural, Jeffrey Dean Morgan, also from Supernatural incidentally… )
Deep breath. Back down to earth.
Good.
In my “tackling the tack room” post I mentioned the beaters. And about re-using them to make a hanger for the halters for our tack room.
See, I’d been collecting these babies for a while thinking “one day I’ll do something with them”.
I used a couple in the mud room for hanging hats. Wayne used one on one of his robots. I spray painted some white. But for the most part they just lay there taking up space and not justiying their existance.
Last weekend when I ran out of hooks and anything bendy to use for hanging up tack I looked at the beaters once more and said “your time has come!”
The only hanging space left in the tack room by that point was the wall along the left hand side right near the door to the corral (or small horse yard… really a small sheep yard considering the casita was a shearing shed in its previous life).
Its a wall with exposed studs and no real place to hang things, so I put another of my handy timber slats up (leftover treated pine from our decking rennovation).
I then drilled holes in the pine, all the way through, for the various size beaters I had. Each beater had to be pushed (or pounded) in till it wedged snuggly.
Once done I hung up our collection of halters so they’re easy to grab as you head out the door.
And just so you don’t think I’ve forgotten Wayne’s input into the hanging racks, here is a photo of one of the bent spoon hooks he made.
I like the way the tack room is organised now:
– saddles ready to ride on their trestles
– extra girths, stirrup leathers & reins along the wacky wallpapered wall
– bridles near the saddle on a timber slat
– saddle blankets over saddles to keep off bird poop
– horse rugs airing out over the fences and slats.
Nice.
Orderly.
My mind is at peace in there.
Next job: tackle the workshop area…
z

Shared at:

Keeping It Simple

DIY Show Off


rustic crate window boxes

 
I thought I’d share something I did a few weeks ago now. I had meant to share it soon as I finished it but the weather got nasty, then I never seemed to remember to take photos while the sun was out, you know how it goes.
This morning while taking photos of the fallen tree I noticed the window boxes and remembered to photograph them.
When I saw these crates at the tip shop over summer I knew they’d be perfect for the driveway side of our house which is BORING. I wanted something to brighten it up and make the house look more welcoming. These boxes are outside the mudroom and toilet windows.
(Excuse the ugly pipe, it will be painted to match the house. Its where the sink went into the mud room.)
I just love these crates! I have temporarily put stuff in them, some plants really need to go into the ground, but for now they brighten up the place. I love seeing them as I approach the house.
Mainly I’m going to keep succulents in them. This spot gets late afternoon sun in summer and I don’t want plants to shrivel up and die. Though I think a couple of them are already showing frost damage.
And just cause I happened to take them, here’s a couple of panoramic photos of our place from up the top paddock. I had to stitch these together from a lot of separate photos and I have to include them very small but you get an idea of the land around our house. (You can see the fallen tree to the right.)
The casita is the one with the red roof, the house with the blue. The wonky little shed in the foreground is the woodshed. Not so pretty from this side. 🙂
z

Shared at

Keeping It Simple
DIY Show Off

wire light fitting

Over the last 2 weeks I’ve been working on this light shade for the wardrobe room that I posted about here.

I wanted something more industrial in feel to match the hardware shelves I used in the room so I looked around at what I had.

I found this fuddy duddy lampshade I’d picked up from somewhere. I’d already ripped off the granny pink frilly cover that came with it and was left with that glued on ribbon.

Have you ever tried to remove that stuff? It sets like concrete. I tried cutting it off and broke a small pair of scissors. I then tried slicing it off with a scalpel and broke that. I tried a stanley knife and cut myself.

In the end I soaked it in hot water for about two days and went back to scissors and eventually got it off.

Then I put it on the coffee table in the living room where I would do a bit of wiring when the mood took me. I had planned to add beads to it as well but only got as far as adding some small black ones randomly. I used a thicker black wire and thinner silver wire. I’m not sure if I’ll add crystals to it later or not.

I put it up on Sunday and I love the way it looks when the light is on, the pretty shadows it casts on the ceiling.

Meanwhile I’m suffering big time. I spent most of the day on Sunday gardening as I had to get some new plants into the ground before winter. Having problems with my right arm (RSI, carpal tunnel, arthritis, whatever) I tried to spare it and used the left for the heavy work: digging out gigantic weeds using a pick, taking the weight of the shovel, etc.

I put 2 blue plumbagos along the fenceline to hide the water tanks, 2 purple salvias to fill gaps along the front of the porch, 2 white gauras on the porch corner, 8 seedling snap dragons in a narrow bed on the driveway side of the house and 2 mexican orange blossoms on the ends of the trellis. I still have 2 pale yellow double banksia roses to plant and to relocate one of my hydrangeas. When they all grow (thinking positive here) it will look gorgeous.

I also put up some crates as window boxes outside the mud room with Wayne’s help cause by then my hands weren’t working that well.

As a result of all that work I have thumbs that are refusing to work. They’re sore and have no strength to grip much of anything at all.

Ugh.

Remind me never to garden again. Its bad for my health.

z

Shared at Knick of Time Tuesday

dragonfly windchime & other shiny things

I haven’t been doing much these last few weeks, but I ‘ve been messing up the living room with my wiring and beading so I could knock up a few more wind chimes for the local shop I sell through.
I do enjoy making these things as I watch TV, sorting through my boxes and collections of odds and ends till I find something which inspires me, then putting bits together to form something pretty.
As you know, I love rusty things, old things, crystal beads and shiny wire. A few weeks ago I bought my first couple of spools of coloured wire and I’m loving them!
This little dragonfly is made of a mix of silver wire, gold wire and silver beads. It sits on what I believe is the cover from an old car light I found in a tip shop. It makes the best sound when the wind jingles the tea spoons.
 
This heart is made from an old coat hanger bound with red and white lace and embellished with an odd collection of keys, crystal beads and a tiny sugar spoon.
A silver napkin holder makes this very loud windchime for those who like more of a chime. It consists of a collection of spoons, forks, orange glass beads, a large clear crystal and a tiny star cookie cutter.
More chimes to share soon, though I should really be concentrating on finishing the house painting. But that’s ok… I can wire and bead while I catch up on episodes of Dexter, The Walking Dead, Game of Thrones, Supernatural, CSI, Bones and Downton Abbey.
I have ecclectic taste in TV series.
z

{almost} no sew curtains

I did tell you I was on a roll didn’t I? Weeks of very little from me, then suddenly I just can’t seem to shut up about the things I’ve made and done!

Do you remember when I found a ton of old cotton flour and bank deposit bags at an op shop ages ago?

Most of them are from the 80s, but that one with the woman holding a cake on it is in pounds so I figure it has to be from the 60s before Australia went metric.

At first I thought I wanted to make cushion covers out of them, but some are pretty old and the shape doesn’t really lend itself to a cushion unless you trim the image (no way) or lie the cushion sideways (not ideal).

I also thought they’d make great (interesting) curtains for my ugly kitchen.

A talking point type of thing, if you will.

So first thing I did was sort out how many bags I’d need for each window. I have two windows in the kitchen. One is tall and narrow, the other is tall and a bit wider. The first looks out to the front yard but is positioned in such a way that you cant really see out of it much, sandwiched as it is between the cupboards holding the microwave and the stove/rangehood.

The bigger one looks out into the mud room now that we’ve enclosed that tiny porch.

I won’t go into what I’d LIKE to do with the kitchen layout and window placement…. I won’t…

The tall narrow window gets the full HOT afternoon sun and had a venentian blind on it… very necessary if you didn’t want the kitchen to become a furnace on days like today. However the venetian blind was broken and I wanted it gone.

It was peach.

Need I say more?

I decided it needed a full curtain – 4 bags, 2 across and 2 down. I ironed them and sewed them together on my trusty ancient Singer sewing machine (bought for me by my father at a Trash and Treasure market about 20 years ago – well done dad!)

Using some small curtain clips I’d bought from ebay (cause the only place I found them locally was insanely expensive) I suspended them from the window sill using some old curtain hooks and a stick of bamboo I ripped out of a screen….

Ok. I didn’t have a curtain rod which would fit so I improvised!

On the other side of the room I had put up a hanging rail to hold the frying pans and some totally useless/display only bits and pieces. I only needed a short curtain to cut out some of the glare but still allow us to look out the window to the front gate if we bent over the sink, leaned to the left and carefully pressed our faces to the window all while avoiding braining ourselves on the sharp cupboard corner.

Don’t you love the layout of our kitchen? I know Wayne does. You’ll recognise him. He’s the one with the band aids all over his head.

Hm. Not quite right… It was lacking something (and I don’t mean how crooked it is… I fixed that.)

The main problem, as you can see on the narrow window, is that the curtain looked see-through with the strong sun behind it.

I couldn’t leave it like that. Not in this heat. So I grabbed this girl’s best friend – burlap!

I cut a piece of burlap slightly larger than the flour sack curtain I’d made, clipped it all together and voila! Much better!

I did the same with the other window too, only this time I cut the burlap longer so it would go behind the rail and cover a bit more of the unsightly mess in the mud room.

Not bad for an almost no sew project. Basic and easy.

Just the way I like it!

z


Shared at:

What we accomplished Wednesday at Green Willow Pond

Beyond The Picket Fence

The Girl Creative


upcycled baking tray sign

Dada!
As promised…. (drum roll) here is the better dog grooming sign!
This one was made using a rusty old baking tray which had seen better days – it began its life as an eager young tray, looking forward to doing its best, cooking oven fries and such. Then it started to lose its good looks and was banished to defrosting dog food. Things went from bad to worse when all the defrosting lead to corrosion and rust… causing it to be tossed out into the yard where it spent the last 2 years covering a hole its human meant to fill.
Then one day said human was thinking of making a sign and walked by the now much bigger hole and saw the poor rusty tray just lying there, waiting for the ultimate death (the tip). Suddenly life looked up for the old tray – it was brought inside, sanded within an inch of its life to get rid of the loose rust, then painted over with black rust guard paint to protect it.
But back to me…
When designing this sign on the computer (I use InDesign for all my type stuff) I found the best way to fit Dog Grooming and an arrow was to be a bit imaginative – hence the sideways ‘ing’. 
I think its cute.
Anyway, I used a symbol font for the pointing finger cause arrows are just too boring. Then I used Stencil as my font cause it kind of lends itself to being cut out… don’t you think?
I printed it out, cut it out using a scalpel (yes, you heard me… scalpels are so much easier to cut stencils with than stanley knives). I then traced the letters using a pastel pencil.
I used some of the enamel primer I am using on the house to fill in the letters, joining them up so they no longer look stenciled. I did this twice to get a smoother look.
I think it came up pretty well.
I asked Wayne to drill a hole on the handle to match the one that came with the tray and then he made 2 wire hooks to fix it to the fence near the front gate.
No one can miss it now!
z

Shared at:

Knick of Time

Beyond The Picket Fence

the dog room sign

 
I have a new ‘Dog Room’ sign!
When I’m grooming dogs I find that people who’ve never been to our place before will wander around the yard aimlessly, not knowing where to go. I used to have the blackboard on the front porch with instructions: ‘Dog grooming in the shed behind you’, but since I started painting the house the chalkboard has been moved.
I thought it was time I did what I’d always planned and put some signs up to direct people to the right place.
The first thing I did was consider what I had on hand which would I could use to make a sign. I had plenty of timber, but I also had this cute little wire thing I’d found at a tip shop which I thought would make a great wall hanging sign holder.
I have no idea what this thing was used for originally, unless it was to hang bananas on… I drilled holes in it and voila! A bracket to hang a sign off!
I also have quite a few of these old metal tool boxes. The smallest one I had was a perfect fit for the hangy bit thingy. 
(You only get the best technical terms here!)
So… since I was already painting the house and had the undercoat enamel tin opened, I used some of that paint to paint the letters on the metal box.
I had made myself a stencil (for a sign I’ll share tomorrow) so I simply re-used it to do this sign. For this sign I decided to shortcut the process. Instead of drawing the letters and then painstakingly painting each letter by hand as I did with the other sign (the neat one), I just painted over the paper carefully as you would a proper stencil.
Given I was using a paper stencil I’d cut myself and not a proper one, I had a bit of ‘leakage’ under the stencil. Not to worry. I wanted this sign to look a bit rustic. After all, its going on the side of a very rustic old house-come-shed-come-grooming-room/workshop/feed storage/laundry and whatever else we need it for.
You’ll notice the chippy paint on the old timber windows, the unpainted boards, the general aura of abandonment and disrepair…
Of course I had to hang the sign on the bracket. I only had one piece of chain I could pry open to attach on both ends. All my other chains are too heavy and too impossible for this job. So I improvised. I got some rusty old wire and made myself a hook for the other side.
It now hangs off the door frame (the entrance to the hydrobath room with the grooming room to the left) between my dying herbs in colander planters (you may remember them from this post when the herbs were new and still happy to be alive) and the four leaf clover Wayne made me out of rusty barbed wire.
PS: I cannot grow herbs. I’m going to put succulents in those baskets. Or plastic plants. At least I can’t kill them…
This is the view as you drive into our yard. I think people will get it. Don’t you? Especially with the new sign at the gate directing them to look that way.

Stay tuned for that sign tomorrow!

z

Featured at: 

Beyond The Picket Fence

Shared at:

Beyond The Picket Fence
Homespun Happenings

tea light chandelier

I had this idea that I’d like to try making a dangle which could hold a tea light and shine on its own light, not just rely on the sun hitting beads and crystals.

So when I found these tiny little glass craft bottles, I thought they’d be perfect for the job!
First I filled them with a mix of pink and yellow crackle glass beads and aurora borealis beads. Then I made little wire hooks for them.

I found a little cup shaped metal bowl in my junk collection and an old vegetable steamer. 
Put them together…
Perfect.
I tested it out with a tealight in it, just to see how it looks. 
Sort of like a cross between a spaceship and a jellyfish.
But it brings a smile to people’s faces when they look at it and go “Hey! That’s a vegetable steamer!”
Yeah. But with a difference!
z

Shared at:

Knick of Time Tuesday at Knick of Time
What we accomplished Wednesday at Green Willow Pond


coat rack FAIL

Thought I’d share this beautiful coat rack fail with you, just to show you I’m not perfect and I can’t do EVERYTHING (in case you did actually believe that).

I had this brilliant idea that I could make a cute coat rack using these antique style brass coat hooks I’d gotten on sale a long time ago.

I had this small piece of old skirting board which was perfect. How hard can it be?

Harder than I thought, turns out.

Firstly, I didn’t measure correctly. Sure the hooks were evenly spaced, but I forgot to take into consideration the space on the ends… that should have been smaller and the space between should have been bigger.

First fail.

Then I couldn’t get the darn screws in properly so that the plates sat flat! I tried all kinds of things… every effort digging me deeper into the quagmire of failure.

The skirting board was hardwood… the drill too strong… the screw heads just popped off left right and centre.

I gave up.

I gave it to Wayne and asked if he could fix it.

He fixed it.

He broke the timber and gave me the hooks to use on another project.

I dont know if I can… I’m scared of them now!

z