teeny tiny birdcage

Just a little something I whipped up while watching TV.

My hands were bored.

The inspriation? Pinterest of course! On my Wired board.

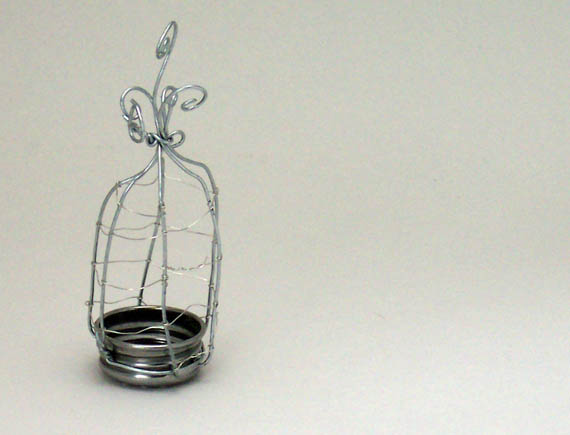
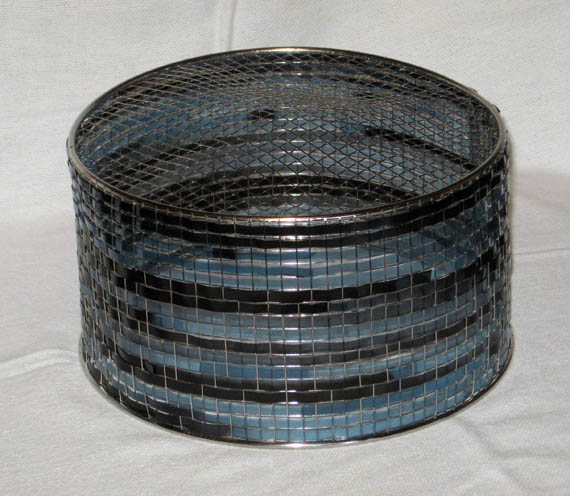
I used a bottle top, then two different gauge wires. I love my tiny birdcage.

I haven’t yet found anywhere to put it, or use it. But then again, my house (and shed) are full of things I love but haven’t yet found a place or use for. I’ll get to it eventually. I always do.

At least for a while.

I’ll find a place for something, then one day I’ll be doing up another room or another corner and I’ll scavenge my house for the perfect item to finish it off. I’ve been known to plunder a vignette/room/shed/outdoor area for that perfect item to finish another vignette/room/shed/outdoor area.

Everything can be re-used.

Well. Almost everything.

Some things are best sent to the tip.

I know that.

We’re planning a couple of tip trips over the next weeks. I’ve been collecting piles of stuff in a corner near the casita and DJ has been busy burning piles of scrap wood (sob) and rubbish in the paddocks and piling stuff that needs to go too.

Although I’m losing my stockpile of weathered wood, we’re finally cleaning up the rubbish piles we inherited when we bought this place.

There is still a huge stack of timber near the garage. We plan to use that over our September break in my crazy woodshed makeover. It was once great wood. A mix of hardwood lining (like the stuff used in the mudroom), floorboards and weather boards. I’d love to keep it for something special, but the fact is its rotting in the weather. When we bought the house it was lying on the side of the garage, semi wrapped in plastic. We moved it to higher ground and wrapped it better.

In come the horses. Over the last few months they’ve unwrapped it and scattered timber all over the place. Breaking bits of it as they walk over it… you get the picture. Its a matter of use it or lose it.

Since we first moved here we’ve had this ugly woodshed. The shed itself is cute and stable – with round corner posts and a timber floor. The undercover area outside needs a serious bit of work as it was done the wrong way and the beams are all sagging and the roof is hanging low. That will be fixed (if I have anything to do with it) but the woodshed itself – I have plans!

Its currently covered in thick shadecloth. Ok… it works I guess, but its ugly. It looks like a badly wrapped package. I plan to rip that all off (and recycle it!) and then clad the shed in old timber.

DJ doesn’t quite get it. He says things like ‘There isn’t enough wood in the pile to do it’ thinking I want uniformity. I don’t. I want a crazy, characerful, rustic farm shed, made with mismatching bits of timber and with a yellow climbing rose growing up the side.

As I said… I have plans. I just hope we have enough time to tackle it over our break.

Fingers crossed nothing else comes up.

z

teapot chime


I had a silver teapot I found at an op shop.
I had a quite a few salt and pepper shaker lids leftover from my garden stake project.
And I had Pinterest for inspiration!

I saw this somewhere along my wanderings. Gorgeous.

Only I made a few changes. I wanted mine to look more like water spouting out than drops pouring out. So instead of having one lid from which others hung, I made each lid come out of the spout itself in a graceful curve.

At the end of each curve of wire I hung a lid and some aqua crackle glass beads. I also added some tiny bells to the lids for extra jingle.

I wanted to hang it on the porch where the wind will catch it and make it tinkle but taking photos of it there proved to be impossible… so I tried a few more interesting settings.
I love the contrast of the shining silver pot and lids with the rusty red bucket and old biscuit tin. And the weeds.
Much as I love the vignette of silver and rust, I didn’t want to leave it out in the middle of the yard exposed to rain. I’ve put it on the porch, on a ledge next to a rusty pot holding succulents. 
Works fine there too.

I think it might need a few more lids. I found a few more yesterday so I can add them any time. Make it richer/fuller.  Still, I’m rather pleased with it as it is.

z

PS. This project has been added to the Knick Of Time Tuesday link party! Go visit and check out what other bloggers are doing.

DIY pendant light


What do a deep fry basket, an old xray and some crystals have in common?

They’re hanging in my guest room!

When I found a deep fry basket at the tip shop I just had to have it. It was clean and shiny and, being part magpie, I collected it for my nest. I knew it’d be perfect for something.

 
I don’t have a ‘before’ photo. And no step by step photos either. Sorry.

I removed the handle and thought about it. I’d been to an art from junk show last year and someone had used xrays to make a lightbox.

I have xrays. Tons of them at the bottom of a suitcase… I have no idea why I hold onto them. Maybe future generations will be interested in my fractures.

I cut the xrays into strips narrow enough to thread through the wire and put weaved them through the basket.
I had to order chandelier cyrstals online (thanks ebay) and waited for them to arrive.
I also orderd the three-cord twisted black cloth wrapped electrical cord. Ok. I know that sentence doesn’t sound right, but live with it.

I searched for black fittings, a black plug, a black switch and a black light globe holder thingy. (You don’t have to know what its called to use it!). I found the plug and the switch but the light thingy was hard to find.

Hello black spray paint.

I then climbed on a ladder, put a hook in the ceiling of the guest room, and hung it. No hanging off this chandelier as the ceiling will cave in.

I brought the ladder from the spare room in Fentonbury to use in here as a bedside on one side, the suitcases on the other.

The room still needs painting and the bedding needs to be sorted. However, I like how its coming along so I feel progress is being made, even in baby steps.

z

PS. This project was linked to Beyond the Picket Fence’s Under $100. Visit the link below for ideas you can recreate which will cost under $100.

Beyond The Picket Fence

pretty garden (well, not quite)

 
I absolutely fell in love with the garden decorations I’ve seen on Pinterest.

I wanted them.

I wanted a pretty garden like that…

See, our garden is NOT pretty. It’ll never be pretty while we allow horses in it. At the moment we have to feed Dancer in the yard cause the boys eat her food. She also enjoys a nibble of the grass. And stomping on my pathetic excuse for a flower garden.

I guess I have to decide what’s more important… spending quality time with the equines, or a pretty garden.

I’m working on it.
 
Anyway, I admired the baubles on Pinterest.

I looked at them.

I decided I could make something similar.

I had a few odds and ends around the house. I found more at op shops. I got to work.

The first ones I made were made using two of my cheap poodle ornaments and some candlesticks.
I liked them. I put them in my pathetic little flower garden (before the frost took its toll on my plants) and they looked great for about 2 weeks. Then something (or someone) knocked one down and broke the poodle.


I glued the poodle together, but I discovered the glue I was using (supposedly will glue anything to anything. hmph) was useless. So I tried superglue.

Lesson: do not buy $2 dollar store superglue. You may as well use flour and water.

But I know that now. Not when I was making these things. Here is what my coffee table looked like for a week.

I don’t do things by halves.

After they dried, I put them on a bookcase to wait till the weather improved enough to put them outside.

Naturally DJ knocked them over. Broke 2 of them and proved that the glues I used were not up to the challenge.

I fixed what I could, then took the survivors and put them in the garden. Or whats left of it.

Its really not easy photographing them all at the same time and not getting the muddy cement and the water tanks in the shot.

Maybe, come spring, the bushes will come back to life and flower. And the pretty decorative jewels will add to the beauty of my garden.

Till then, they ARE the beauty in my garden.


If they last till spring I’ll take more photos.

z

SQUIRREL!!

It was brought to my attention today, by a good friend, that I may lack focus.
Those weren’t the exact words she used… scattered was one of them. Easily distracted was another. Take on too much put in an appearance. Not superwoman got a mention. Crazy was in there somewhere too…
In fact, I was compared to the dogs in UP (watch video if you haven’t seen the movie). Love the dogs in that movie but I think I see what she means… I’ll be doing one job, then I’ll see a rusty object and … SQUIRREL!
ANYway… I don’t think I’m scattered. I think I just have too many ideas, too many lists, too little time and too little space in my head.
In fact, that’s my usual excuse when I forget things. I only have so much space in my brain. If I let more things in, some things have to go to make room for more.
At least I’ve had a productive weekend. I did tons of stuff which was on my list. Plus things which weren’t. I love weekends like that!
(Means I can put new things on the To Do List!)
So, here’s what I’ll do. Rather than go on and on in a long scattered blog, I’ll confine myself to one project per blog. How’s that for focus? Huh?
One thing I did was work on the corner of the deck. This is where we step up off the driveway onto the deck. Last weekend I put a large chalkboard on the wall. This weekend I moved the cabinet I’d mosaic-ed to the porch and added legs to it.
Not real legs. Temporary legs. I just cut chunks of a leftover post from when we made the deck. They’re the right size more or less so I may just paint them and call it good.
Last night I did my own version of chalkboard art. Badly. My handwriting really sucks. Which proves this is authentic.
If I was photoshopping it, you’d bet the typography would be spot on.
I put my old watering cans on the cabinet, added the only pot plant I have which is flowering (the only plant flowering in my yard, full stop!) in a galvanised planter, and voila! Very pretty.
Please ignore the horrible handwriting. It helps if you look at it and squint.
 I think I’ll stick to computer typography from now on.
z

baby steps


We have too many shoes. And boots.

Scratch that.

DJ has too many boots.

This is what the mud room looks like currently:

Yep. A total mess. See the black and white tiled floor which is no longer black and white but black and grime?

See the piles of boots and layers of coats on the walls?

And the old boxes containing more shoes? What about the stuff I just ‘put there for a minute’ 3 days ago?

And if you look closely you’ll see Montana peeking out of Mischa and Barney’s crate…

This weekend I had a list of things to do. As always. But this time I’m proud to announce that I managed to do almost every single thing on my list, plus a few things that weren’t.

Like putting the shopping list chalkboard up in the tiny entry way where the fridge lives. So handy. Go to fridge, can’t find something cause its out – write it on the chalkboard!


I was going to do my usual thing with jute string and tied up chalk but decided to do something different. I did a white wash over weathered pegs and hot glued them to the frame. Quick and easy.

Since I was on a chalkboard roll, and since I had the hammer and nails out and was going strong on things not on my To Do List, I figured I’d put the huge chalkboard I’d found at an op shop a while ago up on the wall outside the mud room. Its a handy spot to leave messages…

This got two pieces of chalk and two pegs to hold them.

Have you ever noticed that if you hang something from just one hook, it will hang crooked and move when you bump it, then hang lopsided?

Well, I had a low tech solution.

Nails. On each bottom corner to hold it in place.

Ok. Maybe not the best solution, but this wall is going to be painted soon and I’ll do the job properly. Till then its fine as it is.

I just need to get out there and write something interesting on it!

Stay tuned.

So… after I did all the other things on my To Do List for the weekend, I decided on the spur of the moment to remove cupboard doors from my upper kitchen cabinets.

Cause, why not? Its my kitchen and I can do what I like, right?

At least thats what I told DJ when he came in and started whining about how what on earth was I doing now and why couldn’t I just leave well enough alone…

Here’s what I’ve learned.

That those hinges which close doors on the outside of cabinets suck. That the people who make those hinges supply them with the worst possible screws cause just putting the hinges on had ruined the screw thread. Getting them out was a huge adventure involving much swearing and the use of many different tools… including a claw hammer. (Do not try this at home!)

That partners don’t always have the same enthusiasm you have in the whole ‘lets try to change the kitchen for the better without changing anything really cause we haven’t got the money for new cabinets, benchtops, new stove or moving windows’…

And that quick jobs like ‘hey, I’ll just take the doors off those cabinets’ turn into marathons with hurdles.

On the positive side I learned that I like having somewhere in the kitchen where I can display things I like. And see things I no longer like.

Like the 50s cannisters. I love them, but I’m over them. I want different stuff in there now.

I also learned that I really, seriously want to declutter the benchtops.

Ok. I knew that before I started, but this seems like a good time to bring it up.

This is phase 1 of changing the kitchen to something I’m more likely to love looking at. Live with this for a while… find moulding/trim/whatever I can find to prettify the cabinets and make them look more like shelves…

Then rip out the entire kitchen and put in new one.

Ah… I can dream.

At least I got a few things done and taken a baby step towards a different kitchen!

z


good morning sleepyhead mirror

I just love old window frames. And old doors. And old timber.
Ok, I love anything old, chippy, rusty and generally distraught.
I have a window/mirror in the bedroom already…

…but when I saw this beauty in a tip shop a long time ago, I just had to have it.

It sat in the shed for an awfully long time, buried somewhere between dog crates and ununsed luggage. Then one day while looking for something else I rediscovered it and thought the time was right to give it a makeover.
It needed a little work. There was a split in the frame and a few nail holes I had to fill. And of course it had no glass in it.
I liked the colour as it was. Bits of blue and yellow paint showing through from different paint jobs over the years. In most cases I prefer to keep the original paint if I can. Still, it needed something extra.
A shelf to hold bits and pieces!
The window frame itself is kingbilly pine – rare Tasmanian timber which was used a lot many years ago for window frames. I couldn’t get any of that so I did the next best thing. I used what I had on hand – some treated pine from out deck extension.
I cut it to the right size then did my artist thing – I mixed up paint till I matched the colours on the frame, painted it and distressed it to match.
I think I did a pretty good job. When you look at it, you can hardly tell the paint job on the shelf isn’t as old as the one on the window frame!
I had to be creative to attach the shelf… I used two old brackets I happened to have in my ‘bracket’ box (see? these old bits and pieces I collect DO come in handy!). They were the perfect colour, having been painted over in a pale blue at some stage.
I attached them upside down. I think that gives the whole thing a touch of crazy DIY-er. Last I added 2 heavy duty eye hooks for fixing it to the wall.

I got the glazier who put the glass in our front door to put a mirror in for me.

Here is the finished product. (please forgive my terrible handwriting!)

 
I have added a couple of hooks underneath the mirror as well for hanging stuff like towels or coiled pieces of rope.

Cause you never know when you might need a coiled piece of rope.

You can see where I haven’t touched the original paint or where its been sanded off. I wanted the kingbilly pine to be visible.
This window mirror is currently on display in a local shop for sale, but I’m torn over bringing it home to use in our bathroom (when we ever get around to the much needed makeover in there), or putting it in my Etsy shop…
I guess time (or my empty wallet) will make the decision for me soon enough.

z

kelly’s keys

 
I can blog about this now. I couldn’t before cause I made it as a house-warming gift for our friends Kelly and Simon and I wanted it to be a surprise. They moved into a little house on a dairy farm a few weeks ago. We haven’t managed to go up and see it yet, partly due to coming down with the flu when we were expected there for dinner.
They came to visit today (and brought Rio and Chloe to have their nails done*) so I got to give Kelly her presents – this key rack I made for them and a few other things I found which I knew she’d like.
Kelly’s pretty mad about black and white cows.
Hence the black and white ribbon on the key rack.
It all started out as a pretty plain, very old, very weathered piece of barn wood.
I roughly painted it with some blue/grey home made chalk paint, then handpainted some old style keys onto it. I loved the way the wood was worn away at one end so I painted the key and grey to make it look like the wearing had happend after, not before, the wood was painted.
I sprayed some old silver coloured hooks white using a flat white spray paint and put them along the bottom for keys… 
It needed something more… So I put an extra, smaller, hook into the worn area and added a heart I made out of some very rusty wire.
Better. Yet it still needed more… So I added a key I’d aged using a concoction I found on Pinterest. It was meant to rust it but didn’t. Still, it looked old(er).
Yep. It was getting closer.
I drilled 2 rather big holes into it and got Wayne to do more of his cute knots with some jute rope. I had to buy a new set of drill bits cause I didn’t have any big enough. (Any excuse will do to buy more hardware.)
Yep. It was getting there, but it still needed something more. I had to look at it for a long time before I would work it out. I hung it on the wall in the living room where I’d see it as I walked by every day.
Then I had a brainwave. It needed a bow.
A cowhide bow!
Have you ever tried to find cowhide ribbon? 
I bought some plain white ribbon from the fabric store in town and painted cow spots on it using a sharpie. Didn’t look too bad.
I made a double bow and looped some wire around the ribbon and the key and hung them onto the hook with the rusty heart.
I’m actually really happy with it. I think it came up pretty good considering the many false starts!

Adding this project to Addicted2Decorating Link Party.

z
*Rio and Chloe are jack russell terriers. Rio is a gorgeous little ratbag who’s already been introduced to the joys of hydrobathing and having his nails done with a dremel. Chloe is only 8 weeks old and it was her introduction to the dremel today.
There’s almost nothing cuter than a baby jack russell. Chloe is the sweetest thing!

blue crystals, chains and rust

 
There’s something about the combination of rust and sparkle that just does it for me. And lace and burlap, but that’s another story entirely.
When I found the first hand sander at a tip shop some time ago I bought it cause I just loved the smoothness and softness of the wood where it had been worn smooth by use. I had no idea what I’d do with it.
In fact if it didn’t still have sandpaper stapled to it, I wouldn’t have had a clue what it was.
Then I found another. And another. It was like once I’d seen one, I was seeing them everywhere. 


Like cars. Have you ever noticed that you can go through life quite happily not having a clue what a Holden Astra looks like, but then you see one and suddenly they’re everywhere?
That’s how it works with wooden hand sanders too. Once your eyes are open to them, they’re everywhere. And I’m buying them. I can only hope I find more. I have more ideas of what to use them for.
An image on Pinterest of a collection of clunky rusty objects on chains gave me the idea that this sander would be ideal to hang a random collection of objects from.
The first one I made I already had a few items in my miscellanous box which were just waiting for the right project. This time around I actually had to scavenge to find the right items.
I went through my miscellaneous box, I went through my collection of spoons, I even went through the bottom of Wayne’s tool boxes. I got some goodies there, but unfortunately Wayne saw me and confiscated them.
Oh well. Easy come, easy go.
Still, I had a few interesting things in my pile. A couple of old hinges. An old spoon. Some rusty nuts, bolts and washers. One of my collection of metal cup cake tins. Lots and lots of rusty wire in shapes made by Wayne. Beads. Crystals.
Cool.
This is one reason I just hate it that tip shops are closing. The one in New Norfolk is gone. Another is soon to close. You can’t get the same amount of rusty junk in op shops. 
At a tip shop you often find boxes full of crap, just begging for me to go through them. Which I do, carefully sifting through all the rusty hardware and finding a bent hinge, a crooked hook, a broken doorknob.
Treasure!
 
 
I just love that stuff.
I’m wierd.
However, there’s no arguing that a collection of junk and sparkle like this looks pretty amazing.

This particular suncatcher has chains and silver beads from a broken necklace, strands of watchmakers chain and a blue crystal with aurora borealis finish which makes it reflect colours in the sun.
I apologise for the overload of photos… I couldn’t make up my mind which ones to use, so I just used them all! 🙂
z

welcome stars

I’m finally starting to feel more like myself. There’s still a whole lot of coughing, spluttering, sneezing and wheezing going on, but all in all – I’m feeling better. Thank goodness. This not being able to do stuff (create) has been killing me. 
Last night I finished a couple of projects that only needed tweaking (and got Wayne to tweak a couple more).
The welcome sign is one of them. This had been on the hallway wall for a couple of weeks and all it needed was to be photographed outside where the walls weren’t the same colour as the paint on the timber. How did I do that? I started with flat white paint, added a touch of this and a drop of that and mixed up a colour that looks almost exactly the same as the colour on my walls!
 
Anyway, this project only needed photographing so here goes.
The timber piece is one that came off the old stable. I gave it a brush of pale blue/grey paint and then hand painted the word on it. I printed the word out, rubbed the back of the paper with charcoal and traced the letters, then painted them. I’ve found that doing it by hand beats any kind of transfer method I’ve tried. Using a thin brush and some acrylic paint I can give the letters the worn look I want by using more or less paint in areas.
I then took some sticks from under one of our gum trees and made stars using thin silver wire for the joins.
I added a few beads to the bottom of each star for a bit of bling. You can’t see the beads as well in the photos as you can in real life which is a pity.
All in all, I think it came up rather nice. When I see it near the door it makes me smile.

 Now on to other stuff!

z