DIY – rennovating the bathroom

I’ve done my share of rennovating. My first house, in Melbourne, was a 1950’s style home with a beautiful deco staircase in front. It needed a ton of work when I bought it – I lived in a construction site for 2 years, only finishing it to sell it. Ain’t that the way?
When I moved to Tasmania I wanted a house I could move into which didn’t need any major work. Not structural work. In Melbourne I had to remove walls and move doors. In Fentonbury I only needed to revamp the kitchen with paint, enclose the back porch for grooming, paint everything… and put in a new bathroom.
I thought I’d share the adventure just ’cause I can.
Warning: the following photos may offend people with delicate sensibilities.
This is what the bathroom looked like when I bought the house. Yet I still bought it.
 
Am I the only person in the world that can look beyond something like this? Our current bathroom is just as bad. And my first house in Melbourne, well… that was worse than both put together. 
There was a small clawfoot tub which I actually really liked. And a cupboard bolted to the floor and wall which acted as storage and a room divider (privacy for the toilet). That had lovely oak doors but was a boring melamine cupboard. And it really took up a lot of space in the small bathroom. The only reason you could get past was that the clawfoot tub was very small.

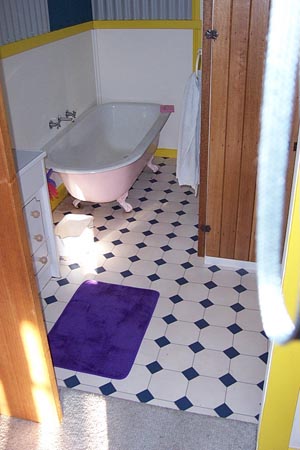
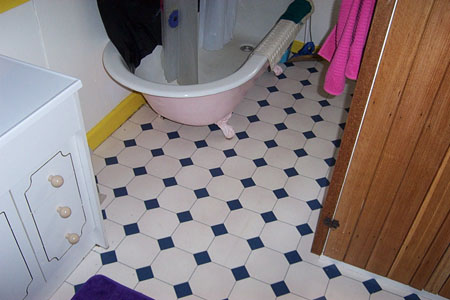
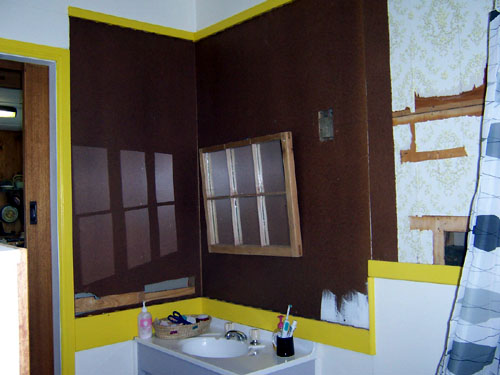
What about the colour, huh? White walls, ok, blue and white vinyl on the floor, ok, egg yolk yellow trims….

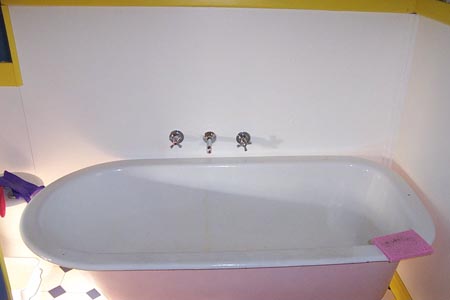
Notice anything? Taps in the middle of the tub… and no shower! Obviously the family of 7 who ‘rennovated’ this house shared the bathwater… eeech. No thanks. I prefer my water running fresh and clean.

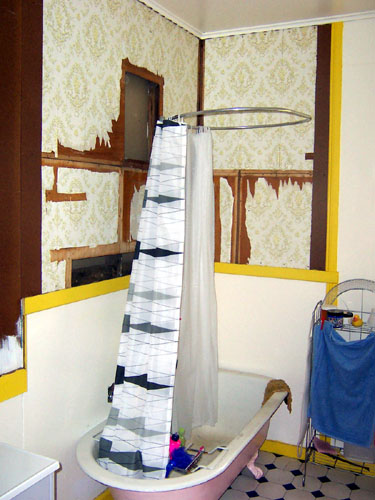
The clawfoot tub was gorgeous. It was a small thing, not that practical but oh so cute. I’d love to have kept it, but it was so ridiculous. It was a round type, with the nice lip around it, not squared off like our current one (yes, I have another clawfoot tub). I even loved the pink. But years of filling the tub with water and sitting in it, water splashing behind and under it had rotted the floor/wall. It was only a matter of time till I got in to shower and landed on the dirt below the house.

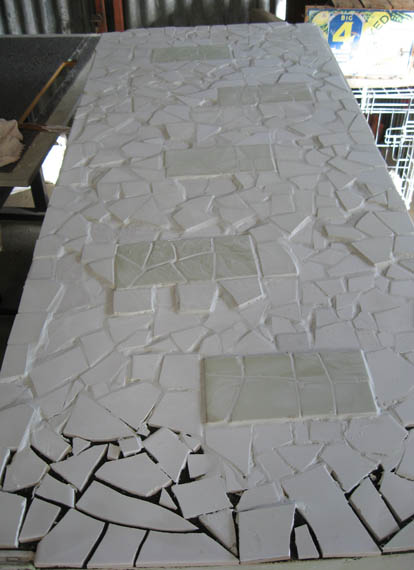
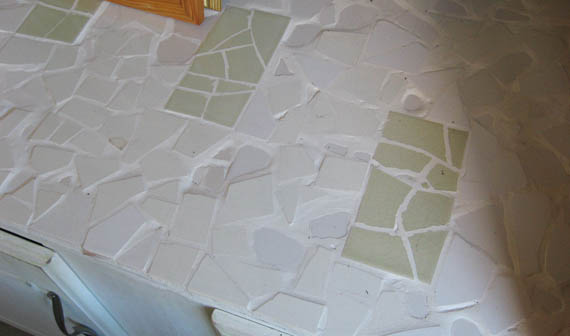
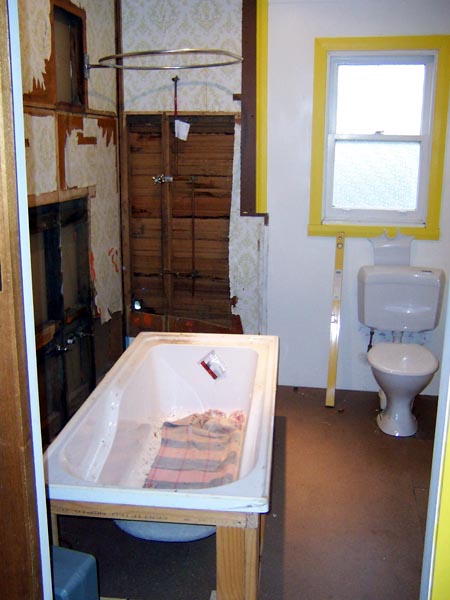
I needed a new floor.

Interesting wall treatment. In theory. I mean, I used mini-orb to redo the bathroom walls (that’s mini corregated iron in zinc finish). They used sheets of colourbond and they alternated them right way (blue), wrong way (grey) for artistic effect.

Hm.

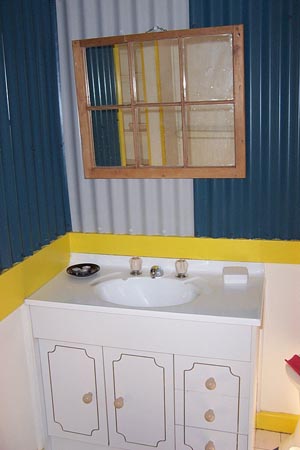
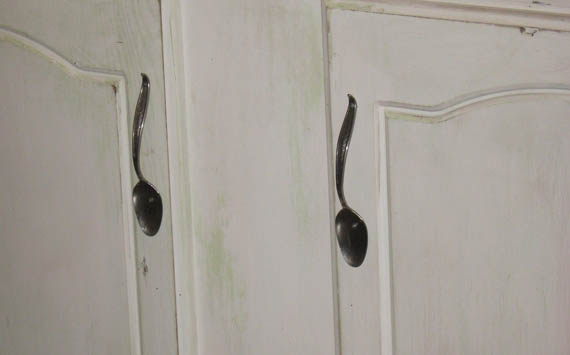
I hated the vanity unit, and I really hated the taps. Since I had to live with what I had for a while I put up a circular curtain rail and a curtain, got myself a handheld shower thingy with a wall attachment and spent the next few months showering while trying to uncling a cold curtain from my body. I also painted the vanity, changed the knobs to make it more acceptable.

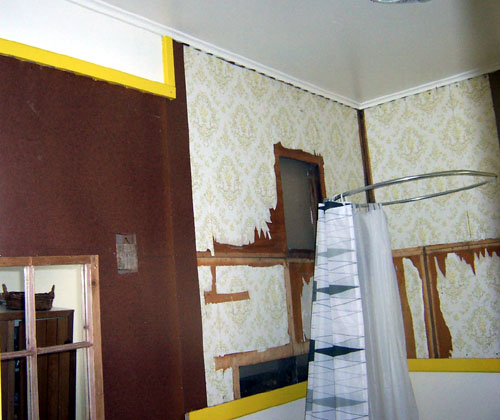
Below are photos of the rennovation started. When the colourbond came off we found holes in the wall. Of course.

I got a friend, ex plumber, to do the bathroom rennovation for me in return for helping him with his show dog. A bit of contra is a good thing when you don’t have much money.

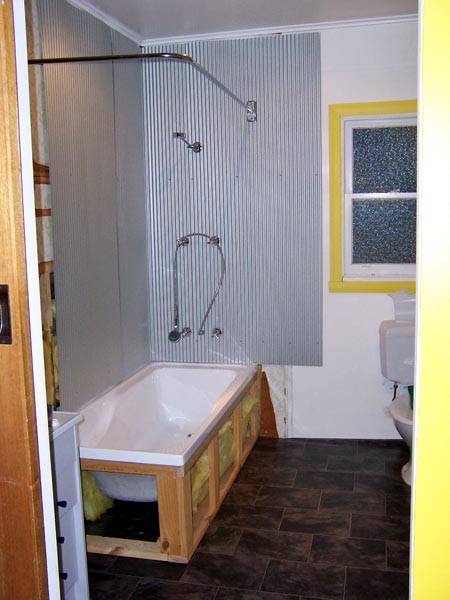
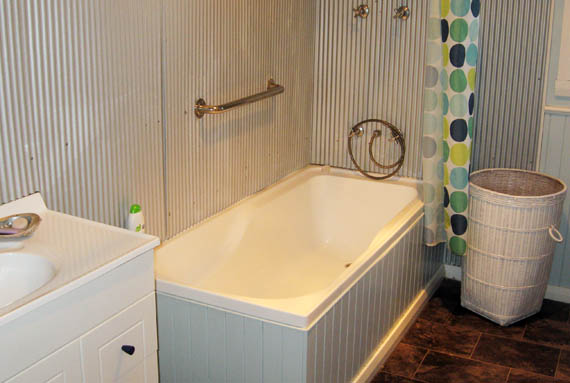
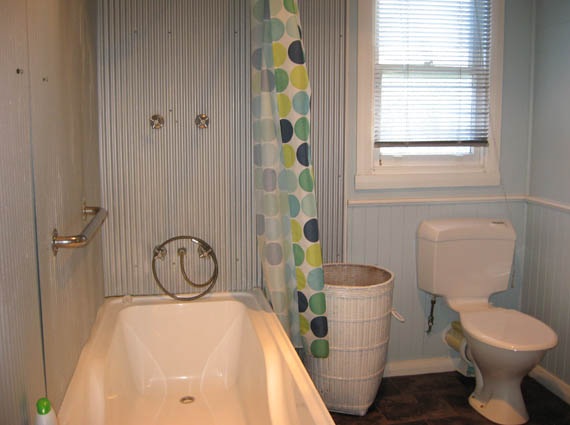
I bought a new bathtub, one that could be built in. Alan put in a new floor for me and moved the plumbing so I could have a shower over the end of the tub.

Having lived through this in Melbourne I was used to living around construction.There’s another advantage to this for a dog breeder: all my pups were well socialized to power tools.

Eventually the bathtub was in place, a large angle rod went up for the curtain and I could finally shower without peeling cold wet curtain off my butt.

I had this great curtain I’d bought at IKEA I was hanging out to use too.

I tried putting in the old cupboard but it didn’t fit. The new tub was much longer and wider than the clawfoot and the space between the cupboard and bathtub was too tight. I replaced it with an old shed door – this formed a simple visual barrier so you couldn’t see the toilet when you opened the door. It also served to hold towel rods.

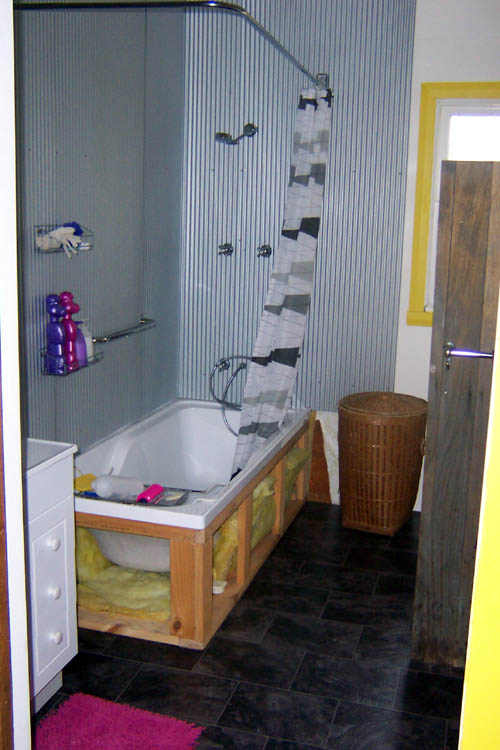
Since I have dark hair and shed like a collie, I opted for dark vinyl on the floor. Nothing worse than long dark hair on light floors.

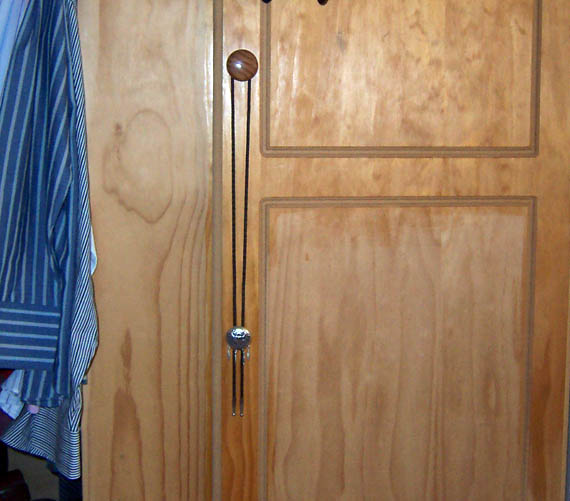
The bathroom had originally had a sliding door which I hated. I removed it and replaced it with a 2nd hand shed door. (Have you noticed I love shed doors?) I didnt paint the bathroom side of the door for a long time cause it matched the weathered room divider door.

You may notice I also clad certain areas around the tub and the walls below the mini orb with old fence palings. Going with that rustic look.

Oh yeah, and if you noticed I painted it lime green.

I have no idea why I did that but it seemed like a good idea at the time. It was bright…

Here’s the door from the outside, painting started on the door frame.

Eventually I painted the door Antique White USA on both sides, same colour as all the woodwork.

I got sick of the lime green and repainted the walls a gorgeous soft blue colour. I had a friend put panelling on the walls and the bath surround, eliminating the rustic look. I moved a tall narrow bookcase I had into the bathroom, panelled the back of it to match the walls, then painted it blue and white. It became the privacy divider plus great storage for towels and other bits and pieces.

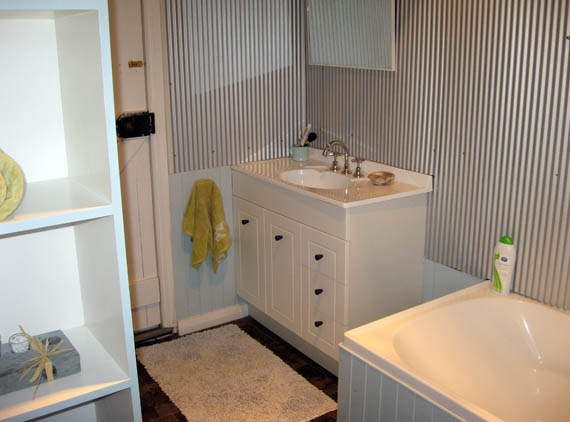
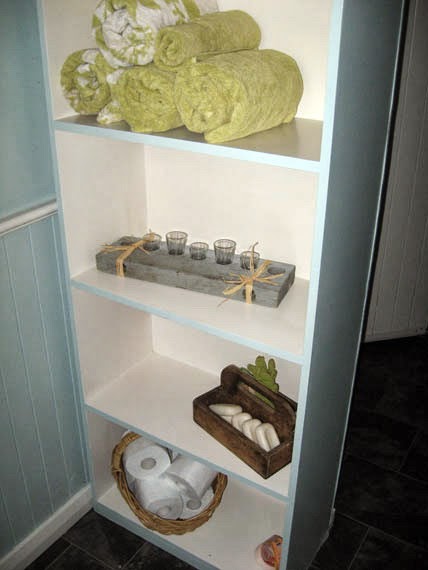
I bought a new shower curtain which was perfect for the new colours and painted my old cane laundry basket white. All that needs now is lining made from blue and white ticking. Lovely.

Big difference huh? From this:
to this:
Much better huh?

It’s a room which actually feels welcoming now, fresh and clean and spacious. And it didn’t cost the earth either. I bartered for some of the work, used what I had where I could, and did as much of the work as I could myself.

Now on to the horrific room that passes as a bathroom here… that will take time.

z

DIY – peg bag

Showing off my cute little peg bag. On our old Hills Hoist – the very symbol of Australian back yards. I love Hills Hoists. The original old style ones like this.
You know what its like – you can buy peg bags but none of them have real character.  And really, I’d never had peg bag. I never used them. I’m the sort who pegs clothes out, then removes them and just puts the pegs back on the line. To me its easy: you find free space on the line to peg up larger items, use the densely peg-populated areas for things like socks and undies.. easy and no extra work.
But then you move in with a man who can’t/won’t move pegs and simply puts sheets on the line over existing pegs. hmmm.
He was obviously raised by a mother who pegged out clothes and collected pegs when she collected dry washing off the line. My mother treats her pegs with a certain amount of disrespect.
 
I like my way better. Its the lazy way. However its the little compromises which make relationships work. (heheh)
Having found I needed a peg bag, I decided I needed one that suited my style. A friend of ours has one of her own baby dresses made into a peg bag. Its gorgeous, frilly, and antique (no comment on her age! my own dresses would qualify as antiques as well!).
I went looking in tip shops for a pretty frilly dress to make my peg bag. I couldn’t find anything that appealed to me. 
Till I saw these little overalls. They were just so cute! I simply stitched up the bottom straight across. Then I stitched the top of the straps onto the hanger so it wouldn’t fall off. I used a plastic coated hanger so it wouldn’t rust and ruin the overalls. Lastly I bend the hanger top so it wouldn’t blow off in the wind.
Voila. Pretty peg bag.
z

DIY – wine anyone?

I’ve seen a lot of trays re-made and re-purposed on Pinterest and decided it was time for me to try my hand at one. Seemed like a good idea at the time.
What started like a simple idea turned into a saga of mamoth proportions.
This is what the tray looked like when I found it at… you guessed it… a tip shop.
First thing I did was paint it. And re-paint it. And sand it back a bit. I went with white, then a pale green colour. I tried crackle finish. Nothing seemed right.
I painted chalkboard paint on the base. Then re-painted it and sanded it again. That’s why it looks so messy. I wasn’t very careful with the blue/gray paint I settled on cause I’d already decided I didn’t like the chalkboard paint and was going to wallpaper the bottom of the tray.
Ok. Looking at the photos now I think I maybe should have fixed up the messy bits and stuck with it as it was. But I wasn’t happy so I kept going.

I didn’t take photos of the wallpaper idea. It was horrendous. Take my word for it. I scraped the paper off before it dried and then I had to remove the goop. Yuck. It wasn’t easy to remove and the only way to fix it was to put something else on the bottom to cover the mess.

I bought some popsicle sticks, trimmed off the round ends and glued them to the bottom of the tray. I sanded them smooth, gave them a coat of polyurethane, a light sand and another coat of poly, at it was done.

I actually liked it. Here it is drying.

But thing is I wanted to put feet on it. I’d seen a gorgeous tray with cabinet knobs as feet. I found some knobs I thought would work. Nope. They looked awful.

By this time the tray had become a thorn in my side. Till last night. As I tossed and turned I suddenly came up with an idea!

Corks!


So now, my tray is a wine tray!

Finally!
z

harry the hooker

Wayne’s been at it again. He disappeared into the garage for hours over the weekend and I could hear hammering, see smoke billowing out and hear the odd swear word. He got the forge going… and this time didn’t burn off his eyebrows! Bonus!
Sometime yesterday afternoon he emerged, strutted down to the lawn and set this little man out on the table. 
Meet Harry the Hooker.
He’s cute isn’t he? In a kind of dangerous way.
I just love these little robotic monsters Wayne is making and thought I’d show them off.
z

DIY – the coffee table

This used to be Wayne’s coffee table. It was boring and dark brown and I never gave it much though. Not, that is, till I started thinking of it in another colour, with a different handle… hm…

As usual, no before photos. What I can offer is an ‘after the undercoat’ photo. I found that they now sell Zinsser Stain Cover in Australia. I’d read about it on many DIY blogs and was eager to try it on something. Anything that saves me having to sand is a good thing!

After I’d done a really bad undercoat I painted the table with my own chalk paint. Thats just some white paint I already had which I mixed a bit of super fine grout into. I’ve decided I just love the texture that gives to the paint. So soft and satin to the touch.

I had to give the table 3 coats of paint before I felt it was finsihed. I did one coat of pale blue on the table top, then covered it over with white. I’ve also started doing something I’d never done before in my life: giving the paint a light sand between applications. It actually makes a difference, much as I hate to admit it.

I change my mind alot. I can’t say I have any real ‘set in stone’ plans for my projects. They’re kind of more ‘go with the flow’…

Once the paint was dry I did some sanding with fine sandpaper by hand, and some with the electric sander, concentrating on the edges and spots which would normally get wear.

When the table was finished, I was ready to try another first for me – waxing. I did actually experiment with a some was on something small first, but then I went straight to it. I used a mix of antique black (translucent) wax and clear wax. I had to experiment a bit to get the result I wanted, but in the end the table looks and feels wonderful.

Lastly I put on the new antique knob I’d bought off ebay.

Of course it really doesn’t suit my living room at all. As much as I love it, the colours in the living room are just not right for the table… sigh. I’m thinking I may sell it.

Or re-paint the living room, rip up the carpet, get a new couch…

Might be easier (not to mention cheaper) to sell the table!

So now I’m going to get some well deserved rest. I’ve been moving furniture, cleaning house, washing clothes and clipping dogs all weekend. I’m pretty tired.

z

DIY – louvre door wall hanging


I’m not dead, lying in a ditch somewhere being eaten by tasmanian devils. I haven’t been abducted by aliens and getting probed (cause we all know “the truth is up there”)…

I’ve just been busy. And I haven’t been very creative.

I did take photos of projects which have been finished to share so here is one of them – an old louvre door made into a wall hanging/card and letter holder.

 I found this little door somewhere in one of the tip shops somewhere along the line and held onto it. I knew I’d use it some day. It was grimy and white, which was fine, but I wanted a bit more colour on it. Like it had been painted a few times over the years.

After giving it a good clean I painted it a pale green which I had left over from another project, then did a topcoat with a creamy white. When that was dry I used the sander to distress it in places so the green showed through and even the timber in some areas.

This pic is the only ‘before’ photo I have. Sometimes I just get carried away in my eagerness to start a project and forget to actually take before pics. Here I used an old sale board as the backing. I used glue to fix it to the back of the door. I then put those little screw in eye thingies (the technical name for them) and some wire so it could be hung on the wall.

It now lives in my home in Fentonbury as wall art which has a practical use as well. I’d originally planned to put it in the actual kitchen, but this spot seemed best for it. The colours of the cabinet underneath match the louvre door.

One project down. Only a million and 5 left to go!

z

DIY – tealight holder or…?

When we first moved to the farm we found all kinds of goodies in amongst the piles of rubbish we are still battling with. Among the goodies was this:

I  had no idea what it was. It has holes at one end through which I presumed bolts would go to keep it clamped shut. Wayne said its something to do with locking up rifles. Since I have no idea about rifles I’ll take his word for it.

Anyway, I thought surely there must be a use for it. Its an interesting item, the timber weathered and the paint worn off in places. In short: it was my kind of ‘thing’.

I decided that if I clamped it together it could work as a tealight holder. A table centrepiece, if you will. I envisaged the pieces clamped together with leather thongs, tied in the many interesting knots which Wayne knows how to do, sitting on a table on our deck on warm summer nights.

Till then I decided I could make use of it in Gully Road. I found some tiny glasses, filled them with white decorative gravel, added a couple of drops of lavender oil… tied the blocks together with raffia – voila! A pretty, nice smelling addition to the bathroom.

z

DIY – mosaic makeovers

I got the best comment from a reader the other day. A lovely lady from North Carolina wrote in to let me know that she loved my blog and that my makeovers had inspired her to do some stuff for her own house. Welcome to the blog Victoria. I hope my blog continues to amuse and inspire you.

Today I have two mosaic projects to share. They’re easy to do and I know that when Merrill gave me a hand with one of them she became all excited and went off and did her own kitchen table top! It now looks a million times better and she’s rightfully proud of it.

the school desk

My first mosaic project was a small school desk. This was an old school desk I bought at a country school fair for $2. I bought 3 of them… You can never have enough small timber tables. Or cabinets. Or frames…

Anyway, this is what the table looked like when I got it.

I cleaned it up and used it on the porch for a while, I have pretty much just moved in to my house in Fentonbury then.

When I started making the porch look pretty and inviting, I realised I needed a table to sit coffee cups and books on. I looked around and thought one of the school desks would do perfectly with a makeover.

I had never tried mosaic till then, but how hard can it be, right? I looked it up online and got my supplies. I undercoated the table and got right to it.

I decided to make a pattern using small square tiles (I did have to break some in the end) but I tried to keep it as simple as possible. Once the tiles were set in place with the glue, I grouted with vanilla coloured grout cause I didn’t want it too whte.

Finally I gave the table a coat of Antique White USA (do you ever get tired of hearing that colour mentioned?) and it was done.

The table is now acting as a small desk in the purple room in Fentonbury with the small fold up chair I found at a farm auction a few years ago. I got it free cause no one else saw the potential of it and it was on the rubbish pile. Unlike the galvanised watering can I paid $50 for…

It was my first auction… I got into a war with a lady over it… Thats now on my list of things never to do again.

All I did to the chair was sand off most the peeling old red paint and estapol it.

the pine cupboard

Once upon a time there was a footlocker type cupboard… It was meant to sit underneath this wardrobe of Wayne’s to hold shoes I imagine… But when we moved to Wind Dancer it wouldn’t fit in the tiny room which has become Wayne’s walk-in wardrobe. The ceilings are too low in this house for such high wardrobes.

For a while it sat on the small deck and did, in fact, hold boots and shoes. It was plain pine, and thus ugly in my opionion. I thought it’d look much better painted white, distressed and with a pretty top. The top wasn’t meant to be seen so was just chipboard.

Sorry I don’t have any before photos. It was just too ugly.

I’d found these old crazed green tiles at a tip shop, very old fashioned. They were the inspiration for the top.

First thing I did with that was move it from the porch to the garage where I would work on it. I figured that since it was heavy and since it needed distressing anyway, I would push and roll it up the driveway thus killing two birds with one stone: transportation and distressing.

The gravel gave it some nice dents and scratches.

I undercoated, then painted the cupboard a pale green which I tried to match to the tiles, then … YEP! Antique White USA. (I have loads of the stuff, I gotta use it up!)

When the paint was dry I rubbed some watered down burnt sienna artists acrylic into the cracks and scratches to give it an aged look.

Next I broke the green tiles and after sacrificing one which, like Humpty Dumpty, could never be put back together again, I found a technique which allowed me to break tiles then put them onto the top in the right shape!  (Thanks Merrill – she helped with this!)

I used plain white tiles I found at tip shops, not all the same thickness, broke those and used them in a random fashion to achieve a contrast between the oblongs of green and the randomness of the white. The result is an uneven ‘textured’ surface with a sort of geometric pattern.

Of course, you always run out of grout before you finish…

And the edges were really rough. I had to find a way to finish those off smoothly which I did by some sanding and some imaginative grouting.

Lastly, the cupboard needed new handles. I got Wayne to make me some spoon handles. Very cute.

The cupboard was intented to live on the porch to hold boots and provide a spot to sit to pull them on, plus hold a pot plant or two. Since the porch is still a hold-all for timber and tools for other ‘not quite finished’ projects, its been useful in the grooming room to hold blankets.

For the time being its found a home in Fentonbury.

z

DIY – the many lives of a cabinet

I love collecting old bits of furniture. The only reason I dont live in a house with narrow walkways between towers of furniture is that I am also pretty good at controlling my urge to acquire.

Not having much money helps too.

As does the occasional purging of things I dont need. I have a good relationship with the owner of an antique shop in New Norfolk and have sold a few things through her in the past.

My biggest regret is that I can’t buy all the bits and pieces I would love to have, to upcycle, renew and make over.

Actually my biggest regret is that its really not easy to find interesting old furniture at affordable prices any more.

There are days when I wish I didn’t have to work so I could spend my days making over furniture… maybe one day…

So. The title mentions a cabinet so I guess I better get on with it!

I found this little cabinet in a 2nd hand shop in New Norfolk many years ago. I liked the shape of it and needed something for the bathroom so I grabbed it.

I didn’t have to do much to it, clean it up and re-paint it to refresh it mainly. A good clean and paint inside mostly, cause it had been used in a shed and had paint stains on the shelves.

I kept the old handle though cause its interesting with the old paint chipping off.

This cabinet has been used in almost every room of the house so far. It started life in my bathroom in Fentonbury where it held cleaning products, soaps and bathmats.

It then got moved the bedroom where it was my bedside table for a while.

When we moved to Wind Dancer Farm, I put it in the guest room and kept spare blankets in it.

Now its back in Fentonbury, in the kitchen.

Yes… the skirt on the bottom is broken on one side. I didn’t want to fix it cause imperfections are part of the charm. I love my little cabinet in all its wonkiness.

z

DIY – word art

For a while now I’ve admired some of the word art I’ve seen on Pinterest. And you already know I have this thing about chipped paint, old stuff and the shabby look.

So I when I found this big old frame at a tip shop, I knew I had to have it. It was just what I needed to try out a new technique for ‘chippy’ paint I’d seen here.

This is what the frame looked like when I bought it. More or less. I’d already removed some of the mess. There had been something on canvas in the frame originally, it had been ripped off and this painting was done on the plywood backing. Hm. Interesting.

I removed the plywood and undercoated it so it wouldn’t show through the fabric. I cleaned the frame, then I used vaseline to create areas which would remain black when I spray painted it white.

I don’t usually use spray paint for my projects. For one thing its just too expensive. For another, I prefer to paint. This project called for flat white spray paint, and given that a brush would have smeared the vaseline, I had no choice.

Plus I was itching to try the technique.

While the frame was drying, I covered the plywood with some fabric I’d accidentally found on a trip at Spotlight. Uhuh. I was NOT shopping. I was just walking past and it called out at me!

I used the hot glue gun to attach the fabric to the ply, then put it back into the frame. The finished product looks fantastic!

I have taken it to Fentonbury where it now hangs above the bed in the main bedroom.

I had some fabric left over so here’s something I whipped up last night: I thought a cushion would add something to the room. I think its cute.

(Ok, so I’m not a great sewer, alright?)

Not bad for an old frame someone threw out huh?

z